 en
en  Español
  中國人
中國人  Tiếng Việt
  Deutsch
  Українська
  Português
  Français
  भारतीय
  Türkçe
  한국인
한국인  Italiano
  Gaeilge
  اردو
اردو  Indonesia
  Polski
 A mobile proxy is a proxy server that operates using a mobile carrier's SIM card, compliant with 3G/4G/5G standards. Similar to common proxies, it routes user traffic and serves as a bridge between the user and the target resource. The key distinction lies in using a mobile carrier's network and an authenticated SIM card for connections. Users are assigned to a dedicated pool of rotating IP addresses, rather than a static or dynamic one. Due to the nature of mobile communications architecture, mobile IP addresses are in constant rotation, and each session will use a random address from a dedicated pool.
Resellers primarily use mobile proxy farms to resell IP addresses. These proxies are also popular among medium and large businesses for their cost-effectiveness and high trust level, like residential proxies provide. Unlike residential proxies, which charge per traffic unit, mobile proxies offer unlimited bandwidth, significantly reducing ongoing proxy server expenses. A single mobile proxy can rotate its IP address around a thousand times a day without traffic limits, offering substantial advantages for businesses of all sizes.
For large businesses, the cost-effectiveness of mobile proxies becomes particularly evident, as the pay-per-traffic model of residential proxies is less economical for their high-volume needs (read more about the best mobile proxy providers). Mobile proxies of 4G/5G formats not only boost the data collection process but also enable access to restricted areas and help mask activities.
Own proxy farms are particularly useful for:
The use of mobile proxies is expanding every day, presenting a growing number of opportunities. For several years, creating mobile proxies has been a popular strategy in business solutions, allowing the implementation of diverse tactics.
To build your own mobile proxy from scratch, you'll need specific equipment and a management environment. To create and configure a 4G/LTE/5G mobile proxy, you will need:
To manage your modem or proxy farm effectively, it's crucial to use a high-quality control panel that combines diverse functionality with a user-friendly interface. Proxy-Seller offers an affordable solution, enabling you to maximize the capabilities of your mobile proxies.
Currently, we offer two options to start using our mobile panel:
Note that the subscription is not part of the starter kit and must be acquired separately.
Next, let's explore the key features of the mobile panel included in the subscription to better understand its capabilities.
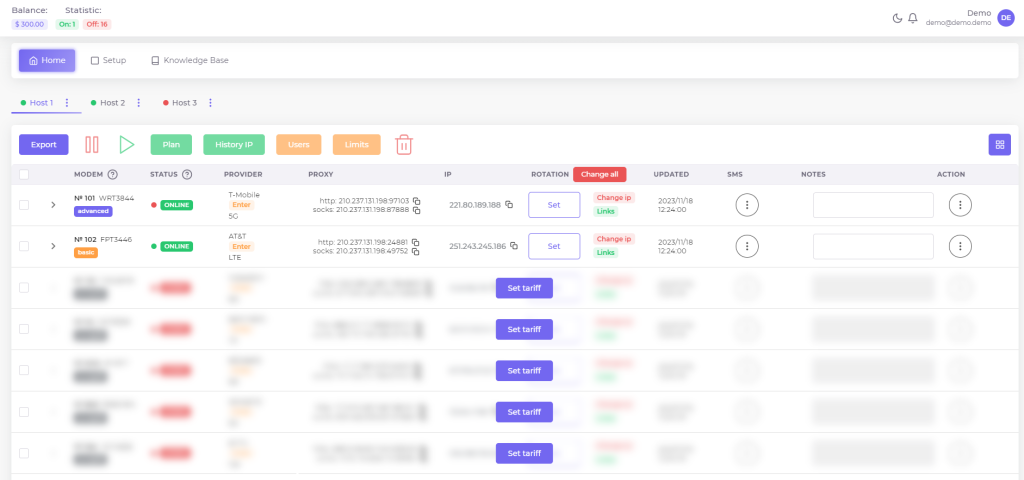
Once your account is successfully authorized, you will gain access to the following panel:

In the upper right corner of the screen, you'll find access to your account settings and notifications. Additionally, there's an option to switch to a dark theme for your convenience.

In the upper left corner, you can view the balance and status of connected modems.

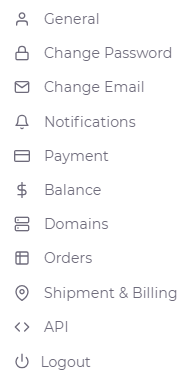
The account settings section offers several functionalities, including:

Currently, the panel is divided into three main sections: "Home", "Setup", and "Knowledge Base".

In this article, we'll explore the features of the primary "Home" section. Just below the section button, you'll find a list of active host tabs. Each tab represents a connected hub with its associated modems.

To rename or delete an unnecessary tab, click on the three dots next to the tab name. The main modem management window consists of two sections: the upper section serves as the control panel for selected modems, while the lower section is a comprehensive database containing all details about SIM cards and modems connected to the selected hub.

The modem control panel features a range of buttons, each with a specific function. Let's explore them in order from left to right:
Let's move on to the informative part of the workspace:

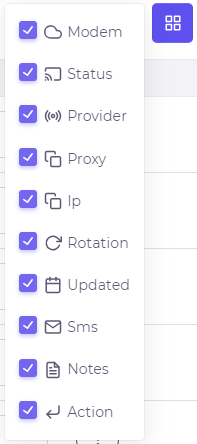
It consists of several columns detailing various modem information, arranged from left to right:
The workspace is fully customizable, allowing you to set the control panel's appearance to your preferences. You can hide columns that are not needed, optimizing the workspace for maximum efficiency with your own 4G/5G rotating proxy.

To explore the additional features, try out the mobile panel demo version.
There's a whole landscape of proxy types out there, each peddling a slightly different flavor of anonymity and speed.
This type of proxy uses IP addresses assigned to real devices by Internet Service Providers. Their main advantage is authenticity. These IPs handle requests like a regular user, making them perfect for accessing localized content or sneaker copping. When targeting websites that block data center IPs, residential proxies shine.
These offer the same authentic IPs but with more flexibility. They support high bandwidth caps and allow many users to access the same IPs simultaneously. This boosts concurrency but might reduce IP reputation due to shared usage. Use them if you need volume without pinpoint targeting.
Unlike rotating IPs, these proxies keep the same address for long periods, improving speed and reliability. They provide fixed IPs leased directly from carriers. Use static options when session persistence matters, such as when managing social media accounts or automated tasks requiring long logins.
These proxies run on servers in data centers with IPs not tied to carriers. Because they’re stable and offer fast speeds, they work well for speed-critical tasks. However, they lack the authenticity of residential IPs, so websites may detect them more easily. Use these when speed and less IP rotation are more important than appearing as a regular user.
This is a hybrid option combining residential and data center IP pools. They offer the benefits of both worlds: stability from data center origins and authenticity from residential sources. These proxies perform best during long sessions where both speed and IP trust are key.
These protocols differ mainly in traffic support. SOCKS5 handles TCP and UDP traffic, making it versatile for browsers and torrent clients that require complex routing. HTTP(S) proxies manage only HTTP and HTTPS traffic. You’ll prefer SOCKS5 for full traffic control in varied applications.
Proxy authentication methods vary:
You’ll pick a method based on your security needs and setup complexity.
Proxies can also support encryption options like TLS/SSL tunnels and SSH tunneling. These options secure your data between your device and the proxy server, protecting against eavesdropping.
Once you've learned the basic features and registered on the mobile panel, you can start creating your 4G/5G mobile proxy. For guidance on building, connection, and setup, refer to the “Knowledge Base” section. This section includes comprehensive setup instructions, answers to common questions, a list of minimum requirements, and compatible equipment. We highly recommend reviewing these details before creating your mobile proxy.
If you're unsure about your equipment meeting the requirements, please reach out to our support team via the feedback form with your equipment details. Our experts will verify its compatibility with the mobile panel and provide tailored instructions.
To create a mobile 4G proxy, you’ll start with hardware: 4G or 5G modems and SIM cards. You’ll also need carrier agreements if required by your local mobile providers.
Recommended tools include platforms like LumiProxy, ProxyRack, Smartproxy, Oxylabs, or a custom setup using OpenWRT firmware on 4G routers. Choose based on your skill level and budget.
Maintaining a stable 4G/5G IP rotation requires good SIM management:
Here’s what to configure for your proxy setup:
API access adds automation power. Look for REST API endpoints that control proxy provisioning, rotation, and access. Use authentication tokens and follow rate-limiting policies to keep your app stable.
When integrating proxies, set them up in tools like Puppeteer, Selenium, Scrapy, or Postman. For advanced routing, configure proxy chains to pass traffic through multiple proxies, enhancing anonymity.
You can also set reverse proxies for load balancing and failover, ensuring requests always find an available proxy if one fails.
Security is essential. Use firewalls to control traffic, enforce encrypted connections, and limit logging to protect user privacy.
Proxy-Seller simplifies this process by offering ready-to-use 4G/5G mobile proxies from over 20 countries with top carriers like Vodafone, T-Mobile, and Orange. You get trusted mobile IPs tied to real devices, great for automation, social media, and scraping.
Proxy-Seller’s user-friendly dashboard helps manage proxies with automatic IP rotation and flexible rental plans. Their API supports SOCKS5 and HTTP(S) protocols with multiple authentication methods, including username/password and IP whitelisting. Plus, 24/7 support and a 24-hour proxy replacement or refund guarantee keep your setup smooth.
| Challenge | How to Fix |
|---|---|
| Network instability and latency often disrupt 4G mobile proxy use |
Improve quality by:
|
| SIM card management can get complex | Automate rotation, balance top-ups, and manage SMS verifications with specialized tools or SMS API providers to avoid manual hassles. |
| IP blocking happens when sites detect proxy use |
Avoid this by:
|
| Legal risks vary by jurisdiction | Always research regulatory requirements before deploying proxies, and avoid activities that violate terms of service or laws. |
| Hardware costs and maintenance add up | Plan a budget for modems, routers, and ongoing software updates. Regularly maintain devices to prevent failures and interruptions. |
By understanding these challenges and using practical strategies, you can run stable, efficient 4G mobile proxy setups that meet your needs.
In conclusion, it's worth noting that custom mobile proxies offer significant benefits to corporate clients. When used effectively, they can notably enhance sales and competitiveness for both medium-sized and enterprise-level companies.
Comments: 0