
This article will break down the various ways to configure proxy settings for Java on a Windows operating system. We'll go over the fundamentals, from using the Java Control Panel for simple HTTP proxy setup to using Java's global system properties for more precise control via the command line or programmatic configuration.
In order to configure Java proxy settings in the Windows operating system, you need to call the corresponding control panel. In the seventh version of the OS, you need to call the search column. This is done by the “Start” button or a key combination, Win + R (it is suitable for future versions of Windows).
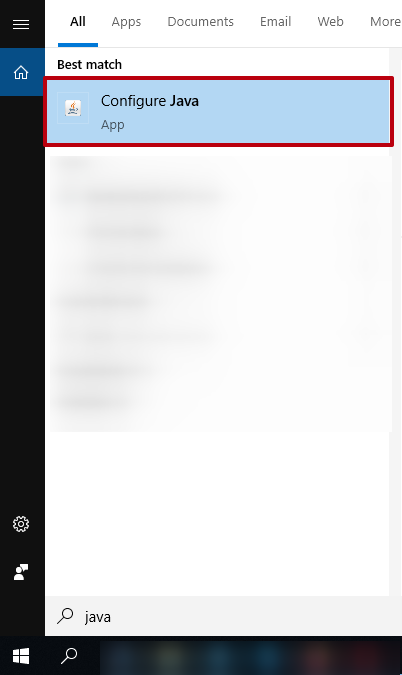
By this action, you open the right panel, in which you need to perform the desired operation.
Before reading the next instructions, we recommend finding out how to disable IPv6 traffic on Windows PC.
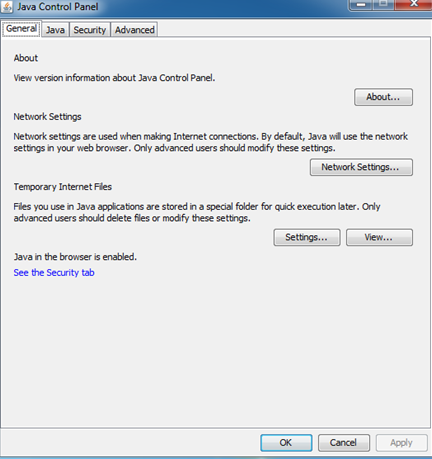
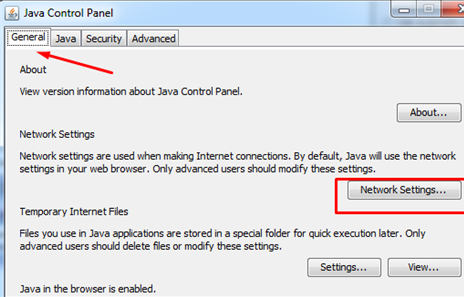
To configure the Java HTTP proxy, you need to follow these steps:
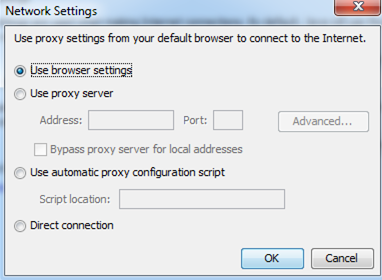
Such settings are needed to execute applets. These are programs included in HTML. Therefore, after the completion of work, you must close your browser. Then we launch it again and load the applet. If it boots, then everything is in order.
Otherwise, the screen will display a message:

If this error occurs, you must configure the browser proxy.
This is how the Java proxy is configured.
To test your Java proxy settings with real network routing, you need access to a proxy server. This lets you verify the behavior of your Java applications under different proxy scenarios.
A popular choice is Squid, an open-source caching proxy server. Squid runs on Linux, Windows, and macOS, making it easy to install on most systems.
Installing Squid generally involves downloading the package from your OS repository or Squid’s official site and running a simple setup command. For example, on Ubuntu you use apt-get install squid, while on Windows you can use precompiled binaries. Alternatively, you might consider Apache HTTP Server with mod_proxy or Charles Proxy, especially for debugging purposes.
The default Squid setup usually works well for demonstrations. However, you can tweak the squid.conf file to set basic access controls and adjust the listening port (default is 3128) to fine-tune your test environment.
To confirm your proxy is working, try tools like curl with the -x option or configure your browser to route traffic through the proxy server.
For more advanced or large-scale testing, consider Proxy-Seller. This premium Java proxy server provider offers a vast selection of proxy types: residential, ISP, datacenter (IPv4/IPv6), and mobile proxies.
Proxy-Seller Features for Java Testing:
Use Proxy-Seller’s Java proxy options to simulate traffic from various IPs, perform geotargeting tests, or validate proxy behaviors within your Java Squid proxy configurations.
Java uses specific system properties to define proxy settings by protocol. Here’s a practical list you’ll use frequently:
| System Property | Description/Default |
|---|---|
| http.proxyHost | HTTP proxy server hostname |
| http.proxyPort | HTTP proxy server port (default 80) |
| https.proxyHost | HTTPS proxy hostname |
| https.proxyPort | HTTPS proxy port |
| ftp.proxyHost | FTP proxy host |
| ftp.proxyPort | FTP proxy port |
| socksProxyHost | SOCKS proxy hostname |
| socksProxyPort | SOCKS proxy port |
| http.nonProxyHosts | Hosts that bypass the proxy (pipe-separated, e.g., `localhost |
Note that wildcards are supported in http.nonProxyHosts. On Windows, escape pipes with double backslashes ("\\|") to avoid issues.
You can set different proxies simultaneously for HTTP, HTTPS, FTP, and SOCKS. When multiple proxy properties are present, Java prioritizes protocol-specific settings over global SOCKS proxies.
Oracle’s “Networking Properties” documentation provides a full list and explains behavior nuances. Be careful with case sensitivity and property names to avoid silent misconfigurations.
Set proxy properties at JVM startup using -D flags. For instance:
java -Dhttp.proxyHost=127.0.0.1 -Dhttp.proxyPort=3128 YourAppThis way, all java.net.URL connections, like HttpURLConnection and URLConnection automatically use the specified proxy.
You can combine multiple proxy settings in one command, e.g.:
java -Dhttp.proxyHost=127.0.0.1 -Dhttp.proxyPort=3128 -DsocksProxyHost=127.0.0.1 -DsocksProxyPort=1080 YourAppTo unset or override proxies, launch JVM with different -D options or none at all.
Keep in mind tools like Maven and Gradle will inherit these proxy settings when running builds if the JVM is configured that way.
Inside your Java code, set proxies dynamically using:
System.setProperty("http.proxyHost", "127.0.0.1");
System.setProperty("http.proxyPort", "3128");
These properties affect all subsequent URLConnections globally within the JVM.
To remove proxy settings at runtime:
System.clearProperty("http.proxyHost"); // or
System.setProperty("http.proxyHost", null);
Note that modifying proxy settings globally can cause issues in multi-threaded applications or container environments like Tomcat. Threads may face inconsistent proxy states.
To debug active proxy settings, use java.net.ProxySelector or JVM debugging arguments like -Djavax.net.debug=all.
Best practice: Set proxies during initialization and avoid frequent runtime changes. Synchronize access if modifications are necessary to prevent conflicts.
Global system properties impact every network connection inside the JVM. This can cause unintended side effects if different parts of your app require distinct proxy settings.
In short, global Java proxy options offer simplicity but limited flexibility and pose risks in sophisticated Java proxy server environments. Use them for basic needs, but switch to more granular methods when required.

 PHP
PHP Node.js
 Python
 Java
Java Golang
 en
en  Español
  中國人
中國人  Tiếng Việt
  Deutsch
  Українська
  Português
  Français
  भारतीय
  Türkçe
  한국인
한국인  Italiano
  Gaeilge
  اردو
اردو  Indonesia
  Polski
Comments: 0