
 en
en  Español
  中國人
中國人  Tiếng Việt
  Deutsch
  Українська
  Português
  Français
  भारतीय
  Türkçe
  한국인
한국인  Italiano
  Gaeilge
  اردو
اردو  Indonesia
  Polski
 Brave is a modern privacy-focused web browser that has a simple interface. Launched in 2019, it was built based on the Chromium code. Although Brave Browser proxy setup can further enhance anonymity. Such an intermediary acts as an intermediary between your network and the websites you visit. It masks your IP address, helping bypass geographical restrictions and enhancing online security. For example, if a website is blocked in your region, setting up an intermediary through Brave Browser settings enables you to access it without restrictions.
Whether you are using Brave Browser for Android or desktop, the process of setting up can vary slightly, but the benefits remain consistent – helping to mask your digital fingerprint. Therefore, this guide will cover how to set up proxy details, its benefits, and best practices.
Although this solution offers built-in privacy features like tracker prevention and ad-blocking, proxy configuration offers an additional layer of protection. Here are some reasons to use an intermediary:
It hides your network IP address by routing your requests through another server. Therefore, websites you visit will be unable to track your online activities, which provides an extra layer of privacy. Maintaining anonymity is important for activities such as web scraping, where IP bans are common.
Some websites restrict access based on users’ location. Meanwhile, streaming and ecommerce platforms often display content based on location. Setting up an intermediary helps you bypass these restrictions and access content that would otherwise be unavailable in your current location. Bypassing geo-restrictions is especially useful for digital marketers conducting market research and testing ads.
In environments where internet access is restricted, such as schools, workplaces, or certain regions where platforms like YouTube are restricted, a Brave Browser proxy can help you reach blocked websites and resources. This makes such a tool even more versatile for users who value freedom of information.
High-quality IPs can mitigate ISP throttling and offer more stable speeds. They work by minimizing latency, caching frequently visited sites for faster loading speeds.
For users who prefer a visual guide, below is a step-by-step video tutorial on how to set up a proxy on Brave Browser.
It does not include a built-in connection manager, so it relies on your system’s network settings. To configure a new IP, you need to adjust these settings through the internal settings menu. Follow the steps below to set it up.
After launching, click the three horizontal bars at the top right, and navigate to “Settings”.
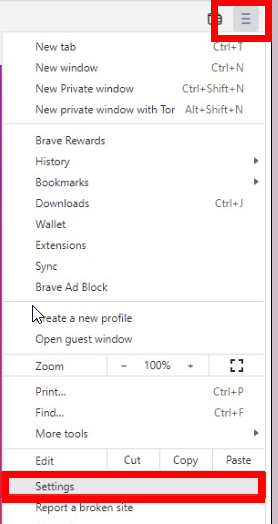
Navigate to the “System” option, select “Open your computer’s proxy settings”.
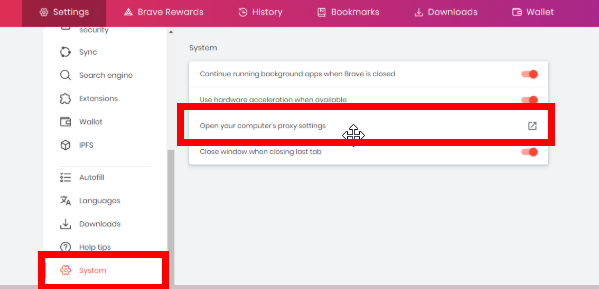
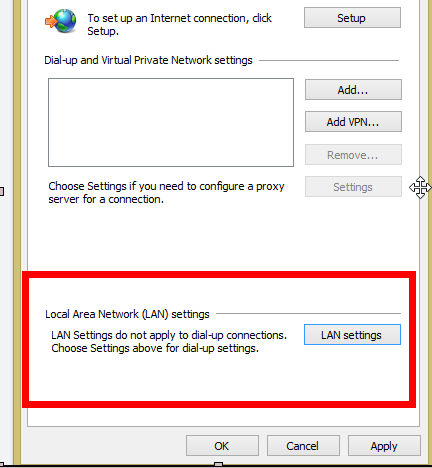
Click on “LAN settings” that opens on the connection tab.
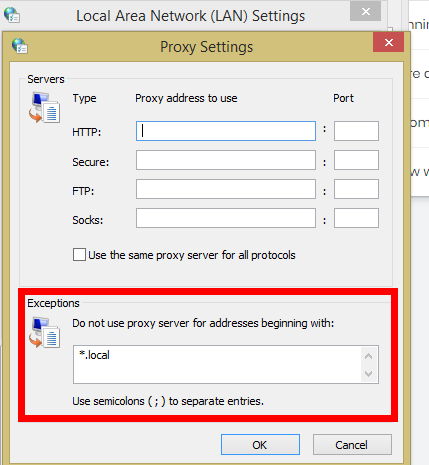
Enable the “Use a proxy server for LAN” option and enter the IP address and port.
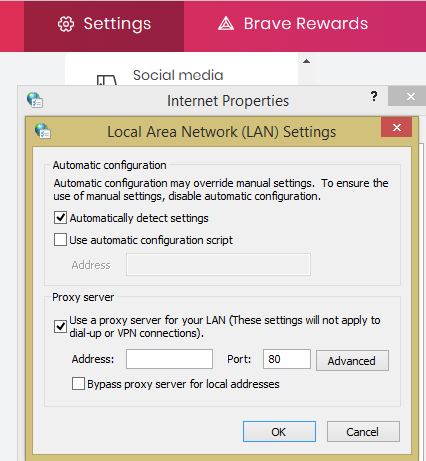
You can specify sites that should bypass the proxy and use your direct IP instead. Enter the addresses of these sites to use your real IP when visiting them. Then, click “Save.”
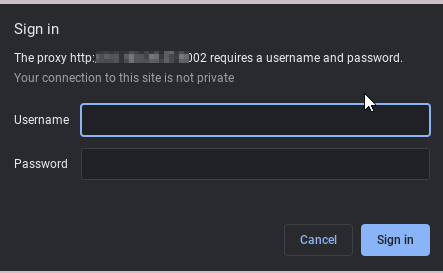
The browser itself does not store authentication details. However, if you're using a private IPs, a prompt for a username and password will appear when you need to access a web page.
To do this:
In addition, it is crucial to learn how to update Brave Browser to the latest version to ensure compatibility with new configurations.
Brave Browser proxy setup can improve privacy, security, and flexibility for online activities. Whether you are trying to bypass geographical restrictions, access blocked content, or hide your digital fingerprint, this tool offers a straightforward process. It is crucial to understand that, like any browser, there are pros and cons.
Pros include:
While cons may include:
Finally, high-quality premium IPs generally provide better stability, speed, and reliability compared to free ones.
Choosing the correct type depends on your activities. For example, residential IPs are best suited for multi-accounting as they are highly trustworthy. On the other hand, mobile ones are best for working with mobile-based platforms while datacenter proxies are ideal for tasks that require high speed.
Common reasons why it may not connect include incorrect credentials, server downtime, IP bans, or an invalid type configuration. Double-check your settings to make sure there are no typos or omissions. If the problem persists, contact your provider for alternative server details.
Yes, but they are usually unreliable, slow, and insecure. Additionally, they can put your data at risk of theft by malicious third-parties. For sensitive tasks like automation, account creation, or bypassing geo-restrictions, premium solutions are recommended for a more stable experience.
Comments: 0