
 en
en  Español
  中國人
中國人  Tiếng Việt
  Deutsch
  Українська
  Português
  Français
  भारतीय
  Türkçe
  한국인
한국인  Italiano
  Gaeilge
  اردو
اردو  Indonesia
  Polski
 Clash acts not only as a proxy client but also as a user IP address manager. You can buy proxy and connect it via the client and manage it with routing rules. You can monitor connections and control network traffic in real time. This feature increases the range of possibilities for using Clash for Windows for example using it for software development, managing multiple accounts on different applications and playing games that are geo-locked. In addition, the tool includes in it multiple features which open a multitude of other use cases for personal and day-to-day work tasks.
The following paragraphs will shed light on the different steps required for the Clash for Windows setup to configure a proxy. Additional screenshots will be provided as well for a more deep understanding of the process.
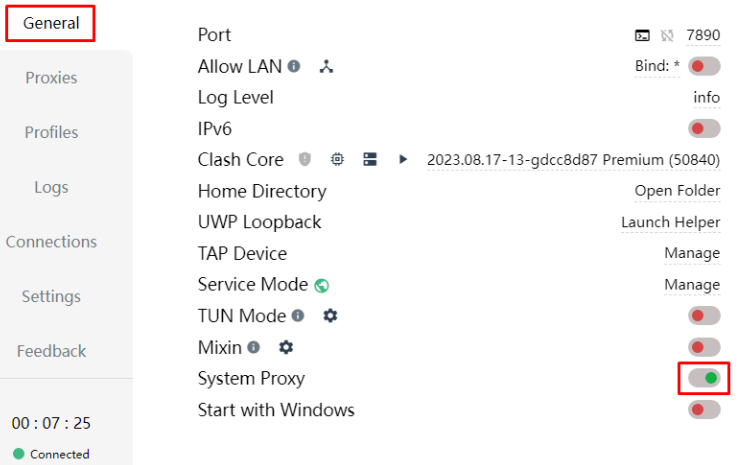
Once you are in the Clash app, navigate to the “General” folder. In this window, activate the box which says “System Proxy”, and it’s important to note that Clash for Windows will be proxifying whole system traffic while this feature is activated.
Now, navigate to the “Profiles” tab, find the default profile, and edit it by right clicking and selecting “Edit” from the options presented.

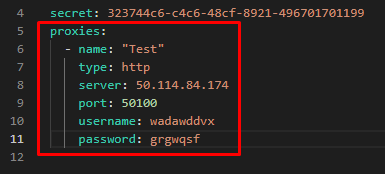
The opened configuration window will prompt you to fill several lines with your proxy server information on them. Proceed with filling designated fields in Clash using the data provided by your proxy provider. Make sure there are no typos.
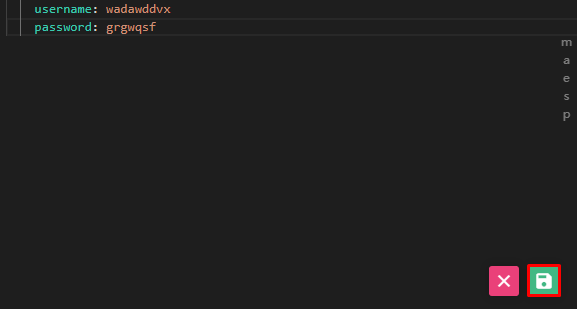
Press the “floppy disk” icon in the lower right corner of your screen to finish editing the config file.
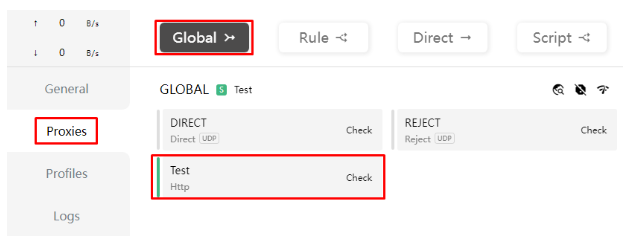
After moving to the “Proxies” tab, locate the “Global” button and click it. This should bring up the window where the proxy server that you configured can be found. A “Check” button is there as well, so you can click it to test the proxy. If it’s functioning well, the green line indicated in the screenshot below should come up.
At last, go into your web browser, and access a site that is able to check geolocation. Make sure you are having the IP location that the proxy IP should have.

Clash lets you define custom routing rules to send traffic from certain domains through a proxy, while keeping other traffic direct.
To achieve this, you must add two configuration blocks inside your profile file: proxy-groups and rules.

proxy-groups:
 - name: Proxy
 type: select
 proxies:
 - Test
 - DIRECT
rules:
 - DOMAIN-SUFFIX,youtube.com,Proxy
 - DOMAIN-KEYWORD,tiktok,Proxy
 - GEOIP,CN,DIRECT
 - MATCH,Proxy
Here is what these rules actually do:
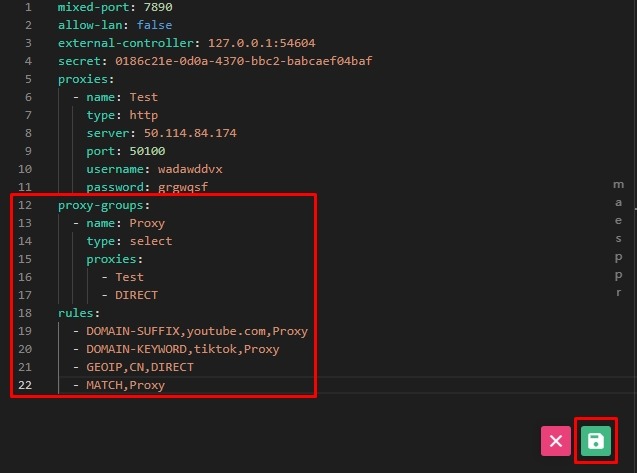

From this point on, Clash for Windows will route traffic according to your rules instead of a single global proxy. This lets you precisely control which resources use the proxy and which connect directly.
Fallback mode lets Clash automatically switch between several proxies if the current server stops responding. This is useful when you need continuous connectivity and cannot manually change nodes every time.
How to configure a Fallback group:
proxy-groups:
 - name: AutoProxy
 type: fallback
 proxies:
 - Proxy1
 - Proxy2
 - DIRECT

rules:
 - MATCH,AutoProxy

Important detail: only one MATCH rule must exist in the entire rules list. If you add a fallback group, replace the previous - MATCH,Proxy line with - MATCH,AutoProxy. Otherwise, Clash will only apply the first MATCH rule and silently ignore the rest.
A proxy is a very useful modern technology, particularly when integrating it with Clash as a proxy configuration, since it will mask your original IP address which will, therefore, hide your identity and your location from potential online trackers and it is quite useful for privacy when trying to access sensitive information online. Proxies help users to overcome geo restrictions on access by permitting access to blocked content, websites, and media which may be otherwise banned in the users actual country.
Apart from the mentioned access and privacy, proxies also assist in bypassing censorship that are set by ISPs or governments allowing for unfettered access to the targeted internet services and websites. This feature is critical in regions where people’s use of the internet is heavily monitored and certain activities are restricted. In addition, proxies can also help enhance the performance of internet connections by providing fast and reliable access to the frequently required information, hence minimizing the load time.
Proxies also improve safety by serving as a barrier between your computer and the risks on the internet, such as malicious advertisements or malware-infected websites. Individuals or organizations that manage large networks might find it beneficial to implement proxies with the help of which the network can be well managed making it possible to regulate the bandwidth usage thereby enhancing the efficacy of the network performance.
In the Clash for Windows different types of proxies can be applied. Consider the specific use case to select the most suitable option:
But what about protocols? HTTP and HTTPs ones are appropriate for general web surfing, the latter securing the web traffic by encryption. For streaming, gaming, and applications that require TCP and UDP protocols SOCKS5 proxies are the best option to choose.
| Proxy type | Connection speed | Anonymity | When to use |
|---|---|---|---|
| ISP | Very high | Medium | For stable work where you need minimal latency and consistent routes |
| Residential | Medium | High | For sites that are sensitive to IP type and need trusted traffic |
| Datacenter | High | Low | For resource-intensive automation that does not require IP pool changes |
| Mobile | Below average | Maximum | For tasks needing network flexibility and high IP diversity |
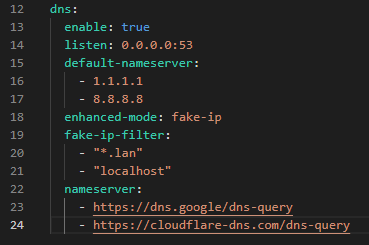
Clash for Windows also allows for advanced users to customize a set of proxy configurations that include setting rules for traffic routing.
Using built-in DNS settings one can modify it by changing the config of profile settings.
Even with correct installation, misconfigurations can break connectivity or disable your routing rules. The table below lists frequent issues, their impact, and how to fix them.
| Error | Impact | How to fix |
|---|---|---|
| Global mode selected while using rules | Routing rules are ignored completely | Switch the mode to Rule in the Proxies tab |
| Mismatched names in proxy-groups and proxies | Clash cannot apply the intended proxy server | Ensure proxy names match exactly across all configuration blocks |
| Very high ping or unstable proxy server | Slow connection and packet loss | Use the Test function and choose a stable node near your location |
| Firewall or antivirus blocking Clash traffic | No internet access, even with an active proxy | Add Clash to firewall and antivirus exceptions |
| Wrong Clash version installed | No connection or errors at startup | Install the latest 64-bit version from the official source |
To sum up, there is no doubt that setting proxy tools for Clash for Windows improves your internet experience by boosting security, privacy, and bypassing geo-restrictions on some specific contents. This guide provides easy to follow, step-by-step instructions on how to use Clash for Windows so users can fully exploit the rewards that proxies offer. Make sure to try using different types of proxies and setups to see which one meets your needs.
Comments: 0