
How to set up & use the Proxifier correctly
Summary generated by AI:
The Proxifier program is required to connect the proxy to software that does not support this feature. With its help, you can use any software that works via the Internet on the basis of intermediary servers: browsers, messengers, software for account promotion, etc. This proxy software will help you to secure the work on the network by using intermediary servers that hide valid data about your pc.
Proxifier supports multiple proxy types, allowing it to handle a wide range of tasks, from everyday browsing to automation and development.
- ISP proxy — suited for stable application traffic routing and long sessions, where using a fixed IP address is essential.
- Residential proxy — convenient for tasks that require simulating normal user behavior and reducing the risk of blocks.
- Mobile proxy — used in scenarios with frequent IP changes and a high trust level from websites.
- Datacenter IPv4 or IPv6 proxy — fits high-load and technical tasks, where speed and working with IP pools are critical.
Below you will find detailed step-by-step instructions for setting up proxies in Proxifier for all network connections or individual programs.
Video guide for setting up and use a proxy in Proxifier correctly
Proxy settings in Proxifier for all network connections
To get started with the Proxifier software, download it and launch it on your computer. You also need to buy proxy from a trusted provider—we recommend using private solutions to ensure greater operational stability. Follow this step-by-step instruction:
- Go to the "Profile" section.
- Open the "Proxy Servers" tab.

- Press the “Add” button.

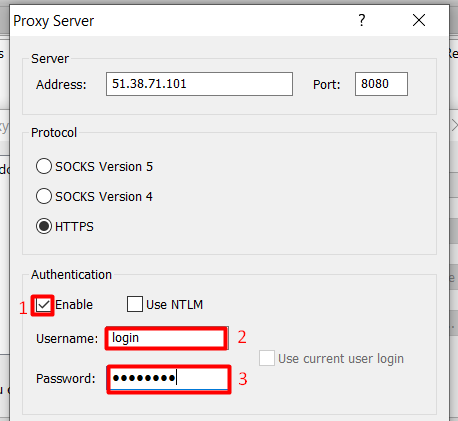
- Enter the IP address and port of your proxy server in the fields.

- Select the connection protocol of your proxy server.

- If your proxy supports authorization by username and password, then put the mark in the "Enable" checkbox and enter the username and password.
- Press the “Check” button to test the proxy server's functionality.

If you see a red message “Testing Failed” after doing the test, this means that the data is incorrect or the proxy is not working. You need to check the details of the proxy server, such as the IP address, port, username, and password.

If the test passed successfully, then you will see the highlighted green inscription.

- After checking the proxy's functionality, press the “OK” button.

- Press the “Yes” button to allow the proxy server operate by default for all applications.

Now all the network connections will be transferred through the configured proxy server.
Proxifier proxy settings for specific programs
To set up the proxy in Proxifier for specific programs follow this step-by-step instruction:
- Click the “Profile” category.
- Open the "Proxification Rules" tab.

- In the opened window, press the “Add” button.

- Type in the name for the new proxy. For example, we’ll configure a proxy server that will work only for the Google Chrome browser.

- Press the “Browse” button.

Also, read the detailed instructions on how to connect the proxy on the Google Chrome browser.
- Select the "exe" file to set a proxy for the application you need and press the "Open" button.

- Near the “Action”, select the proxy server you need from the drop-down list.

- Press the “OK” button.

- Press the “OK” button once again to save the changes and exit to the main menu.

The proxy setup is completed. Run the program for which the proxy server was configured (in our case it was Google Chrome). To check the connection, go to the site that detects your IP address, for example, our tool for checking "My IP". Also, information about which proxy is used for the application used can be obtained in the main Proxifier window.

By the same principle, you can connect a proxy server to any browser, messenger, software for promotion or another program.