How to set up a proxy in the Accovod browser

Comments: 0

Content of the article:

The Accovod web browser is uniquely tailored for users who need to access multiple accounts simultaneously. It enables users to stay logged into 3-4 accounts on platforms such as Facebook, Google, and LinkedIn, making it ideal for webmasters. Its multi-account capability is also useful for managing social network groups, handling content, reviews, and posts. Key technical advantages of Accovod include:

  • Enhanced online privacy with incognito mode, blocking of malicious sites, and integrated phishing protection.
  • Optimized performance for slow internet connections.
  • A comprehensive suite of tools for debugging and analyzing web pages.
  • Regular updates to support the latest HTML5 and CSS3 web development standards.

Accovod is versatile, compatible with various operating systems including Windows, macOS, and Linux, and is available for mobile devices.

Step-by-step proxy setup in Accovod

Using a proxy with the Accovod browser enhances network anonymity and reduces the risk of account blocking for webmasters managing multiple accounts. Here's how to set up proxy settings in Accovod for account management:
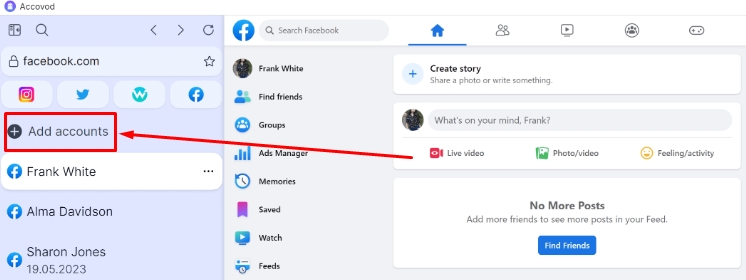
  1. Open the browser and click the "Add accounts" button located at the top of the left frame.

    1en.jpg

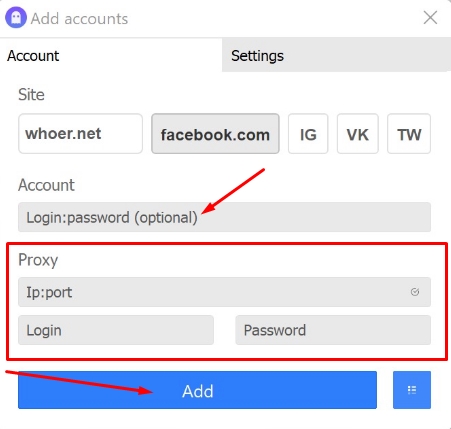
  2. A new window will appear for account creation and technical data entry.
    • In the “Account” field, input the username and password, separated by a colon.
    • In the “Proxy” section, first enter the IP address and port, also separated by a colon.
    • For private proxies, input the username and password provided in the designated fields.
    • After entering all the necessary information, click the “Add” button.

    2en.jpg

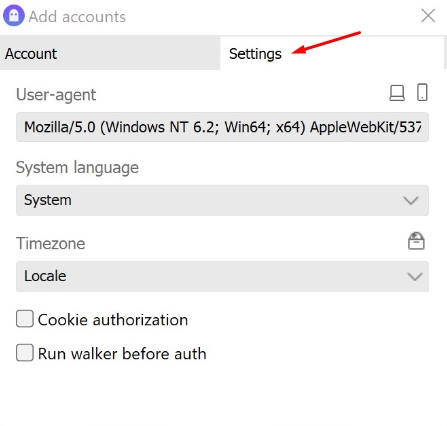
  3. In the same window, there is a “Settings” tab for new account creation. Here, you can edit the user agent, system language, and time zone. Adjusting your User Agent can enhance anonymity and decrease the chance of account blocking. These settings are optional.

    3en.jpg

  4. You can add as many accounts as needed following these steps. To edit the proxy settings for the entire browser, not just a specific account, click the shield icon in the top bar of the browser.

    5en.jpg

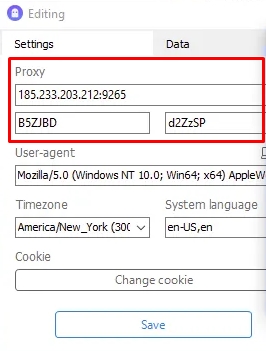
  5. A window for editing the proxy connection will open, with an example format for IP and port entry. Replace these with your own proxy details for anonymous web browsing.

    6en.jpg

After configuring these settings, the Accovod browser will route its traffic through the specified proxy, securing your accounts from detection and blocking. Note that this setup only affects traffic from the Accovod browser and not from other programs or browsers.

Comments:

0 comments