How to set up a proxy in Indigo Browser

Comments: 0

Developed on the basis of the Multilogin platform, the Indigo Browser application is developed to simulate browser fingerprints and for managing Facebook and Adwords accounts. This browser reduces the number of blocking, advertising, increases the efficiency of traffic arbitration. It provides perfect download speed in all operating modes. That is why the proxy configuration is necessary for this application, which will help to significantly increase the productivity of each user.

Proxy with IP Authentication

Indigo Browser itself does not provide a proxy and does not have other ways to change the IP address. But at the same time, the browser supports various types of connections, which allows you to resort to other optimal solutions. Before starting the setup, make sure that you have the following information:

  • type of the proxy (SOCKS4, SOCKS5, HTTP);
  • proxy address / hostname;
  • proxy server port;
  • IP authorization in the control panel of the proxy provider.

Video guide for setting up a proxy in Indigo Browser

Step-by-step proxy configuration for Indigo Browser

Indigo - is a browser, many social media networks admit that such a tool has a place in a Top-5 of anti detect browsers ever made. Recent updates of a base allow you to work comfortably and be secured. By the way, such a browser is paid. The question is: How to configure a proxy server for Indigo Browser? Here you will see a step-by-step guide.
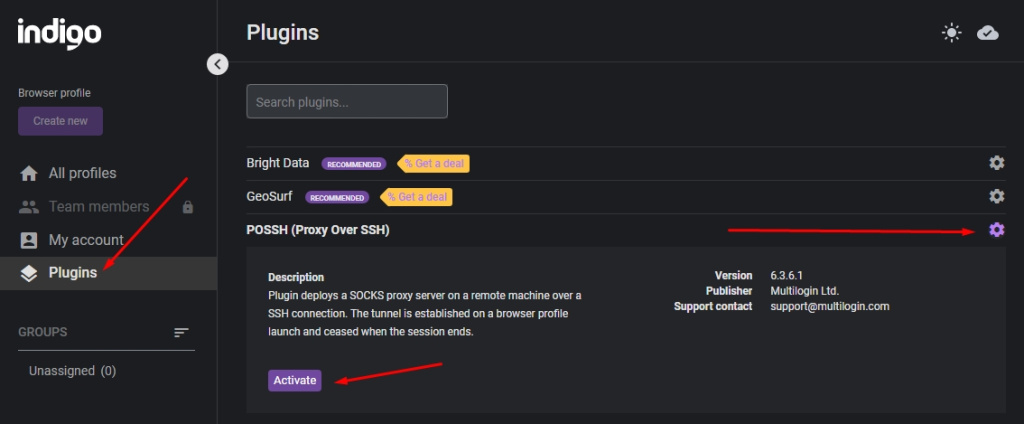
  1. You should turn on the plugin which allows you to work with proxy servers. Open your application, press the “Plugins” menu and then you can see the “POSSH (Proxy Over SSH)” field. Press the “mech” icon at the right corner of the field and in the opened rolled-up window press the “Activate” button.
  2. 1en.jpg

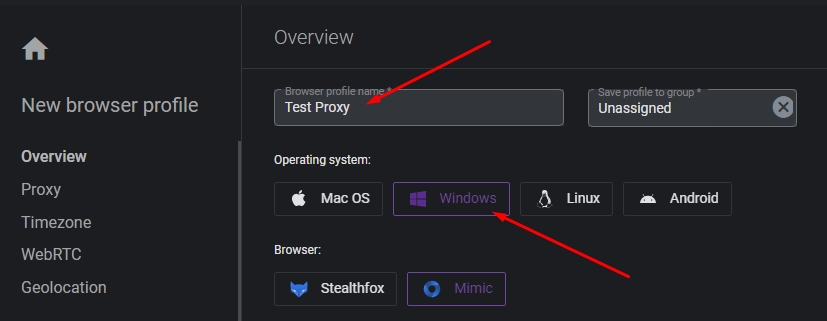
  3. Let’s make a profile to work with a proxy. In the main menu press the “New browser profile” button.
  4. 2en.jpg

  5. In the newly opened window type in any suitable profile name.
  6. In the “Operation System” field press on the “Edit” and choose the operation system, we recommend using “Windows” OS. You are able to configure the proxy server not only for the Indigo browser but also for all network connections. How to do this? Read the instructions for setting up a proxy on Windows 10.
  7. 3n.jpg

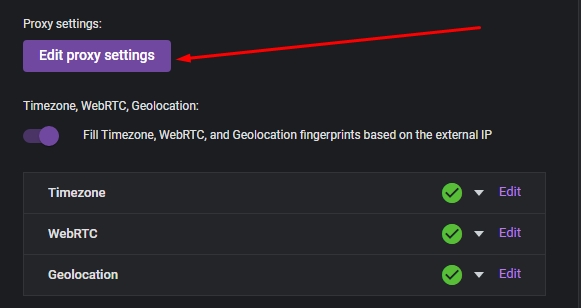
  8. Under the “Proxy settings:” field press the “Edit proxy settings” button.
  9. 4en.jpg

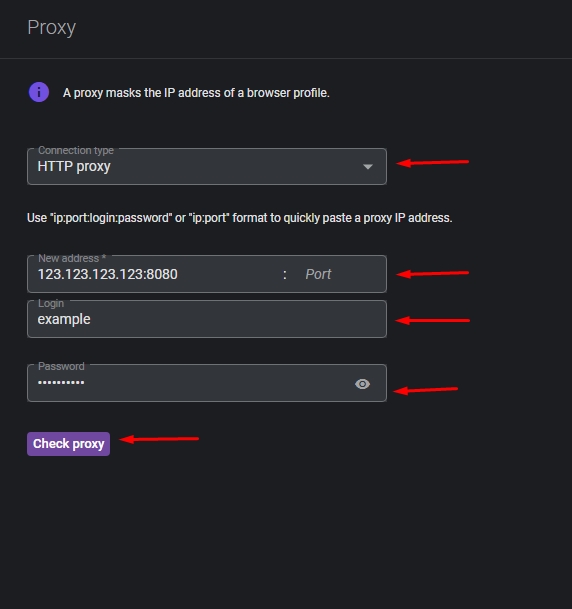
  10. Choose the “Connection type” by pressing this drop-down box. We recommend using the “HTTP proxy”. Enter the required data in the fields. “New address:” field means IP address and after the “:” symbol port input required. “Login” and “Password” fields have to be filled only if you have purchased a proxy server with such an authentication method. All the required data can be found in the order submission mail or in the personal control panel if you have bought an elite proxy server from Proxy-Seller. After this, press the “Check proxy” button and look at the result.
  11. 5en.jpg

  12. If you see the green result of the test, then the configuration of the proxy server is done for this profile. If not - check the configuration once again, there must be a mistake.

Comments:

0 comments