
 en
en  Español
  中國人
中國人  Tiếng Việt
  Deutsch
  Українська
  Português
  Français
  भारतीय
  Türkçe
  한국인
한국인  Italiano
  Gaeilge
  اردو
اردو  Indonesia
  Polski
 Internet safety is important. We all value our privacy and strive to remain anonymous online, especially when sharing sensitive information such as passwords and banking details. As a result, many of us rely on proxies, VPN services, and secure DNS servers, especially when using public Wi-Fi in places like coffee shops or shopping malls.
However, despite our best efforts, we can still encounter a DNS leak that compromises our privacy. Why does this happen, and what are the risks? How can we protect ourselves and maintain anonymity online? Let's delve into these important questions.
A DNS (Domain Name System) leak occurs when your device sends DNS requests through servers that differ from the ones you configured. This can happen when using a VPN or proxy, where the traffic bypasses the secure tunnel and goes through the regular ISP channel to the DNS servers assigned by the provider or operating system.
For those unfamiliar with the topic, a brief explanation: DNS (Domain Name System) is used to convert human-readable domain names like google.com into machine-readable IP addresses such as 192.168.0.1 or text-numeric IPv6 addresses like 2018:0ab6:84a2:0000:0000:7a2b:0271:7435. This conversion allows network equipment to redirect traffic to the correct destination.
You can think of DNS as a telephone directory, but instead of numbers, it contains interpretations of domain names into IP addresses. Every time you enter a website address in your browser's address bar, your device accesses the DNS to find the corresponding IP address.
The issue with DNS (Domain Name System) requests is that they aren't encrypted, even if the website you're visiting uses HTTPS for encryption. This means that your browsing history can be seen by your internet service provider or hackers, especially when connecting to public Wi-Fi. What's more concerning is that your IP address and ports become visible to the website owners you visit, which can be exploited by scammers to intercept your data packets.
To maintain anonymity online, many people use VPNs (Virtual Private Networks) and proxy servers.
A proxy server acts as an intermediary between your device and the target website. When you use a proxy, your device connects to the proxy server and sends all traffic, including DNS queries, through it instead of directly to the target site. This means that your online activities appear to be coming from the proxy server, keeping your information hidden from the target site. Proxies can also change your IP address. HTTPS and SOCKS5 proxies encrypt the traffic between you and the server, further protecting your data from being intercepted by your ISP or hackers.
A VPN (Virtual Private Network) offers an alternative method for anonymizing your online activity. It establishes a secure, encrypted connection over your existing internet connection. Your data is then routed through this secure tunnel to a remote server, which acts as a firewall. This means that your internet service provider (ISP) cannot see what information is being transmitted through the secure channel, nor can they see your DNS request history (as only one connection is made to the remote server). Importantly, complete anonymity is maintained as your DNS requests are sent to the VPN service's IP address instead of directly to DNS servers.
Encrypted private proxies offer even higher traffic security. Elite private proxies can reduce latency (ping) by filtering out spam traffic and using caching.
However, it's important to note that using anonymization tools like proxies or VPNs does not guarantee complete security. One possible issue that can compromise your security is a DNS leak, where your traffic bypasses the secure channel and goes directly, potentially exposing your online activity.
A DNS leak can lead to several issues:
Use an online testing detection service to perform two tests: first without the anonymization tool, and then with the proxy or VPN enabled. Compare the results. If they differ, it indicates that DNS requests are being redirected. For example, use the “DNS leak test” website.
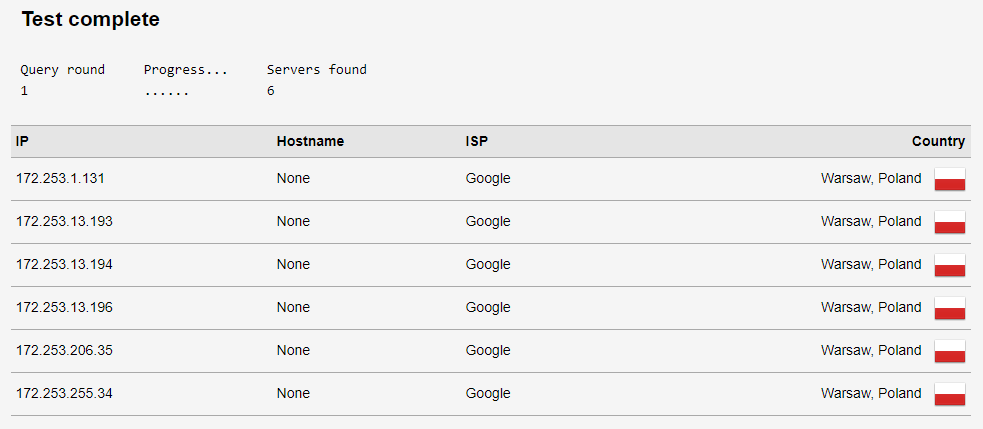
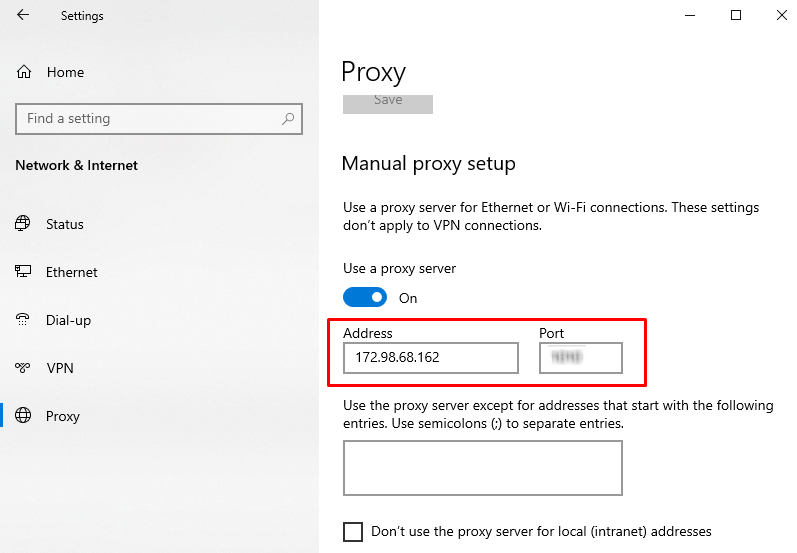

Compare the results. If the IP addresses differ, it indicates that there is no leak.
DNS leaks are most commonly experienced by users of desktop computers and laptops running the Windows operating system. However, this issue can affect anyone, regardless of their device type or operating system.
Common causes of DNS leaks and how to resolve them:
DNS leaks often occur due to misconfigurations in the proxy or the DNS server used by the proxy. Some proxy clients may use their own DNS settings, bypassing the proxy settings and leading to data leakage. Another common issue is when the proxy doesn't support DNS protocols like UDP, allowing DNS queries to bypass the proxy and be sent directly.
How to fix it? Use protocols supported by proxies and enable appropriate DNS filters to reduce the risk of leaks. If you discover a leak, try manually configuring your network connection or router and installing a reliable DNS server. You can change or set a permanent DNS server address in the router settings under the DHCP section (primary and secondary DNS fields).
You can also specify DNS in the network connection settings. Here's how to do it on Windows:
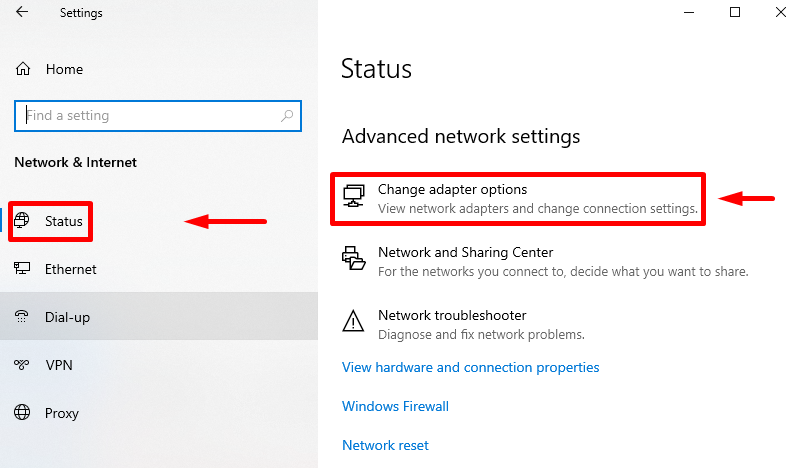
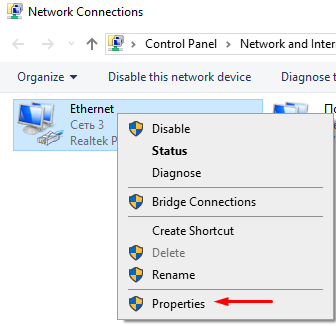
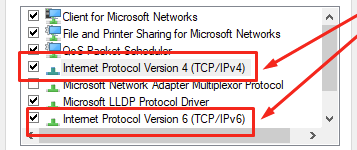
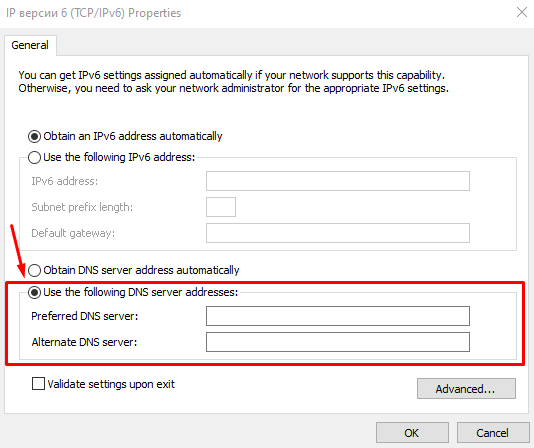
The process for setting up DNS is similar for iOS, Android, Linux, and Mac. You'll need to go to the settings of the network device and edit the DHCP or TCP/IP parameters.
Some Internet providers route all user requests through their DNS servers, but often these servers are not secure. Attackers can exploit vulnerabilities and intercept user requests, redirecting them to fake phishing sites. This issue also arises with third-party public DNS services.
To address this problem, use secure DNS servers that support DNSSEC technology, such as OpenDNS, Google Public DNS, or Cloudflare. If you use a VPN, specify the static DNS servers provided by the VPN operator in the Wi-Fi router settings.
Viruses and malicious applications can alter the network settings of your device and redirect DNS requests to fake servers. This exposes your online browsing history. The more significant risk is that these fake servers can redirect you to phishing sites that steal your logins, passwords, bank card details, and payment system data. Similar DNS issues can occur on Android and iOS devices.
To prevent this problem, regularly scan your system for viruses and keep your operating system updated. Periodically check for DNS leaks and which servers your computer or smartphone is accessing.
A transparent DNS Proxy involves installing a proxy at the local network level and redirecting all traffic through the proxy server without additional configuration of the network card or installation of a client on user devices. However, using a transparent proxy often leads to DNS leaks. Providers sometimes use this technology to collect information about the websites their customers visit.
When using a transparent proxy, DNS requests are redirected directly through the provider's servers, even if static DNS servers are specified separately, a separate proxy connection is established, or DNS filters are used.
The simplest solution to this problem is to purchase elite proxies with traffic encryption. If a DNS leak occurs due to network settings, change the configuration of your network equipment:
You can change DNS at any time on any network device: laptop, router, smartphone, tablet, or even Smart TV. We will consider which DNS to set for this. It is worth choosing secure DNS services that guarantee your safety and help increase the connection speed. There are many reliable DNS servers. The most secure are the following three.
OpenDNS, launched by Cisco in 2005, is a leading DNS service known for its information security and networking technology. Despite being free, it offers features that are not available in many paid services.
Free OpenDNS DNS servers:
Advantages:
The paid plan offers additional features such as viewing history and setting up filters to block specific resources or sites based on predefined rules.
Cloudflare, according to independent testers DNSPerf, is recognized as the world's fastest DNS service. Known for its focus on data protection and privacy, Cloudflare does not store user browsing history, and logs are deleted every 24 hours.
Cloudflare has also launched additional servers with specific functions:
Advantages of Cloudflare include simplicity, speed, and built-in protection against DDoS attacks. Cloudflare also provides the Wrap application, which protects against DNS leaks on Mac, Android, iOS, and Windows.
Google Public DNS is perhaps the most well-known public DNS service. Google, known for its attention to detail in all its services, provides secure and fast servers with a focus on data protection and privacy compliance. The service does not collect user location data and deletes logs with query history once every two weeks.
Google Public DNS Servers:
Advantages include high security and fast data processing speed.
Protecting against DNS leaks requires a comprehensive approach. It's essential to monitor security and install applications from trusted sources. Before unpacking and installing software, at least check it with an antivirus. Additionally, use reputable proxy and VPN services, along with secure DNS servers that utilize modern encryption technologies to protect user data.
Comments: 0