Top 8 Proxy Plugins for Browsers

Comments: 0

Like everything else in technology today, the different options for managing and configuring proxies are numerous. One of the fastest ways is to install plugins for browsers and other applications. This allows configuring proxy settings in browser itself without needing any extra programs on the user’s machine.

This article will provide a comprehensive review for general proxy extensions, but if you want to check the same on specific browsers like Chrome, you can read, for example, our review of the best proxy extensions for Chrome.

What Are Proxy Plugins and Why Do You Need Them?

Plugins are extensions that control how a web browser or an application connects to the internet. The sophisticated plugin channels the connection from the device through a remote server that is situated in a different region. As a result, the plugin changes the user’s geographical IP address. In other words, online activities appear to be coming from a different region entirely.

Among proxy plugins’ most important highlights are the following:

  • Enable users to bypass geo-restricted content by concealing their actual geographical IP address.
  • To bypass cybersecurity controls, reach blocked pages in offices and many more, plugins help you navigate with ease.
  • Proxy server extensions secures your data by encrypting your internet connection, particularly when you are connecting through public Wi-Fi networks.
  • Plugins allow users to conceal their IP address from websites, advertisers, and other potential snoopers, as well as improving online identity security.

These features make proxy plugins indispensable to a large number of users who need enhanced privacy protection, anti-censorship measures, and more freedom in enjoying various online content around the world.

Next, we will examine the best known implementations of this tool for popular web browsers and show how to set proxies in each of them.

Video: Top 8 Proxy Extensions for Popular Browsers

Proxy SwitchyOmega

1.png

This browser extension has the ability to store several proxies and allows to easily switch between them which helps a lot with multi-accounting and increases the level of anonymity while being connected to the Internet. One can glean some of the advantages from the fact that this plugin has a GitHub page and that the developers are quite active.

By the way, it provides a number of additional options, like:

  • the ability setup of profiles for different users with the option to switch among them;
  • the setup of automatic switching for the specific IP address to be used through the “auto-switch” feature;
  • PAC script creation;
  • keyboard shortcuts for more comfortable operating of the plugin;
  • error log.

With these features, one is able to accomplish almost every task, including but not limited to, evading geographical restrictions and controlling several accounts on social media and other services.
Step-by-step Proxy Setup in Proxy SwitchyOmega

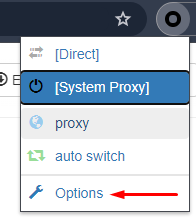
  1. Head over to the main menu, locate the “Proxy SwitchyOmega” icon, click it, and choose “Options” from the list that pops up.

    2.png

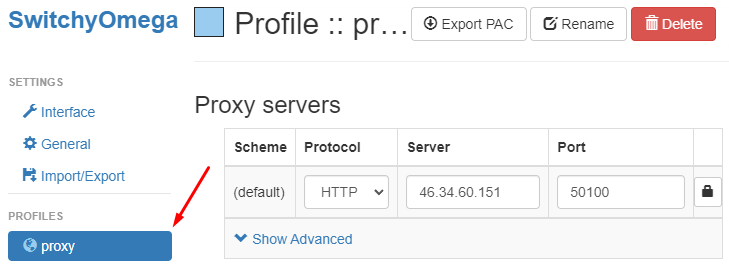
  2. Locate the “Proxy” tab, choose the appropriate connection type, and fill in the IP and port boxes.

    3.png

  3. In case private proxies are used, click on the lock icon to provide authentication details.

    4.png

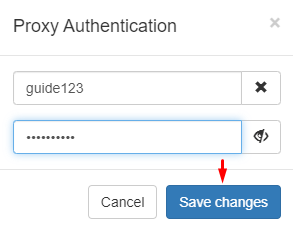
  4. Type in your username and password in the space provided in the pop-up screen. Click “Save changes” then.

    5.png

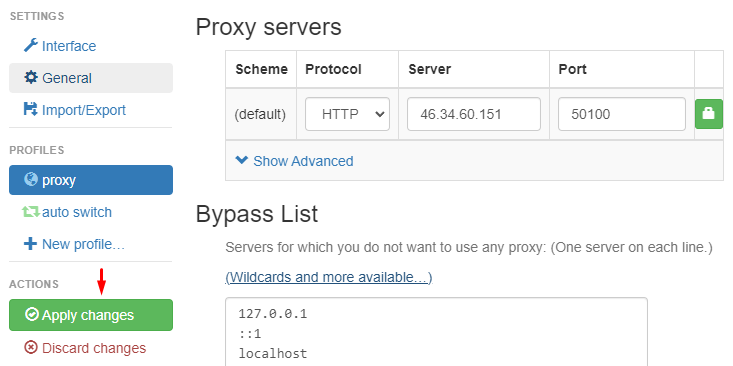
  5. Press the “Apply changes” button to finalize the setup.

    6.png

Open a new browser tab and go to any site to determine geolocation. The IP address that is highlighted should be the same as the proxy IP.

Using Proxy SwitchyOmega with private proxies enables greater flexibility concerning previously outgoing resistant sites and propositions optimal protection for the information belonging to the individual. This add-on is free and works for Mozilla Firefox, Google Chrome browsers.

FireX Proxy

7.png

Using the FireX Proxy plugin in conjunction with proxies, one can gain access to websites previously blocked due to geographic restrictions and significantly increase the level of privacy of their online activities.

This tool lets you set up one or multiple proxies that can be alternated as required. The plugin is multilingual, and so is its dedicated page on GitHub, but as of now, it is exclusively available for Google Chrome.

Another strong point of this proxy server extension is the possibility of adding various resources to a blacklist. This option enables them to tailor their browser for any task and removes the difficulty of needing extra windows or profiles for dealing with resources that do not need proxies to function.
Step-by-step Proxy Setup in FireX

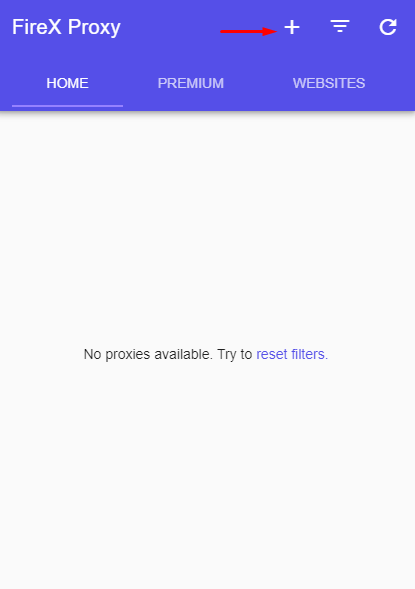
  1. First, download FireX and press on the extension button. In the window that shows up, click on the “+” sign in order to set up a new proxy.

    9en.png

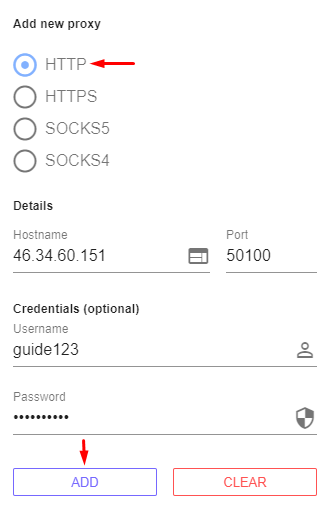
  2. In the following window, select one out of many available protocols like HTTP. Fill in the required areas with the required data, then hit the “Add” button.

    10en.png

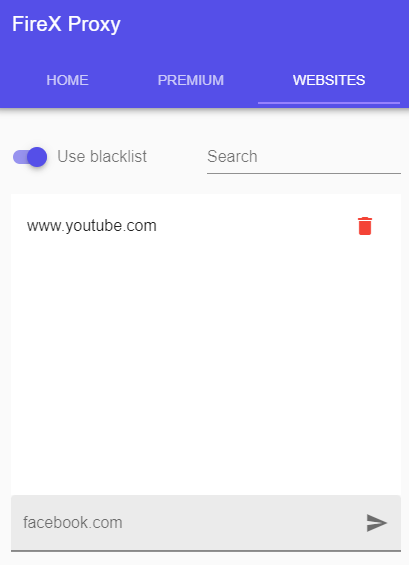
  3. You may add some specific websites into the exceptions list within the “Websites” section. Type in the website link in the active area and press the confirmation button on the right. Enable the slider, after which the server will not be functional on those websites.

    8en.png

The added server connection will be visible on the window section marked as “Home”. At this stage, you can add as many proxies as you require and handle them as you wish.

FoxyProxy

11.png

The add-on can be added to Google Chrome and Mozilla Firefox browsers.

The one who use this tool will benefit from the following functions, among many others:

  • Creation of separate profiles within the plugin;
  • Creation of connection rules based on IP address, URL, and domain name;
  • Interface modification;
  • Import/export options for proxy lists;
  • Hotkeys for managing.

This browser proxy extensions gets updates on a regular basis and has a page that explains the purpose of every button and tab which can adjust to the user’s preferred language.
Step-by-step Proxy Setup in FoxyProxy

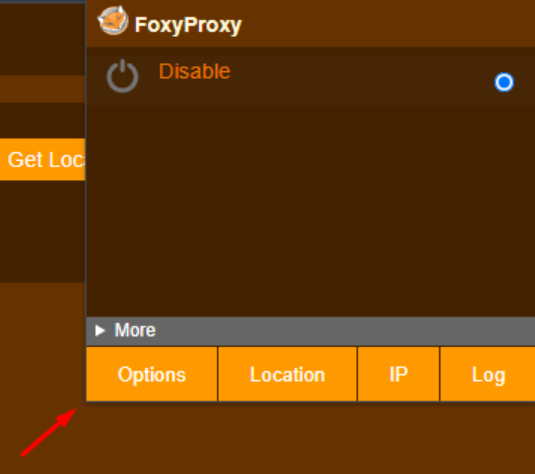
  1. Press the extension icon and select “Options” in the new window.

    12en.png

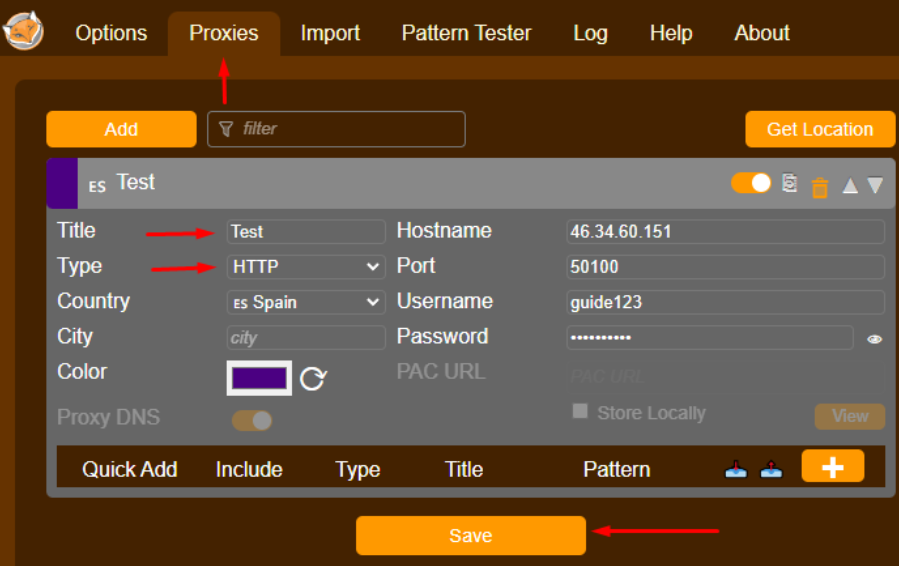
  2. In this new window which appears, navigate to the “Proxies” section tab, input a name in the box for the profile name, select protocol, and on the right side, fill in the information in the relevant boxes. Optionally, one can choose a country, a city, and set a color to allow easier identification and control of the proxies that are configured. As the last step, don’t forget to press “Save” after entering every single detail.

    13en.png

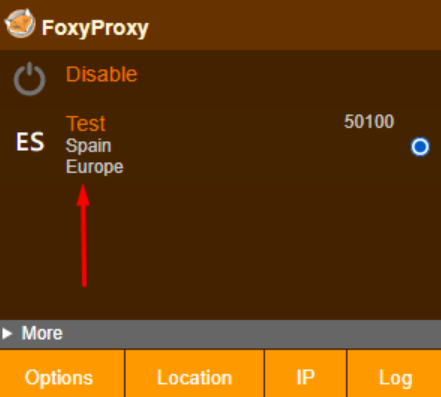
  3. All done, settings are stored. Now, you can enable the configured server from the extension's start page.

    14en.png

The setup is complete. Now any site you visit will show the geolocation having that configured IP address. To enable adding several proxies at once, follow these guidelines:
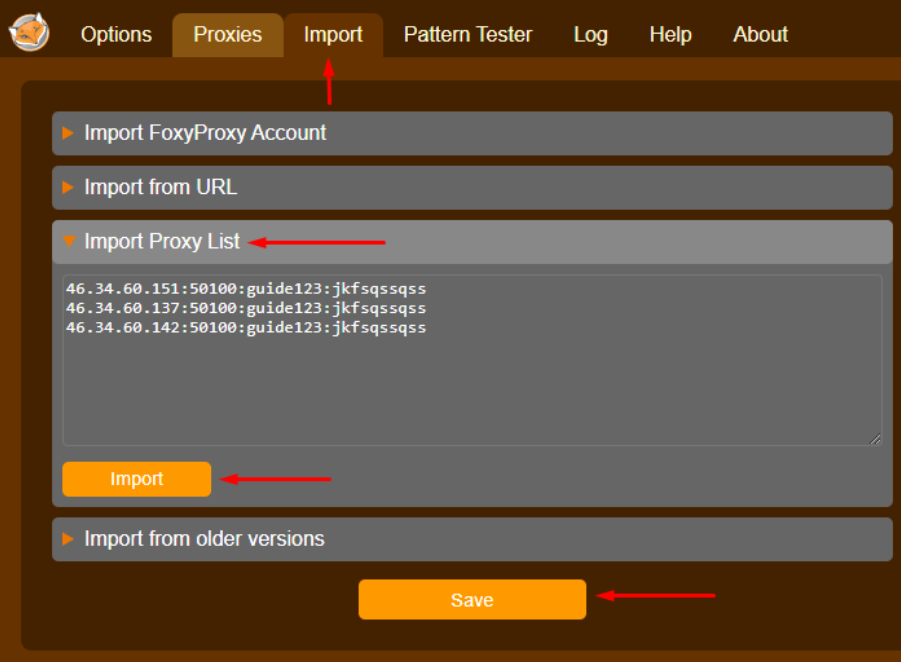
  1. Navigate to the “Import” tab, then select “Import Proxy List”, and enter details in the format IP-address:port:username:password. Then press “Save” and “Import”.

    15en.png

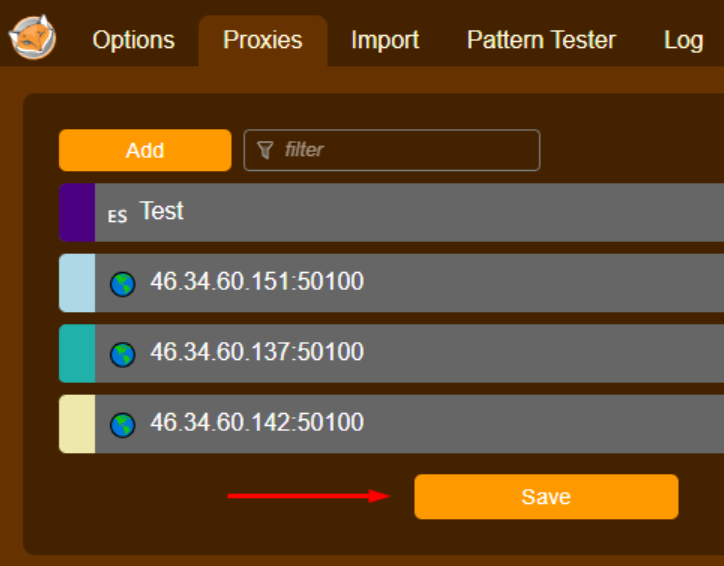
  2. All proxies that were added now should show in the “Proxies” tab, click “Save” again to save the changes. Now, there is a possibility that on the start page the necessary proxy can be chosen and activated. If need be, there is the capability to toggle the proxies between one another.

    16en.png

The simplistic yet powerful interface provides easy management of switching and connecting to servers. Using FireFox, proxy switchers like FoxyProxy can be very useful, also, it is highly recommended to set private proxies for added security of the internet connection.

BP Proxy Switcher

17.png

BP Proxy Switcher offers a range of additional features that can be useful in the fields of multi-accounting and web development. Here are the main features:

  • Cache and cookies clearance without using browser settings;
  • Customization of identifiers for easier management;
  • Automatic tab refresh when switching proxies;
  • Importing proxy lists;
  • Option to set a timer for automatic switching between proxies.

A unique feature of the plugin is the ability to select a specific User Agent and assign it to a chosen proxy IP.

18.png

Step-by-step Proxy Setup in BP Proxy Switcher

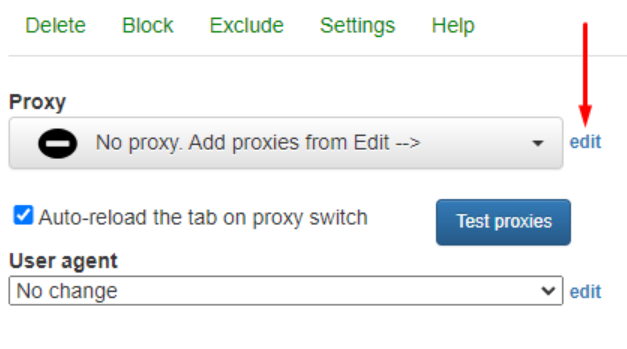
  1. Activate the extension menu. In the window that opens, click the “Edit” button indicated in the screenshot.

    19.png

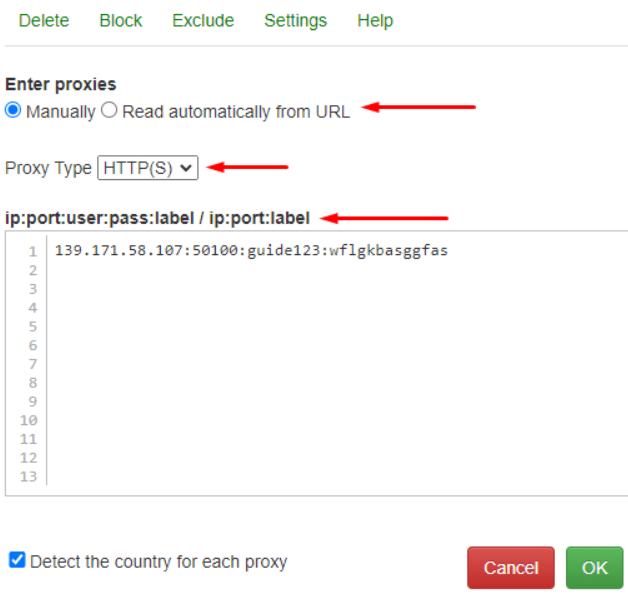
  2. To options available to set up proxies: manually or import a list. For example, choose “Manually”. Enter it in the specified format below: IP-address:port:username:password. You can also set a name to the server by appending it with another colon.

    20.png

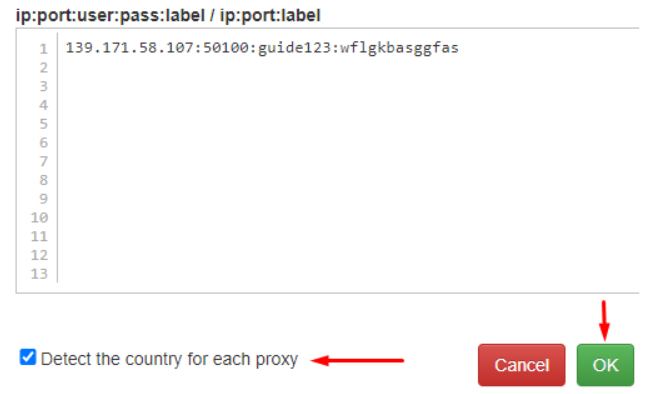
  3. Then, activate the “Detect the country for each proxy” checkbox to automatically determine the country of the configured proxy. To complete the setup, click “OK”.

    21.png

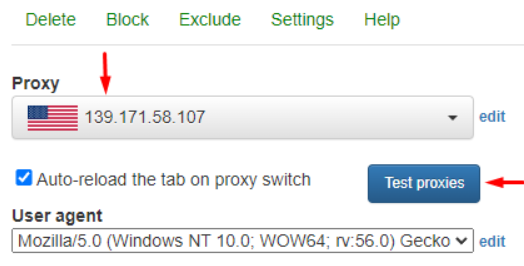
  4. When working with a list of proxies, you can activate “Auto-reload the tab on proxy switch”, which will allow the plugin to automatically refresh the page after changing the IP address. To make sure everything works fine, click “Test proxies”.

    22.png

The setup in BP Proxy Switcher is complete. Let's also consider some additional features:
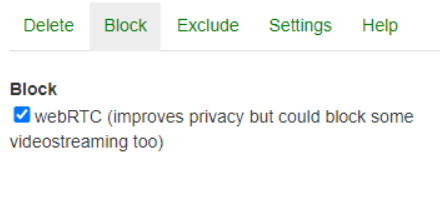
  • In the “Block” tab, you can block WebRTC, which will achieve a higher level of connection anonymization but will also limit the use of features such as video calls or voice communication.

    23.png

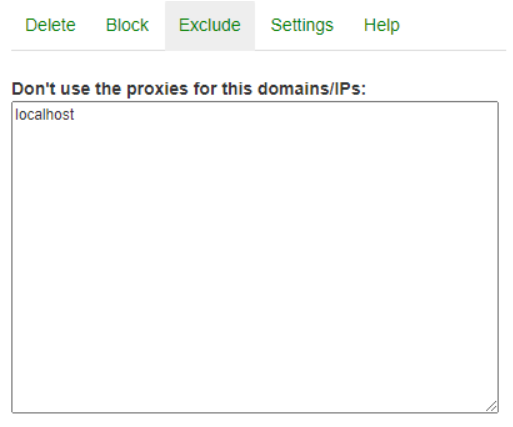
  • The “Exclude” tab allows you to add websites for which proxying is not required.

    24.png

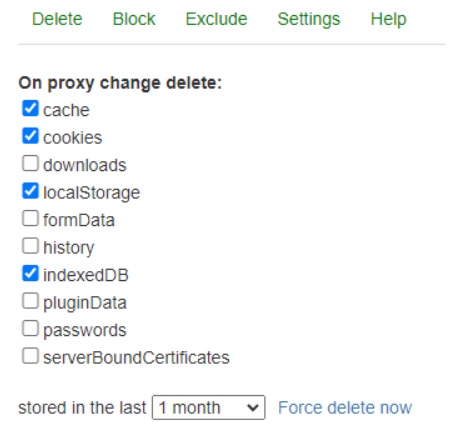
  • To delete browsing history, cache, cookies, and other information, move to the “Delete” tab.

    25.png

The plugin indeed offers an extensive set of features that significantly enhance task efficiency.

Proxy Helper

26.png

This smart proxy Chrome extension offers not only basic capabilities for proxy setup, but set of other interesting options, like:

  • It supports both HTTP/S and Socks5 protocols, as well as Socks4;
  • Authorization feature;
  • A blacklist option to exclude specific resources if necessary.

It is worth highlighting the PAC scripts, which allow for traffic redirection, content loading optimization, and the application of settings based on network connection conditions.
Step-by-step Setup in Proxy Helper

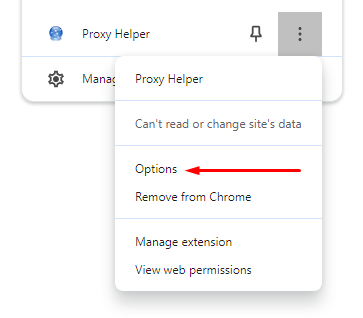
  1. When three dots next to the extension's name clicked, hit on the “Options” item.

    27en.png

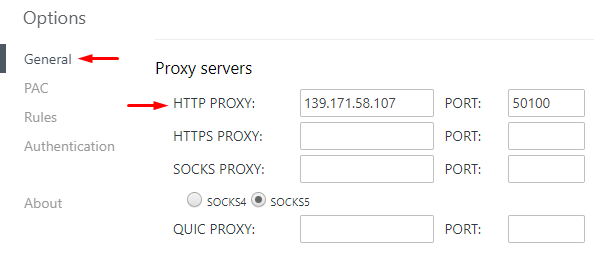
  2. In the new window, navigate to the “General” section, choose the desired protocol, and fill in the fields on the right using the IP address and port from your proxy.

    28en.png

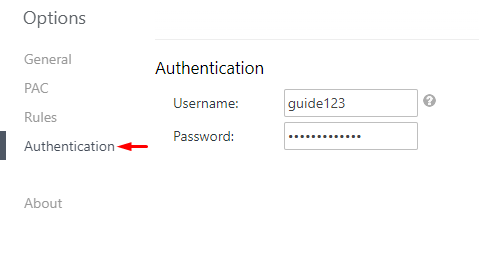
  3. Open the “Authentication” tab and enter the username and password if private proxies are what you have.

    29en.png

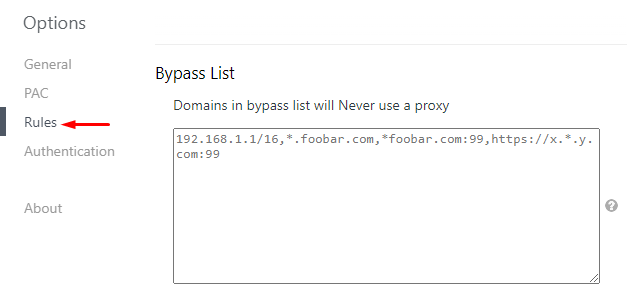
  4. If you need to specify resources for which proxying is not required, head over to the “Rules” tab and insert them using one of the available formats.

    31en.png

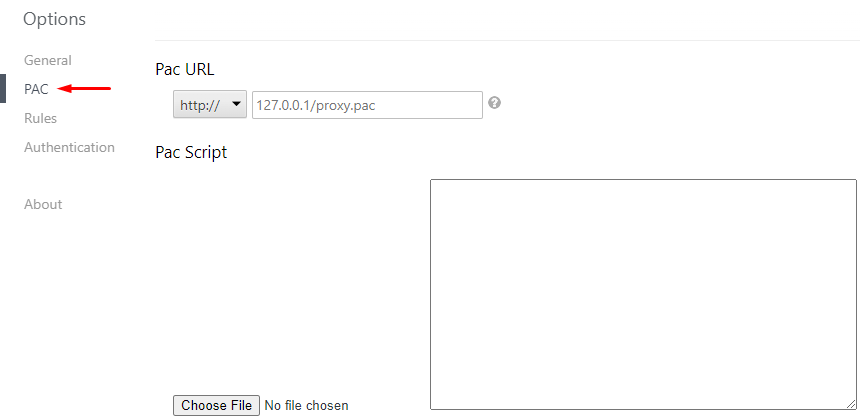
  5. If you have an auto-configuration file, you can upload it using the “PAC” tab.

    32en.png

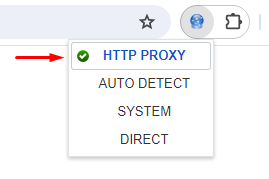
  6. Once the setup is complete, to activate it, click on the extension icon and select “HTTP proxy”. To switch back to the real IP address later, you will need to select “Direct”.

    30en.png

Changing your IP address with this plugin will help secure your data and significantly increase the level of confidentiality of your connections while working with various websites in the browser.

Best Proxy Switcher

33.png

A plugin for setting up proxies in browsers such as Google Chrome and Mozilla Firefox. This tool allows you to add either a single one or upload a list and then switch between them as needed. This feature is useful for managing multiple accounts within a single browser window.

The plugin is available in various language versions and includes a detailed user manual accessible from the main menu.
Step-by-step Proxy Setup in Best Proxy Switcher

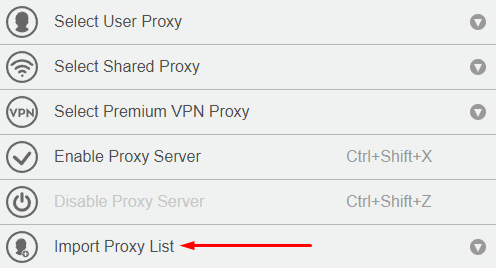
  1. Open the main menu of the extension and click “Import Proxy List”.

    35en.png

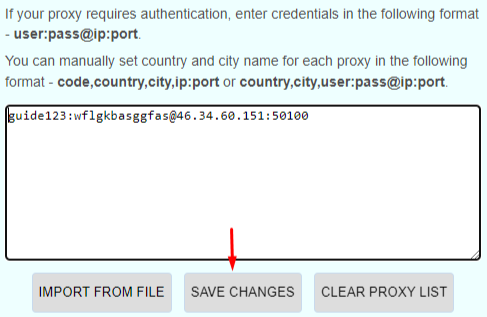
  2. Enter the details in the format username:password@IP-address:port. The tool will automatically determine the location of the proxy. After entering the data, click “Save Changes”.

    36en.png

  3. To add a list of proxies, enter it in the same window.

    37.png

  4. To activate the added servers, go to the “Select User Proxy” tab in the main menu and click on the desired one.

    38en.png

The simple and accessible interface of this plugin allows you to quickly add multiple proxies and switch between them, enabling you to manage accounts without the risk of any blocks or restrictions from the resource being used.

Proxy Switcher & Manager

39.png

A multifunctional plugin, available for most browsers including Google Chrome, Mozilla Firefox, and Opera, focuses on configuring and managing proxy servers.

It's designed to circumvent geographical restrictions or manage multiple accounts within a single space. Notable features include:

  • Creation of profiles and distribution of proxies among them;
  • An error log to identify reasons for any issues or malfunctions;
  • Customization of profiles for easier identification;
  • Auto-configuration using PAC scripts;
  • Hotkeys for navigating the extension menu.

These features make using this plugin more convenient and can help speed up the tasks.
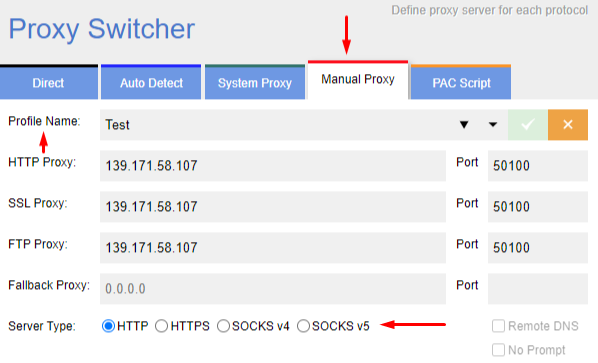
Step-by-step Proxy Setup in Proxy Switcher & Manager

  1. Launch the plugin and navigate to the “Manual Proxy” tab in the window that opens. Set a name for the profile, choose the required protocol, and fill in the fields using the IP address and port of the proxy.

    40.png

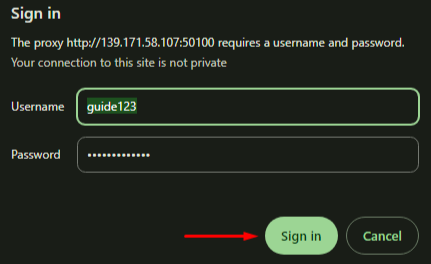
  2. If using a private server, open a new tab in the browser; a window will appear prompting you to enter a username and password. Once the data is entered, click “Sign in”.

    41en.png

  3. In the “Profile name” line, you can also select another profile and configure a separate proxy for it, then switch between them in the main menu.

    42.png

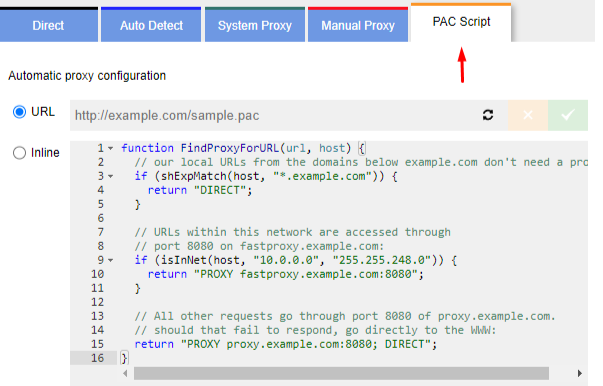
  4. There is also an option to configure automatic proxy configuration using the “PAC Script” tab.

    43.png

Analyzing the main functionality of this tool, it can be concluded that this plugin has all the necessary features for basic needs. Additionally, this plugin can be extremely useful in the field of multi-accounting.

Smart Proxy

44.png

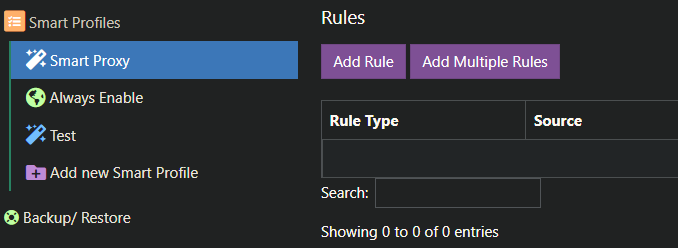
A unique plugin for managing proxy servers, the main feature of which is the ability to automatically enable or disable proxies based on set templates or rules. SmartProxy, indeed, is one of the best proxy extensions for chrome. But also available for FireFox.

The add-on allows switching between different smart profiles, with options available including:

  • adding websites that will use a connection through a proxy, while other resources will operate from the user's real IP address;
  • Always Enable feature provides an option to specify on which websites the configured IP should not operate.

Smart profiles can be duplicated or newly created with different rules set for each proxy.
45en.png

Step-by-step Setup in Smart Proxy

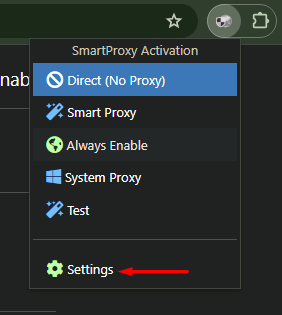
  1. Click on the Smart Proxy extension icon and select “Settings” from the dropdown menu.

    46en.png

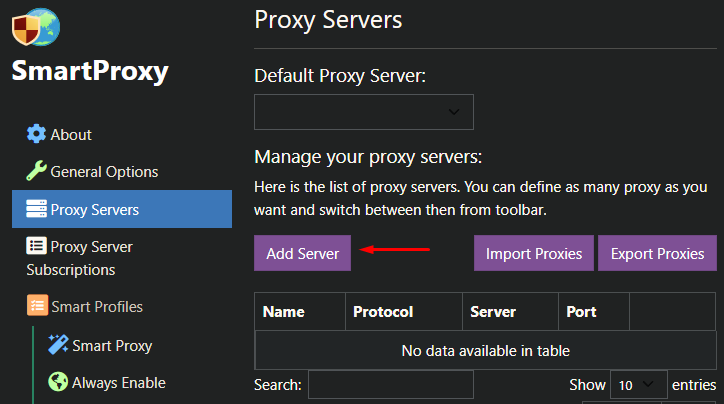
  2. In the new window, go to the “Proxy Servers” tab and press on “Add Server”.

    47en.png

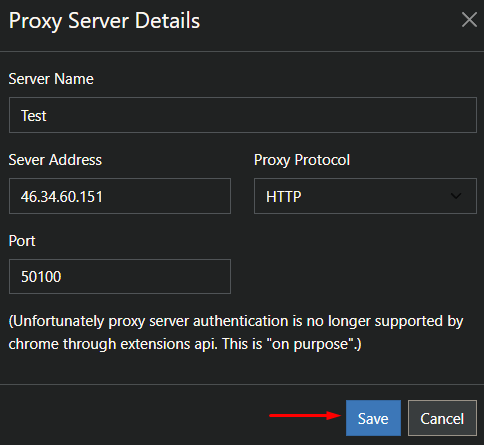
  3. Name the server, select the protocol, and enter the IP address and port in the designated fields. Press “Save”. It's important to note that you should use a proxy with IP address authorization, as the plugin does not support username and password authorization.

    48en.png

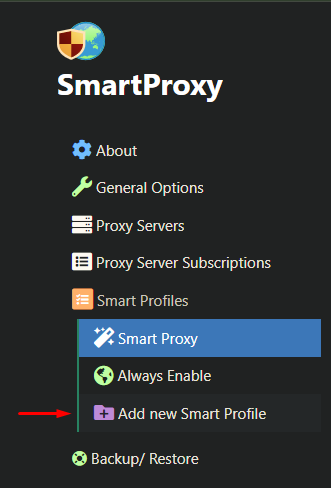
  4. Now, create a new profile, using a smart profile as an example.

    49en.png

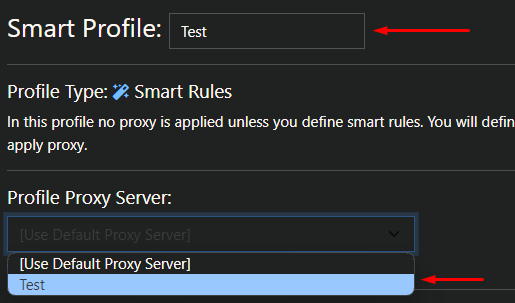
  5. Name the profile, then in the “Profile Proxy Server” section, select the proxy you set up earlier.

    51en.png

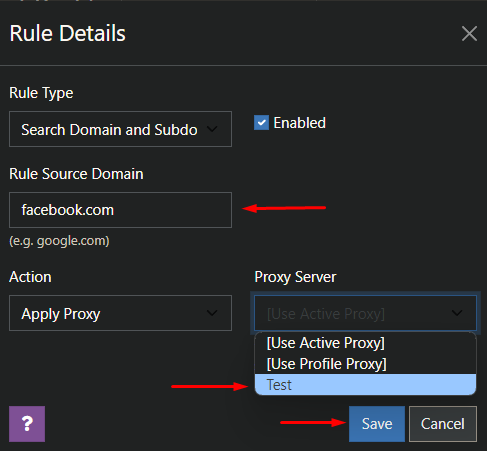
  6. Below, in the “Rules” tab, press “Add Rule”. In the popup window, enter the domain you want the proxy to work with, and in the “Proxy Server” section, select the previously created profile. Press “Save” after all the data is entered.

    52en.png

  7. Now, save the changes.

    53en.png

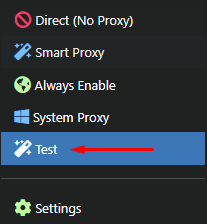
  8. To activate the proxy, press the proxy extension icon and select the configured smart profile.

    54en.png

The setup in the Smart Proxy extension is complete. The unique functionality of the plugin makes it suitable for cases where a separate IP address is needed for different resources.

Conclusion

After exploring the best proxy extensions we can provide some sort of summary. Applications can perform different functions based on the available proxy server extensions. Certain plugins are designed for multi-accounting or web scraping while others are geared towards simpler tasks. Proxy SwitchyOmega, FoxyProxy and Smart Proxy are useful in fields where users have to manage several accounts without the risk of getting blocked. Other such applications serve the purpose of region restriction bypassing or changing IP addresses for better connection anonymity. It is also recommended that these plugins be used only in combination with private proxies to guarantee quality and fast connectivity, as well as provide a high level of privacy.

Comments:

0 comments