Best proxy extensions for Google Chrome

Comments: 0

Proxy setup extensions are increasingly essential for users looking to enhance connection anonymity, secure their data, and bypass regional blocks and other website restrictions. Many modern extensions offer additional features, such as the ability to create separate profiles, which simplifies managing multiple accounts. To find the best tool for your needs, check out the top 7 proxy extensions listed below.

BP Proxy Switcher

1.png

This extension allows for easy and quick proxy setup and provides the convenience of clearing cache, cookies, and other data directly, bypassing the need for manual browser settings adjustments.

Key features of the extension that enhance proxy management include:

  • Displays the country of the active proxy;
  • Automatically refreshes the tab when the proxy is changed;
  • Offers the option to set a time interval for automatic proxy changes;
  • Allows the import of proxy lists from a txt file via a link.

These functionalities are particularly beneficial for scenarios such as managing multiple accounts and web development.
Step-by-step proxy setup in BP Proxy Switcher

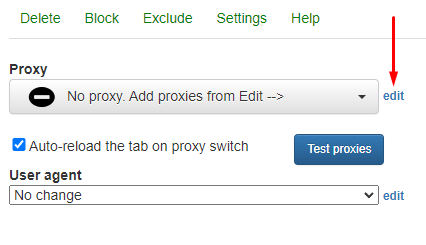
  1. Open the extensions menu and select BP Proxy Switcher. In the popup menu, click the “Edit” button next to the “Proxy” field.

    2.png

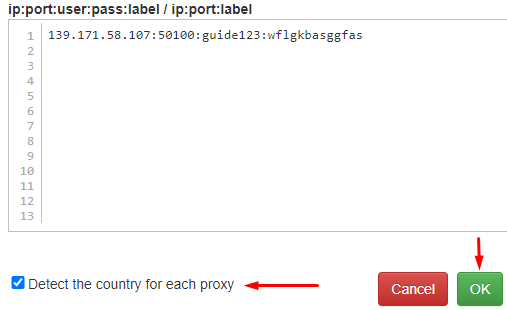
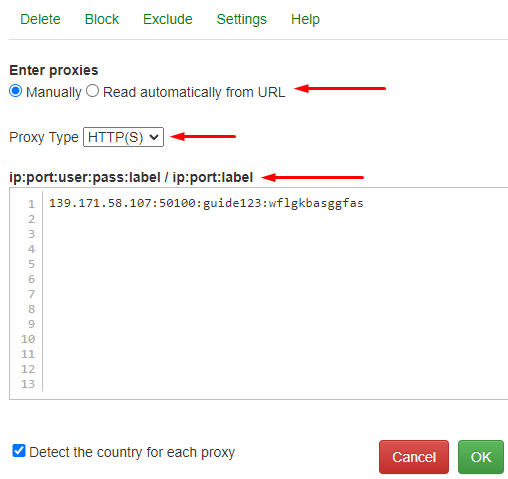
  2. You can either manually enter the proxy details or import a list via a URL. To enter manually, choose a protocol and fill in the proxy details in the format: IP-address:port:username:password. Optionally, add a name by including an additional colon.

    3.png

  3. Click on “Detect the country for each proxy” to enable the extension to automatically determine the country of each IP address, which aids in proxy identification. Once configured, click “OK”.

    4.png

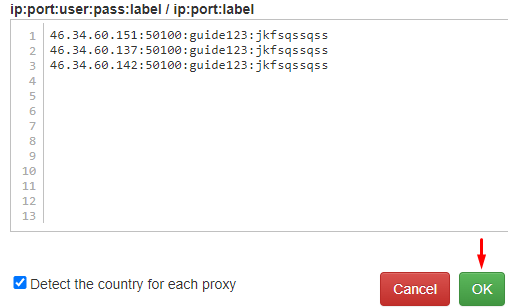
  4. If adding multiple proxies, return to the “edit” section, and input your list of proxies in the specified format, then click “OK”.

    4r.png

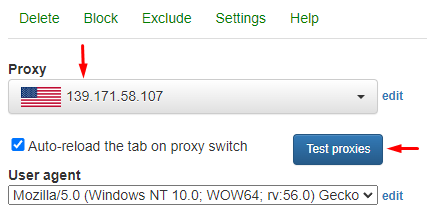
  5. The proxy setup is complete. if managing multiple proxies, enable the “Auto-reload the tab on proxy switch” option to refresh the page automatically with each proxy change. Use the “Test proxies” button to verify the functionality of the added servers.

    5.png

  6. If using a single proxy, select a User Agent from the available list. For multiple proxies, opt to assign a User Agent randomly with each change by selecting “Random from the list each proxy change”.

    6.png

The tool can become indispensable for anonymous online activities and will allow users to customize extension settings for specific tasks. Additionally, the ability to assign a specific User Agent to each IP address will be useful for managing multiple accounts.

Proxy Helper

7.png

The extension, designed for configuring and managing proxy servers, features a user-friendly interface and comes equipped with a robust set of standard functions as well as additional features that streamline proxy server configuration.

Key features of the extension include:

  • Support for HTTP/S, Socks4, and Socks5 proxy formats;
  • PAC scripts support;
  • Options to set specific connection rules;
  • Ability to use proxies that require authorization.

These features enhance the flexibility of the extension, making it highly adaptable for various proxy server operations.
Step-by-step proxy setup in Proxy Helper

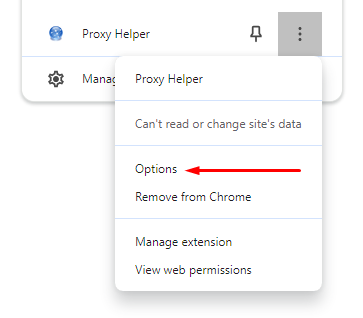
  1. Open the plugins menu located in the browser's top bar. Click on the three dots next to the extension name and select “Options”.

    8en.png

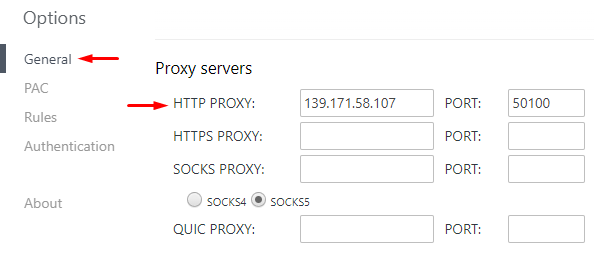
  2. In the “General” tab of the options window, select the desired protocol and input the proxy's IP address and port.

    9en.png

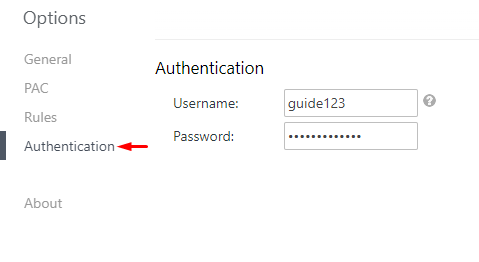
  3. If using a private proxy, switch to the “Authentication” tab and enter your username and password.

    10en.png

  4. To specify sites where the proxy should not be used, navigate to the “Rules” tab and list them in the provided format.

    11en.png

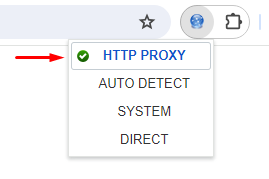
  5. Open a new tab and click on the Proxy Helper extension icon. You'll see options such as “HTTP Proxy” to enable the proxy or “Direct” to disable it.
  6. After setup, you can check if your location has changed using any online checker.

Visit the “PAC” tab to load a proxy autoconfiguration (PAC) file, which offers benefits like:
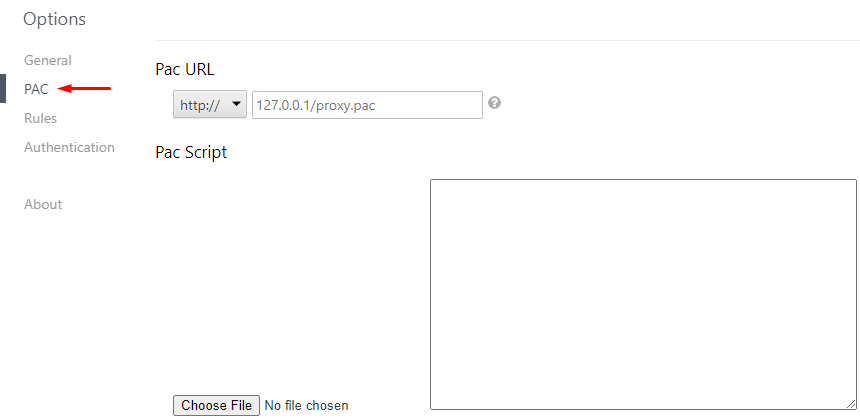
  • Traffic management - redirects traffic through a proxy based on URL patterns for enhanced speed and security.
  • Content loading optimization - accelerate the loading of specific content by distributing requests among different proxies.
  • Automated settings application - automatically apply proxy settings based on network conditions.

    13en.png

Using the Proxy Helper extension enhances task automation, provides access to blocked resources, and ensures a high level of connection anonymity.

Proxy Switcher and Manager

14.png

The extension offers a standard set of features for configuring and managing proxy servers, but it also possesses some unique capabilities, such as:
  • Creating profiles for multiple proxy servers and switching between them as needed;
  • Ability to use PAC scripts;
  • Displaying the proxy status and reasons for malfunctions in an error log;
  • Ability to customize profiles for easier identification when working with proxies.

Step-by-step proxy setup in Proxy Switcher and Manager

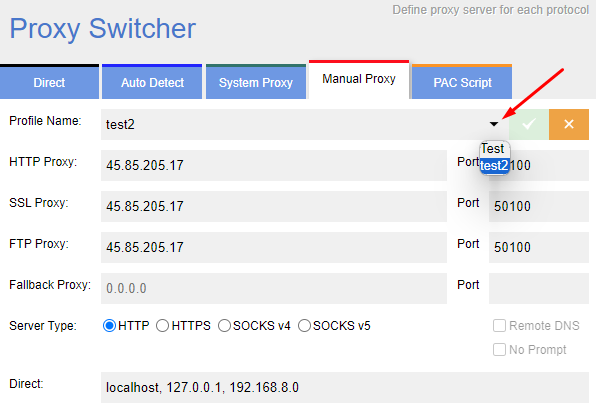
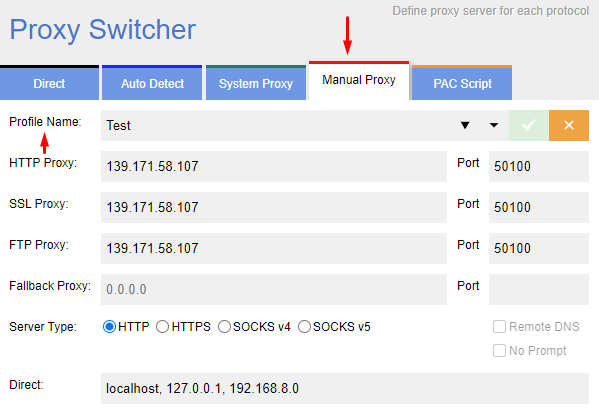
  1. In the extensions menu, click on the Proxy Switcher and Manager icon. In the window that appears, select the “Manual Proxy” tab, name the profile, choose the required protocol — in our case, HTTP — and enter the IP address and port.

    15.png

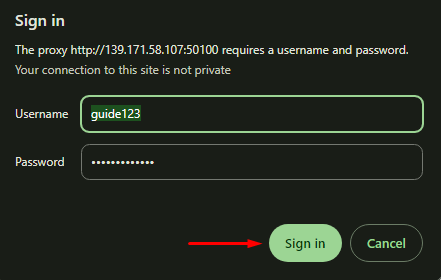
  2. If using a private proxy with authentication, open a new tab; the browser will request you to enter a username and password. After entering the data, click “Sign in”.

    16en.png

  3. Similarly, you can set up another profile using a different proxy server, and then switch between them in the extensions menu.

    17.png

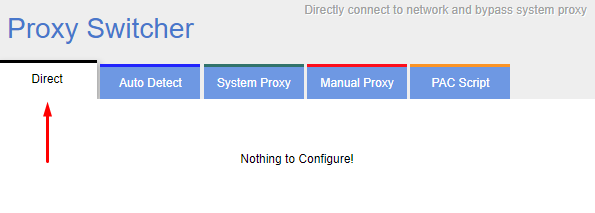
  4. To disable the proxy, select the “Direct” tab.

    18.png

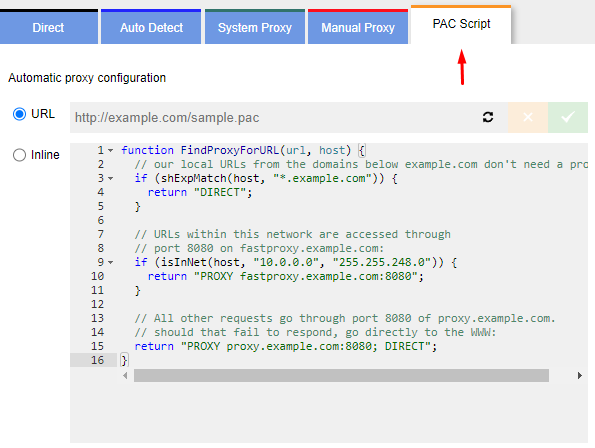
  5. The “PAC Script” tab allows you to upload and configure automatic proxy settings.

    19.png

In conclusion, Proxy Switcher and Manager is a convenient extension, not overloaded with a vast number of tabs and options, but at the same time, it offers functionality suitable for purposes such as enhancing connection anonymity, circumventing regional blocks, and managing a large number of accounts.

Proxybonanza Proxy Manager

20.png

The Proxybonanza Proxy Manager extension is not only suitable for uploading and managing a single proxy but also for importing proxy lists in various ways using built-in tools.

The main features of the extension include:

  • Uploading proxy lists in CSV/TXT format;
  • Exporting proxy lists;
  • The ability to add a note to each proxy;
  • The ability to specify authentication data for proxies within the extension.

The presence of these features makes this extension applicable in the field of multi-accounting. Using proxy lists and switching between them at any time significantly increases the efficiency of account management and protects them from getting blocked.

Step-by-step proxy setup in Proxybonanza Proxy Manager

  1. Go to the Proxybonanza extension menu and click the “Add new proxy” button.

    21.png

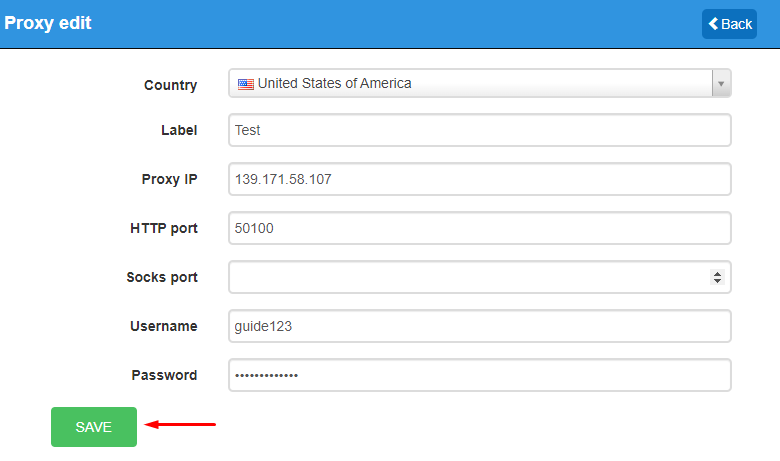
  2. In the new window, you can manually select the proxy country and set a name. Then fill in the fields required for setup: IP address, port, username, and password. Once all the data is entered, click “Save”.

    22.png

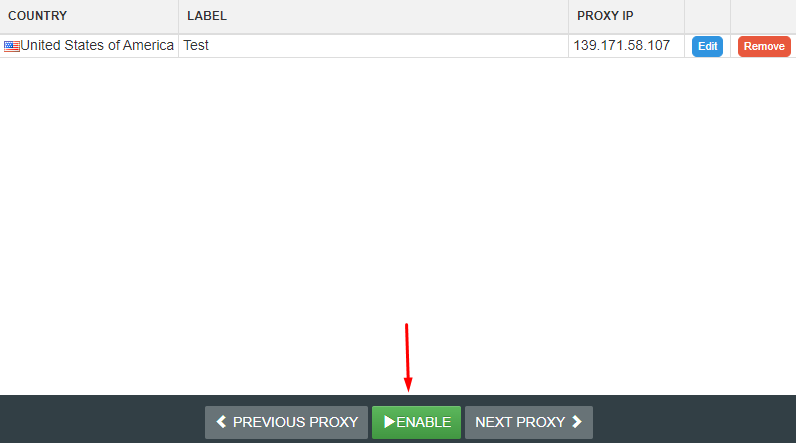
  3. The new proxy will be displayed in the main menu; to activate it, press “Enable”. Then reload the page and visit any website to check the geolocation to ensure the proxy is set up successfully.

    23.png

To upload a list of proxies, follow these steps:
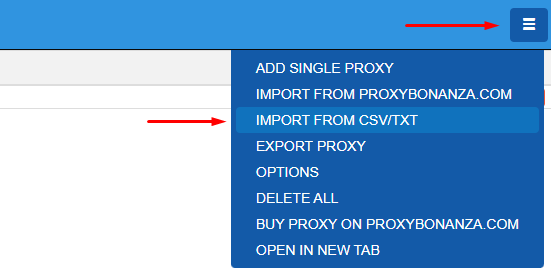
  1. In the main menu of the extension, click on the three stripes in the upper right corner and select “Import from CSV/TXT”.

    24.png

  2. In the window that appears, check the necessary checkboxes. If using private proxies, “Username” and “Password” should be active.

    25.png

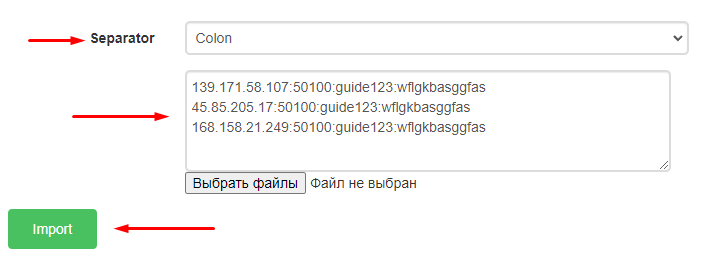
  3. Then select the delimiter format for the data from the proxies; it is recommended to select “Colon” which means the proxy data needs to be entered using colons. In the field below, upload a file or enter the proxies in the format IP-address:port:username:password. Once all the data is entered, click “Import”.

    26.png

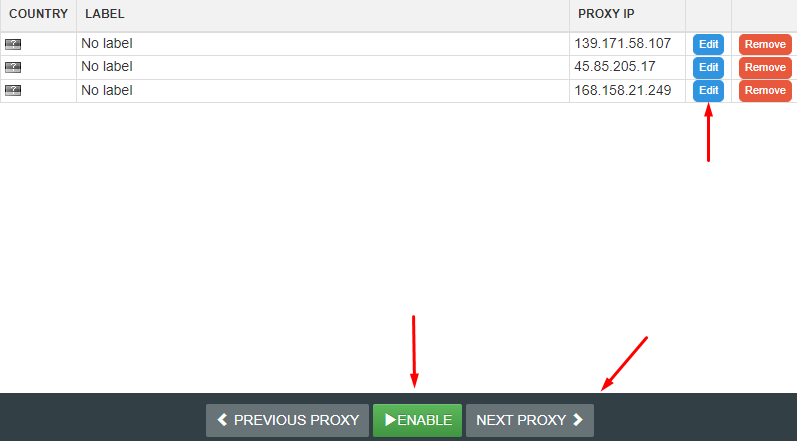
  4. In the main menu, all proxies from the list will be displayed; to assign a name or country to an individual proxy, click “Edit”. To activate a proxy, click “Enable”, and if you need to switch to another, click “Next proxy”.

    27.png

The proxy setup in the extension is complete. Using private proxies in conjunction with Proxybonanza allows you to switch between them instantly and work with accounts without the risk of being blocked.

Proxy Switchy Omega

28.png

The Proxy SwitchyOmega extension is designed for configuring and managing proxy servers within a browser window, without the need to set them up across the entire system.

The functionality of the extension offers additional options that simplify the setup and subsequent management of proxy servers, such as:

  • Creating separate profiles for proxy settings;
  • Creating and working with PAC scripts;
  • Availability of hotkeys and their customization;
  • Ability to automatically change proxies under different scenarios;
  • Error log.

This set of features significantly simplifies work in virtually any field and ensures a high level of connection anonymity.
Step-by-step proxy setup in Proxy SwitchyOmega

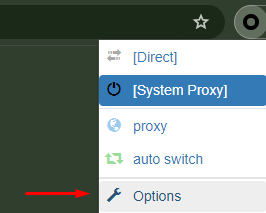
  1. To configure a proxy, click on the extension icon and select “Options”.

    29.png

  2. In the settings menu, navigate to the “Proxy” tab, select the protocol, and enter the IP address and port of the proxy. If using private proxies, click on the lock icon to add authentication details.

    30.png

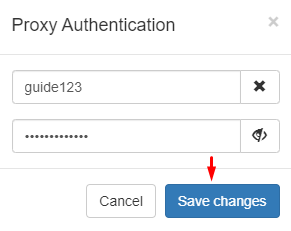
  3. In the new window, enter your username and password, then click “Save changes” for the changes to take effect.

    31.png

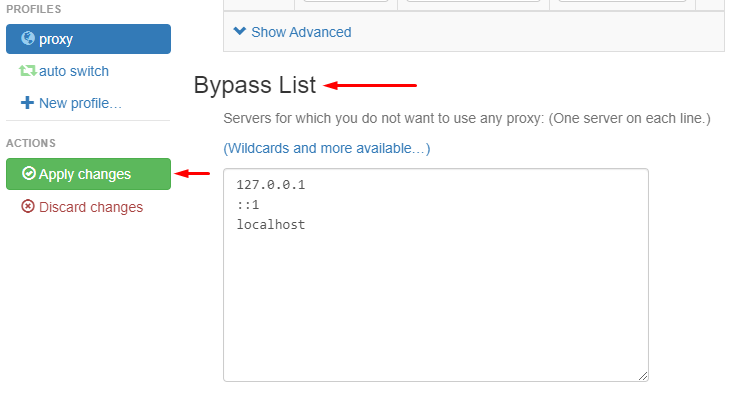
  4. If necessary, in the “Bypass List” specify websites that should not be proxified. To save the settings of the configured proxy, click on “Apply changes”.

    32.png

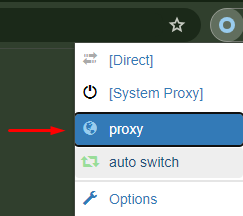
  5. To activate the proxy, open a new browser tab and click on the Proxy SwitchyOmega extension icon, then select “Proxy”. Done, the proxy is set up and ready to use. To disable it, select “Direct”.

    33.png

Let's take a closer look at the additional functionality of the extension. In the settings, there is an option to create separate profiles, assign them names, and choose their type:
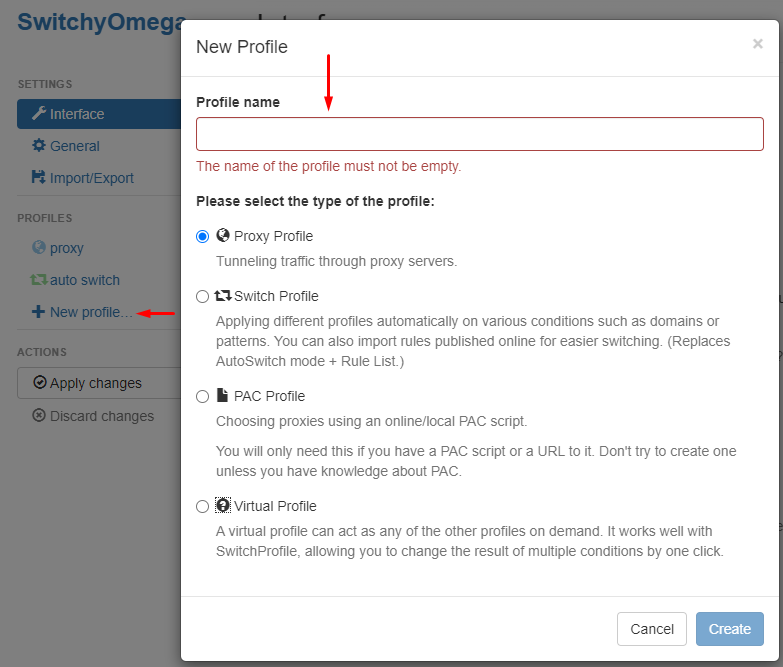
  • Proxy Profile - intended for standard use of proxies;
  • Switch Profile - allows quick switching between proxy servers depending on the user's location or tasks;
  • PAC Profile - auto-detects proxies using a PAC script. This option is intended for automatic proxy server configuration based on the URL. In this profile, you can specify a link to a PAC file, which determines which proxy to use for each resource;
  • Virtual Profile - provides the ability to create customizable filters and rules for browser traffic. This allows modifying or filtering traffic, for example, to block ads, protect against malicious websites, or redirect traffic through a specific proxy server.

    34.png

The new profile will be displayed in the panel on the left and will allow you to configure a separate proxy, giving you the ability to switch between profiles with different IP addresses in the future.

Another interesting feature is the “auto-switch”, which allows you to select specific conditions and rules for switching between profiles. For example, a user can set a rule to automatically select the appropriate proxy profile when visiting a certain domain or using a specific protocol. Rules are set by configuring the following conditions:

  • Host wildcard - this condition allows you to use SwitchyOmega to apply a designated proxy only for a specific domain and its subdomains;
  • URL wildcard - useful when you need to apply different proxy settings for different sections of a website or specific URLs;
  • URL Regex - used for matching URLs using regular expressions, allowing for more complex and precise patterns for URL matching. For most purposes, standard wildcards are sufficient; this method is suitable, for example, for creating combined conditions and requires specialized knowledge in this field.

Also, in this tab, you can upload an existing list of conditions or rules published by other users.

35.png

Proxy SwitchyOmega is the most versatile extension that possesses both standard functionality suitable for simple proxy server setup for bypassing various blockages, as well as additional options that may be useful for specific purposes.

Best Proxy Switcher

36.png

This tool allows you to configure and work with a single proxy, as well as to upload a list of servers, enabling you to switch between them. This can be useful for multi-accounting and other purposes that require having different geolocations and the ability to change IP addresses.

The extension offers functionality that facilitates easy management of proxy servers, such as enabling and disabling a proxy server using hotkeys and quickly importing proxy lists.
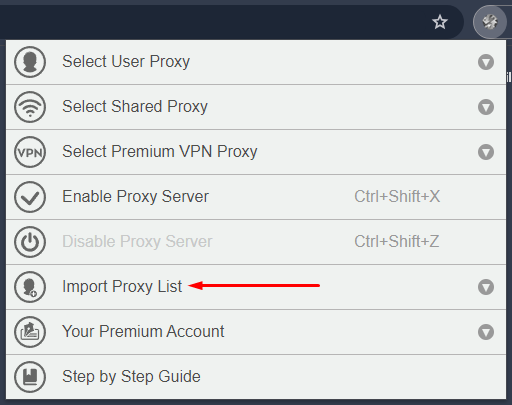
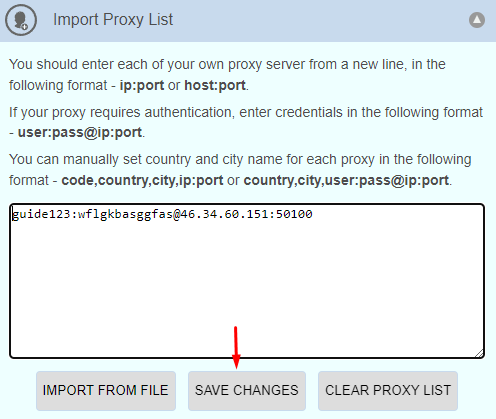
Step-by-step proxy setup in Best Proxy Switcher

  1. Click on the extension icon to enter the main menu, then click “Import Proxy List”.

    38en.png

  2. Enter the proxy data using one of the suggested formats; it's not necessary to enter the country and city as Best Proxy Switcher will automatically determine the geolocation after the settings are applied. Once all the data is entered, click “Save Changes”.

    39en.png

  3. A new window will display the IP address, port, country, and city. To activate the configured proxy, click on it to make the extension icon active.

    40en.png

This completes the setup for one proxy. Next, we will show how to import a proxy list and switch between them:
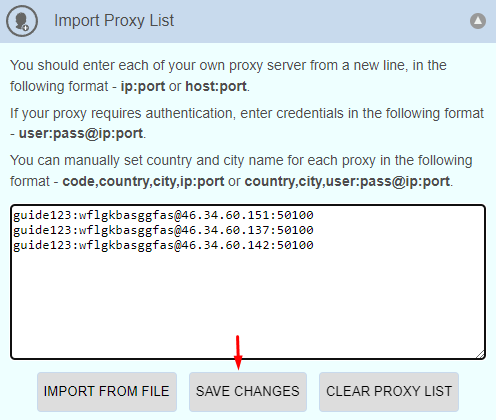
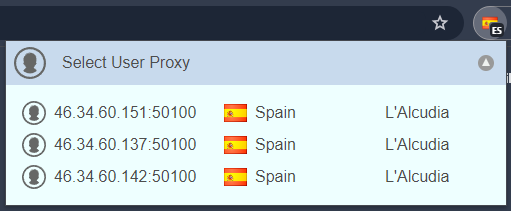
  1. Navigate to the “Import Proxy List” tab and enter the proxies in one of the available formats. Then click “Save Changes”.

    41en.png

  2. In the “Select User Proxy” tab, you can switch between proxy servers by clicking on one of them. It's recommended to reload the browser tab after applying a new proxy.

    42en.png

Best Proxy Switcher allows managing multiple proxies and switching instantly between them, significantly enhancing the security of user accounts in any field of activity.

FireX Proxy

f.png

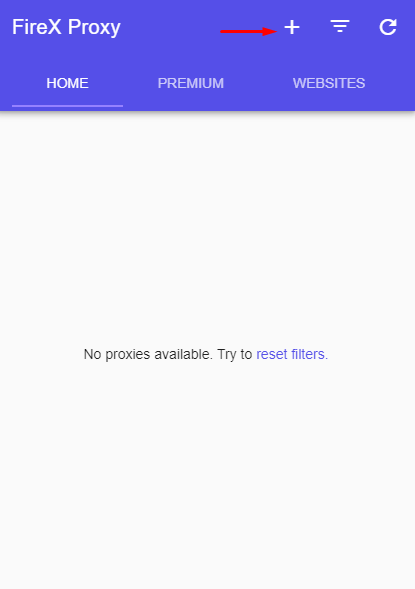
The extension allows you to add proxy servers and switch between them as needed. FireX Proxy features a simple interface and a set of basic functions for configuring and managing different IP addresses. The extension offers the ability to add a list of exception sites, and proxies will automatically be disabled when a user visits the specified resources. Additionally, the application allows you to filter from the entire list of proxies only those IP addresses from specific countries or proxies with a specific protocol.
Step-by-step proxy setup in FireX Proxy

  1. Navigate to your browser's extensions menu and click on the FireX Proxy icon. To add a new proxy server, click the “+” at the top of the interface.

    43en.png

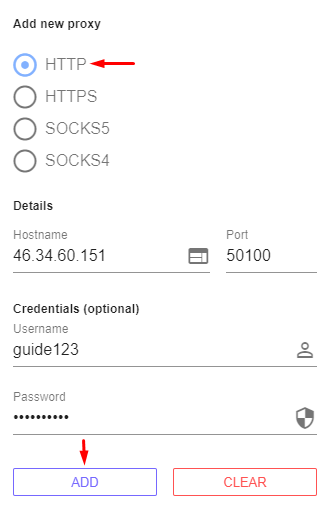
  2. Check the box for the required protocol, then fill in the fields below with your proxy details. Once all the information is entered, click “Add”.

    44en.png

The proxy setup is complete. Next, we will show another feature of the extension: the ability to add a domain name to the blacklist so the proxy does not work on specified sites. Follow the instructions below:
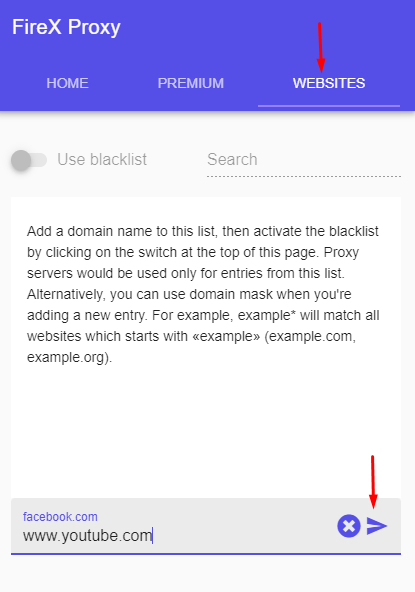
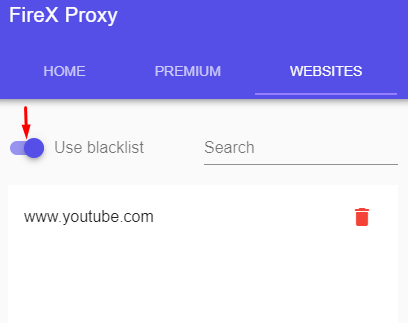
  1. Navigate to the “Websites” tab. In the active field, enter the link to the necessary website and click the button on the right in this window to confirm the entry.

    45en.png

  2. Toggle the “Activate” switch to the active position, now the proxy server will not operate with the specified site.

    46en.png

At this point, this is all the functionality for setting up proxies that the FireX Proxy extension can offer, but it may be sufficient for performing simple tasks.

Thus, in the Google Chrome addon store, you can find both extensions for managing proxies for specific purposes and basic plugins for simple circumvention of blockages. Below, for clarity, a table will be presented showing the advantages and disadvantages of each extension reviewed above.

Extension Advantages Disadvantages

BP Proxy Switcher

  • Ability to import a proxy list;
  • Convenient switching between IP addresses from the proxy list;
  • Ability to set a separate User Agent for each IP address.
  • Lack of tooltips;
  • Only the English language is supported.

Proxy Helper

  • A project page on GitHub;
  • Regular updates from the developers;
  • Blacklist option.
  • Lack of ability to configure digital fingerprint settings

Proxy Switcher and Manager

  • User-friendly interface;
  • Hotkeys.
  • Supports only the English language.

Proxybonanza Proxy Manager

  • Ability to import and export proxy lists;
  • Minimalistic interface;
  • Feature to add notes to each proxy.
  • Presence of built-in advertising;
  • Lack of ability to configure digital fingerprint settings;
  • Supports only the English language.

Proxy Switchy Omega

  • Tooltips;
  • Additional tools for debugging and configuring the extension.
  • Supports only the English language.

Best Proxy Switcher

  • Support for various language versions;
  • Tooltips;
  • Ability to enable and disable proxies using hotkeys.
  • Lack of options to configure digital fingerprint settings.

FireX Proxy

  • Project page on GitHub;
  • Support for various language versions;
  • Option to filter proxies by country or protocol.
  • Limited functionality, suitable only for basic purposes.
  • Lack of options to configure digital fingerprint settings.

In conclusion, it's important to note that the market currently offers a wide array of diverse tools for managing proxy servers. Some of these tools offer unique functionalities that can be particularly useful for tasks such as parsing or managing multiple accounts, for instance, BP Proxy Switcher, Proxy Switcher and Manager, Best Proxy Switcher, Proxy SwitchyOmega, or Proxybonanza Proxy Manager. Others are designed for simpler tasks that only require IP address changes, like FireX Proxy or Proxy Helper. This article has compiled the best extensions for Google Chrome, and with the information provided above, users will be able to choose the right tool for their needs and projects.

Comments:

0 comments