 en
en  Español
  中國人
中國人  Tiếng Việt
  Deutsch
  Українська
  Português
  Français
  भारतीय
  Türkçe
  한국인
한국인  Italiano
  Indonesia
  Polski
 Setting up a Safari proxy on macOS enhances browsing privacy and improves security. A properly set server can help protect personal data, bypass restrictions on certain websites, and stabilize browsing on unreliable networks.
It is also useful for accessing content that may be limited to specific regions or blocked by local providers. This article provides a detailed guide on how to set up a proxy setting in Safari browser, covering each stage from opening the browser settings to entering the correct details.
Using a Safari proxy offers several advantages for users who want better control of their browsing experience. One of the main benefits is the ability to bypass geographical restrictions. Many websites and online services limit access based on location, and routing traffic through a server makes it possible to view content that would otherwise be unavailable.
Another important reason to configure Safari proxy settings is the protection of personal data. When it is in use, sensitive information such as browsing activity and login credentials can be better shielded from unauthorized access.
A properly configured proxy for Safari can also improve connection performance. By caching frequently accessed resources, it may help reduce loading times and provide smoother access to certain sites.
To set up a Safari proxy effectively, you first need to understand the tools and information required. macOS offers built-in features that make proxy for Safari easy to configure without installing extra software. You’ll work mainly inside System Preferences > Network > Advanced > Proxies. This section taps into Mac’s native networking stack to streamline your setup process.
Before diving into the configuration, make sure you have a reliable proxy server provider. Choose one that offers private proxies with stable IPv4 and SOCKS5 protocols. Services like proxys.io provide diverse worldwide IP pools, including rotating proxies, bandwidth limits, and speed guarantees. This ensures you get consistent and secure connections while browsing.
Additionally, gather your proxy details upfront. You will need the following:
Store this data securely. Using encrypted credential managers such as 1Password or Mac’s Keychain Access is highly recommended. This protects your sensitive login credentials and lets you access them easily while setting or updating your Safari browser proxy settings.
Configuring a Safari proxy on macOS involves a clear set of steps that cover every stage of the setup. The following guide outlines the exact process to follow.
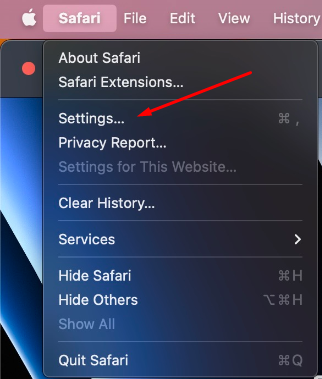
To begin, open the Safari application on your Mac. On the top desktop panel, click the Safari icon, and from the dropdown menu, select Settings. This will open the main configuration window, where further adjustments can be made to the browser.

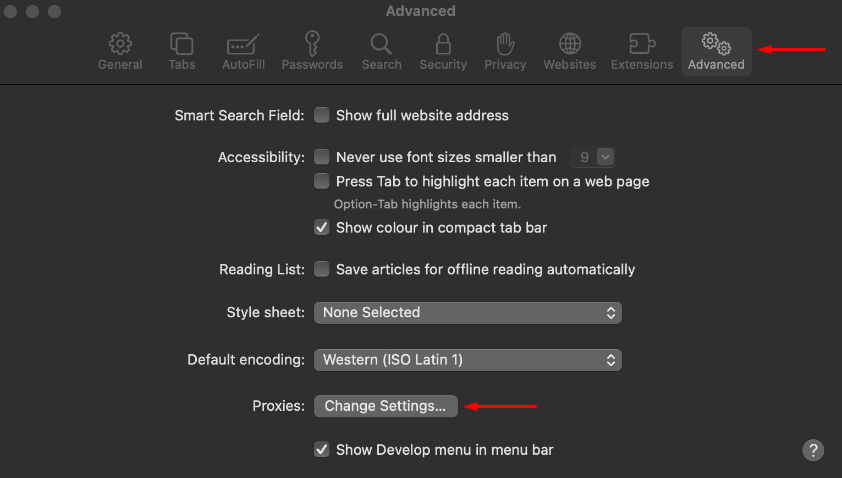
In the settings window, navigate to the Advanced tab. Within this section, locate the Proxies field and select Change Settings. This step directs you to the Safari browser proxy settings, where you will be able to manage all connection options related to the server.

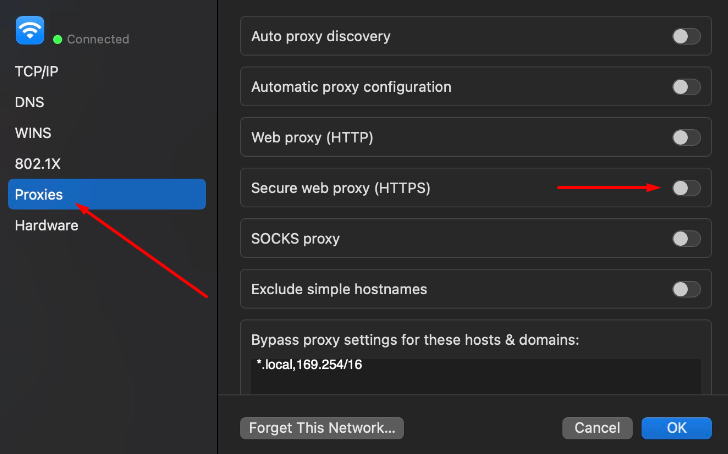
In the Proxies menu, you will see several options for managing connections. To activate the feature, check the box next to Secure Web Proxy (HTTPS). This option ensures that your data is routed securely through the server. Choosing this setting is the first step when you want to set proxy in Safari.

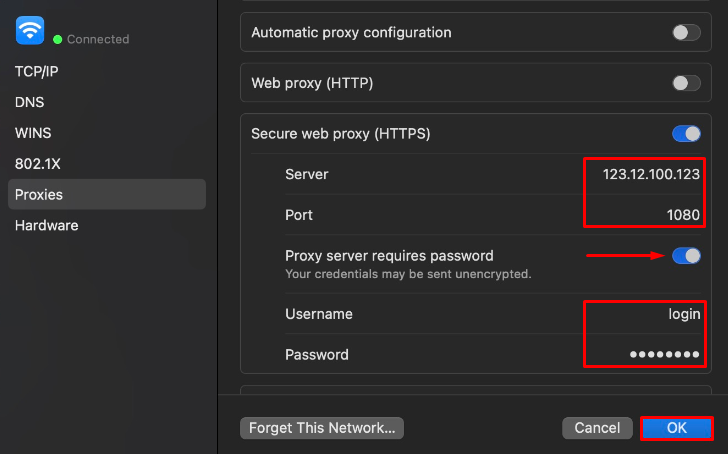
Once the secure option is enabled, you will be asked to provide the connection details. Enter the IP address and port of the server in the designated fields. If you are using a private one that requires authentication, enable the username and password option, then input the required credentials.
This step completes the process of how to set proxy in Safari browser. After entering the details, click OK to confirm and save the configuration.

You may need to update your Safari proxy settings to change providers, refresh credentials, add or remove proxy exceptions, or troubleshoot connectivity issues. Here’s how to proceed:
If your changes do not apply immediately, try these troubleshooting steps:
For reliable proxy updates, consider using Proxy-Seller. They offer over 220 countries’ proxies, including IPv4, IPv6, residential, ISP, and mobile proxies. You’ll benefit from speeds up to 1 Gbps and 99% uptime. Proxy-Seller provides an easy-to-use dashboard and API for quick proxy credential management. Their 24/7 support helps you rapidly update or switch proxies without downtime.
After configuring your Safari proxy settings, you need to confirm everything works correctly. Follow these simple steps:
By following these steps, you’ll know if your safari proxy is working as expected. Regular testing helps maintain secure and private browsing and reduces connection problems before they affect your workflow.
Even with the correct steps, users may face difficulties when working with a Safari proxy. Below are the most common issues, their causes, and step-by-step solutions.
Symptoms: Safari fails to load websites, displays error messages, or shows that the server cannot be reached. This usually happens when the IP address or port number is entered incorrectly.
Solution:
Symptoms: Safari repeatedly asks for login credentials, or access is denied even after entering the username and password. This usually indicates an authentication mismatch.
Solution:
Symptoms: Pages take too long to load, fail to display images, or connections frequently drop. These problems often stem from overloaded or unreliable servers.
Solution:
Configuring an intermediary in Safari on macOS is simple and provides tangible benefits for daily browsing. By taking the time to set up a Safari proxy, users can protect personal data, bypass access restrictions, and enjoy a more reliable connection to online resources.
Although the setup requires just a few steps, it significantly improves privacy and security. For anyone who values secure access to the internet, learning how to apply and manage proxy settings in Safari is highly recommended.
Comments: 0