
Setting Up Proxy in Ubuntu
Summary generated by AI:
Ubuntu is a Debian GNU / Linux operating system with an interface similar to the usual Windows users. It is used on PC laptops and servers. Which means that it also needs to configure a proxy server. In Ubuntu, this process has certain features that you should be paying attention to in the following recommendations.
Proxy settings for Ubuntu
-
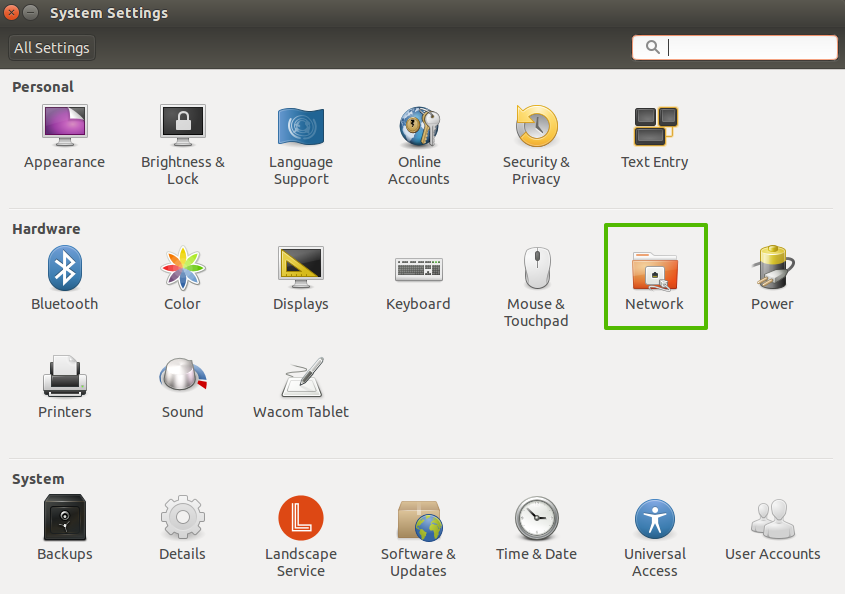
Open system settings in Ubuntu:

-
In the newly opened settings menu, click on the “Network” category:
-
On the left side of the window, click on the “Network Proxy”. In the “Method” drop-down list, choose “Manual”. Fill up the “HTTP” and “HTTPS” proxy fields with the data. Click on “Apply system wide” after. You may find it useful to know how HTTP(S) differs from SOCKS proxies.
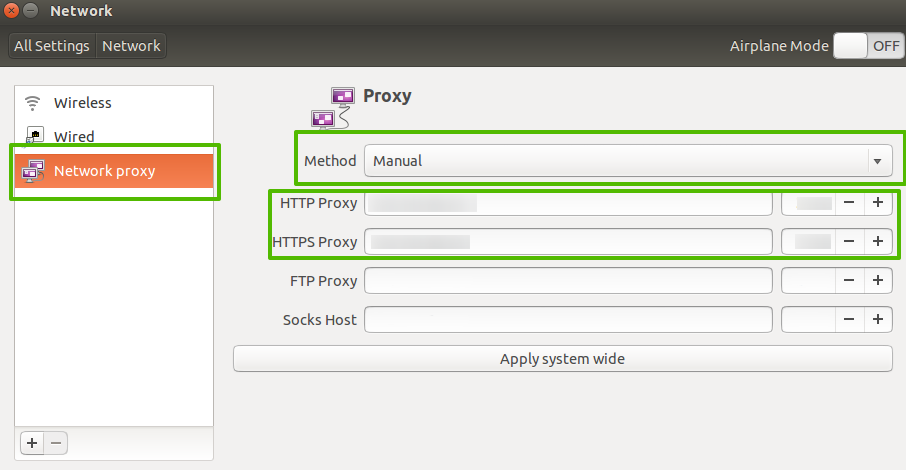
To activate the settings, you must perform a complete reboot.
You can refine the configuration using the command: wget -q0 - eth0.me or wget google.com
![]()
Types of Proxy Configuration in Ubuntu
You’ll learn about three main types of proxy configurations in Ubuntu proxy setups: system-wide, user-specific, and application-specific. Each type serves different needs.
System-Wide Proxy Settings
System-wide proxy settings apply to all users and processes on the machine. You set proxies here when you want every application, user, and service to route traffic through the proxy. This offers consistency and control but requires administrator access and sometimes a system reboot or session restart to activate changes.
Advantages:
- uniform proxy usage across the entire system;
- easier to maintain for large deployments.
Disadvantages:
- requires elevated permissions;
- changes may need a reboot or logout/login.
Note how systemd services often read environment variables from service files or drop-in configurations under /etc/systemd/system/. These proxy settings often require restarting the services to apply changes, but not a full reboot.
User-Specific Proxy Settings
User-specific proxy settings are set for individual users, affecting only their sessions or shells. Configure these when only selected users need proxy access or different proxy rules.
Advantages:
- flexible per-user proxy control;
- no need for admin rights.
Disadvantages:
- other users don’t get the settings;
- applications running outside user shells might miss them.
Application-Specific Proxy Settings
Application-specific proxy settings directly configure individual programs to use a proxy. Use this when only certain applications must use a proxy or require different proxies. This is done by editing app configuration files or by command-line options.
Advantages:
- precise proxy control on an app basis.
Disadvantages:
- setup is fragmented, less centralized.
Setting Up Proxy via Command Line in Ubuntu
Use command line proxy configuration on servers, headless systems, or when scripting automation. You control proxies by setting environment variables, which many tools respect.
Main Proxy Environment Variables
The main proxy environment variables are:
- HTTP_PROXY and http_proxy
- HTTPS_PROXY and https_proxy
- FTP_PROXY and ftp_proxy
- NO_PROXY and no_proxy (for exceptions)
You’ll typically set NO_PROXY to exclude localhost, internal IP ranges, or specific domains. For example: NO_PROXY="localhost,127.0.0.1,192.168.0.0/16,mycompany.local"
Setting Variables for Persistence
To set these variables temporarily for your current shell session in the Ubuntu terminal proxy, run:
- export HTTP_PROXY="http://your.proxy.address:port";
- export HTTPS_PROXY="http://your.proxy.address:port";
- export NO_PROXY="localhost,127.0.0.1"
To make these permanent:
- User-Specific: Edit ~/.bashrc, ~/.bash_profile, or ~/.profile. Add lines like:
- export HTTP_PROXY="http://your.proxy.address:port";
- export HTTPS_PROXY="http://your.proxy.address:port";
- System-Wide: Edit /etc/environment. Use simple KEY="value" pairs, without the export keyword. Example:
- HTTP_PROXY="http://your.proxy.address:port";
- HTTPS_PROXY="http://your.proxy.address:port";
- Alternative Shell Script: Create a script like /etc/profile.d/proxy.sh with export commands. This script runs at shell startup.
After making changes, reload the shell environment with source ~/.bashrc or open a new terminal window.
APT Proxy Configuration
APT package manager requires proxy configuration on its own. Create or edit /etc/apt/apt.conf.d/95proxies and add:
- Acquire::http::Proxy "http://your.proxy.address:port";
- Acquire::https::Proxy "http://your.proxy.address:port";
Although APT can use environment variables, apt.conf offers better reliability.
Editing Files Safely
- For editing files, use nano or vim for interactive edits.
- Use sed for automated scripting.
- Run commands with sudo when you need privileges.
At this point, you can integrate Proxy-Seller easily. Proxy-Seller offers reliable, fast proxies supporting SOCKS5 and HTTP(S). Their network includes over 20 million residential IPs, ISP proxies, mobile proxies, and datacenter proxies. Whether you manage Ubuntu proxy server setups or automation scripts, Proxy-Seller scales with your needs.
Use Proxy-Seller's dashboard or APIs to manage proxy credentials. Then add those credentials to your export commands or proxy config files. This boosts reliability and security in your proxy setup, ensuring compliance and trustworthiness.
Configuring Proxy for Specific Applications in Ubuntu
You can configure proxy settings individually for applications to fine-tune traffic.
For HTTPS, use the corresponding variables or commands (e.g., https_proxy or git config --global https.proxy). You can unset or modify Git settings with git config --global --unset http.proxy.
Browsers like Firefox and Chrome manage proxies internally or via OS settings. Refer to their documentation.
Check each application’s manual pages for exact proxy instructions. Configuring proxies app-by-app ensures precise control when system-wide or user-specific proxy settings are unsuitable or unavailable.
Possible Problems
The problems that arise configuring proxies in Ubuntu can be the following nuances, which should be paid special attention:
- the inability to specify the proxy login and password, which requires authorization settings by IP address according to the standard scheme;
- due to the fact that some utilities do not work with global type parameters, special settings or a login and password are required.
In Conclusion
Regardless of the chosen configuration method, integrating a reliable provider like Proxy-Seller can enhance your setup with fast, secure SOCKS5 and HTTP(S) proxies, boosting reliability and security.
Ultimately, understanding the features and limitations of each method – from graphical settings to environment variables in files like /etc/environment and ~/.bashrc – allows Ubuntu users to establish a robust and tailored proxy solution. By paying attention to nuances like application-specific requirements and the need for IP-based authorization, you can overcome potential problems and ensure seamless proxy integration.