
 en
en  Español
  中國人
中國人  Tiếng Việt
  Deutsch
  Українська
  Português
  Français
  भारतीय
  Türkçe
  한국인
한국인  Italiano
  Gaeilge
  اردو
اردو  Indonesia
  Polski
 With such a large number of individuals connected via the internet, there is the possibility that some of them have malicious purposes like tracking your activities or stealing your data. Proxies protect your device from unnecessary ads, malware, and hacks. In other words, they shield you from the harshness of the internet while optimizing your online experience.
Therefore, understanding Windows 11 proxy settings will help you hide your IP address, bypass various blocks, and simply surf the Internet safely. Windows 11 operating system allows users to set up a new IP address to route their network through an intermediary server.
In this article, we will examine everything you need to know about Windows 11 proxy server and how to enable or disable it with a few steps.
While some people are familiar with such types of intermediaries, they may not know how to configure it on their personal computers. In this section, we shall explore a step-by-step guide on how to enable proxy settings in Windows 11.
Click on the “Windows icon” on your PC and scroll to “Settings.”
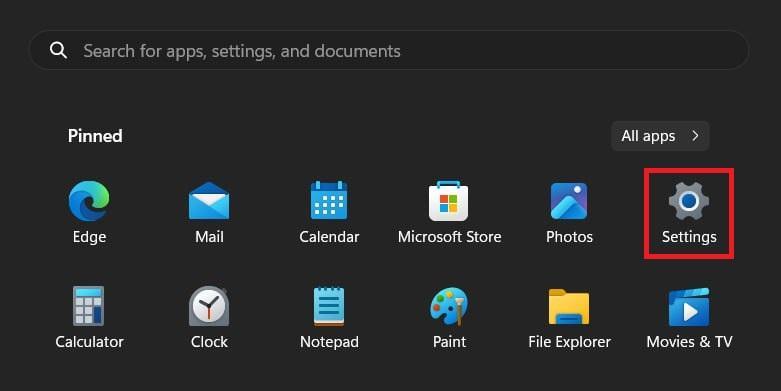
Scroll down to “Network & Internet” to access the configurations.
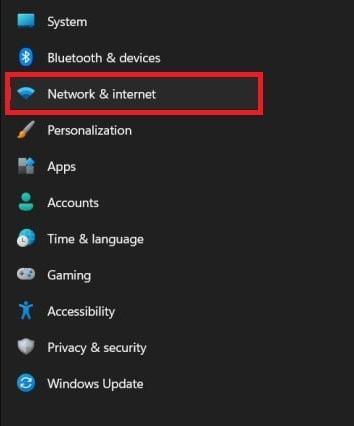
Then, scroll down until you find the “Proxy” option.
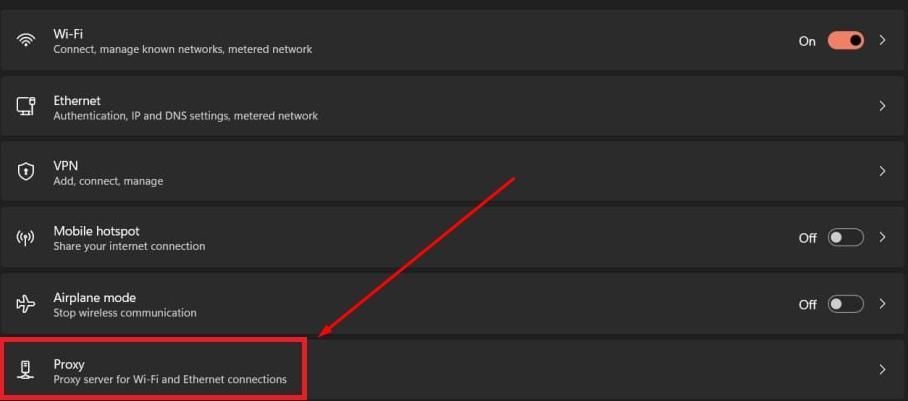
On this page, there are two options – Automatic and Manual setup.
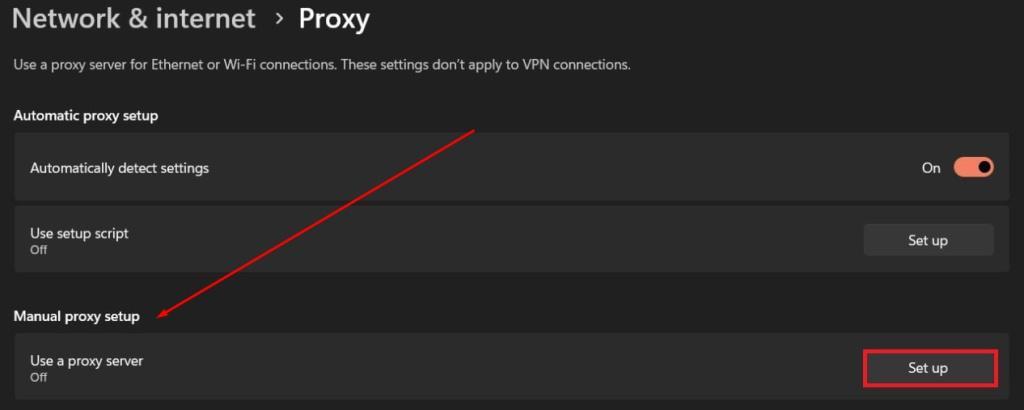
For this guide, we are working with the Manual option. Click on “Set up” as shown in the image above.
The next window that opens contains fields where you can enter the IP address and Port obtained from a reputable provider. Be sure to toggle on the button just underneath the “Use a proxy servers” option.
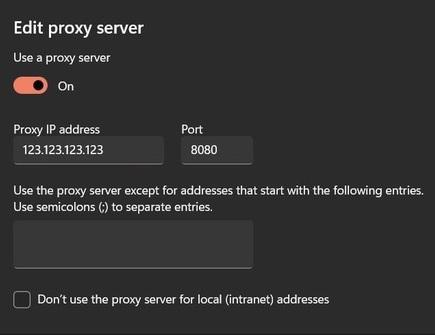
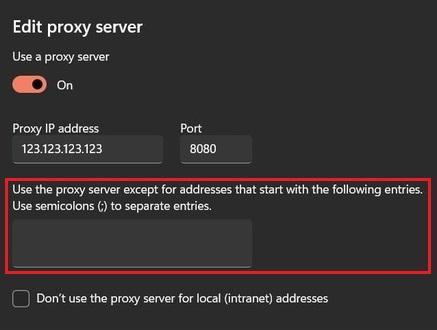
If you want to access certain websites directly, without an intermediary, you can list them in the “Do not use proxy server for local addresses.” Only do this for websites that you trust.
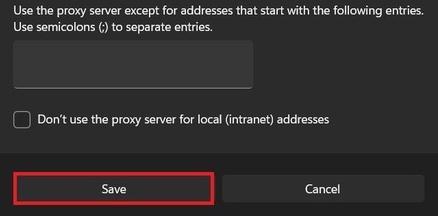
Lastly, click on the “Save” button to integrate the new IP. Now, you have successfully configured your Windows 11 proxy settings.
When you open your browser, an authorization window will pop up especially if you use a private intermediary. Reputable providers provide username and passwords for the access.
Before you start surfing the internet, it’s important to check your settings to make sure everything is working correctly for optimal privacy and security. Here are a few steps to confirm that the new IP is working well.
On your PC, go to Settings > Network & Internet > Proxy. Confirm that the toggle is enabled for the “Use a proxy server” option. In addition, check that the IP address and port correspond with those provided by your provider.
Various tools like My IP address can display your current one. If your intermediary is connected, it should be displayed instead of your actual IP address. However, if your original IP address is displayed then the traffic tunnel is not connected.
Go to your browser and visit any site. If pages fail to load or “Access blocked” is displayed, this may indicate a non-responsive intermediary. However, if the connection is secure and stable, you should be able to access websites that were previously restricted.
In the previous section, we have examined how to configure it on Windows 11. But, what if you are experiencing connection issues or you no longer need an intermediary? This section will provide instructions on how to disable proxy in Windows 11. The steps are pretty the same as when you setted it up – just in reverse.
Click on the “Windows icon” and open "Settings."

On this page, scroll down to “Network & Internet” then select "Proxy" from the menu.

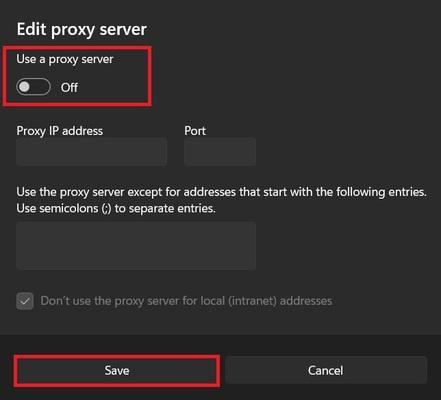
Next to "Automatically detect settings" move the slider to the "Off" mode. Next to "Use setup script" click on "Set up", in the opened window move the slider to the "Off" mode and click "Save". Next to "Use a proxy server”, click on the "Set up" button.
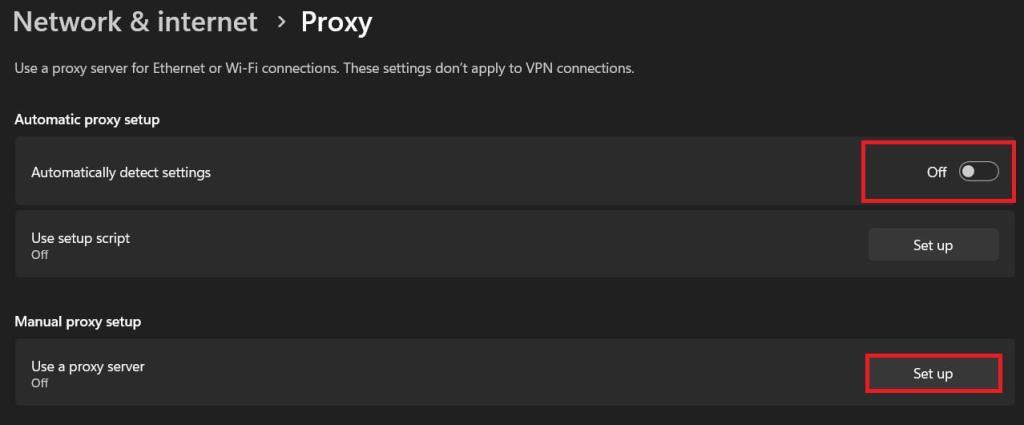
Disable the use of a middle server by moving the slider to the “Off” position. Click "Save" and exit the page.
We have examined what is a proxy server and how it works within the context of Windows 11, so here are some best practices for a smooth experience.
You can get many free options online. However, they pose serious security risks to your network. One of the limitations of a free middle server is that it is often public so a large number of people are connected to it, which significantly affects stability and connection. Instead, choose a premium provider that offers high-quality IP addresses for optimized privacy, security, and bypassing geo-restrictions.
Some websites are https while others are http-enabled. Even with your intermediary server, ensure that the website you are visiting is HTTP-enabled to maintain encryption. This is necessary to ensure your private data does not fall into the hands of malicious parties.
To get the most out of intermediaries, it's often essential to rotate your IP address. This means changing the masked IP at regular intervals to avoid detection, especially during tasks that involve multiple or repeated requests.
For dynamic rotation, consider using residential or mobile solutions – both provide a large pool of IPs that update automatically.
Residential ones work well for multi-account management and web scraping, while mobile intermediaries are ideal for high-trust environments like social media automation or ad verification.
Users may encounter some issues even after successful network configuration. Here are some of the most common challenges and practical steps to fix them.
If the authorization window keeps appearing, you may have entered incorrect details. Confirm the username and password to check for any extra space, symbol, or case issues. Bear in mind that only private intermediary servers require a username and password for authentication before you can access the internet.
A good intermediary network should optimize connection speeds. However, if you notice a decline in connection speed, it could be an indication of a bottleneck. To confirm this problem, use tools like Fast.com to check your connection speed. If the network speed is slow, disable the middle server, wait for about 60 seconds, enable it, and test the speed. You may need to contact your provider to change the intermediary IP if the speed is still slow.
These messages often pop up when the IP has been blacklisted by the website. Alternatively, the content is not available at the location of the intermediary address. To fix this issue, contact your provider for another IP, preferably from a different location. Due to situations like this, most premium services offer automatic IP rotation to ensure an uninterrupted internet connection.
This guide has examined how to set up a proxy server on Windows 11 and how to disable it. When you enable a proxy server for Windows 11, you can boost your security and privacy with intermediaries. Therefore, websites you visit do not see your actual IP address so your location will be undetectable. As a result, you can easily bypass geo-restrictions, access blocked content, and avoid tracking by third-party ads.
We hope that at this point, you can enable or disable proxy server Windows 11 with its built-in features. While intermediaries have numerous advantages, you can easily disable them if you no longer need them. Always double-check the middle server details to ensure you have not entered the wrong details. Finally, choose a reliable provider for premium IPs that allows you to surf the internet without fear of malware, tracking, or data theft.
Comments: 0