Mac OS DNS server Configuration

Comments: 0

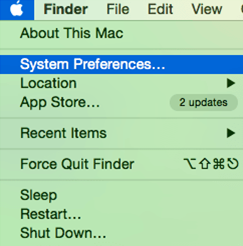
DNS servers are always provided to the user by his Internet provider. However, they may be unstable. If you often see DNS errors on your computer or cannot open websites, you need to switch to third-party services.

What gives a change of DNS server on a MacBook?

Using third-party services allows users to:

  • Increase the speed of the Internet;
  • Eliminate DNS errors;
  • Protect the device from phishing sites;
  • Visit sites blocked in your country;
  • Enable filters (children will not be able to open porn sites) of web content.

And now, find out TOP 10 public DNS Servers.

How to change DNS settings for Mac OS X?

  1. We will consider in detail how to change the DNS server for MAC OS X. There is nothing complicated about this. To change the OSX DNS server, click on the Apple logo. When a menu appears on the screen, select "System Preferences" from it.
  2. Click on the Apple logo. When a menu appears on the screen, select «System Preferences» from it

  3. A window will open in which you need to find "Network".
  4. Find «Network»

  5. The ”Network” window will appear. Select "DNS", it is necessary to click on "+". This will highlight the DNS server for Mac.
  6. Select «DNS», it is necessary to click on «+»

  7. If you want to replace it or add an alternative IP address, use the “+” sign again.
  8. Use the «+» sign again. Press «OK»

  9. As soon as you click “OK”, the new Mac DNS configurations should take effect. If you see that nothing happened, reboot the device.

What numbers to enter?

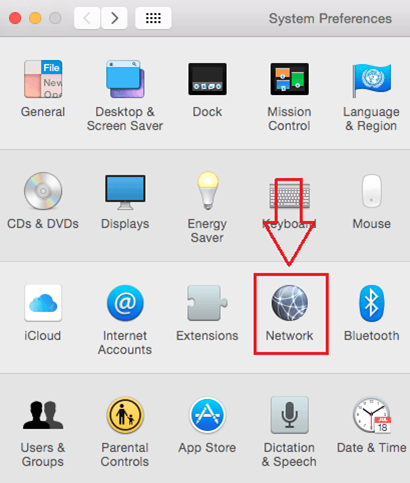
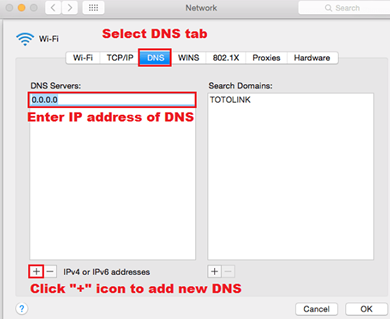
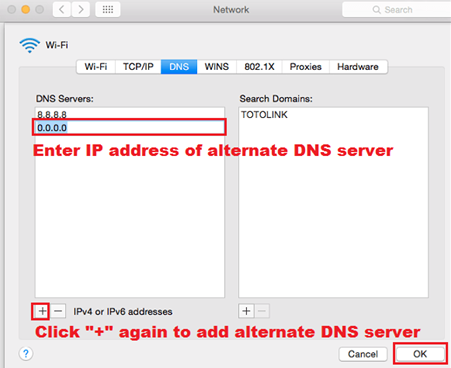
It all depends on the chosen DNS server for Mac:

  • For Google Public, you must list two entries. The first (8.8.8.8) is indicated in the last picture. In the second, the last two eights change to fours;
  • For OpenDNS, the first address will be 208.67.222.222. In the second, the numbers 222 change to 220.

Now you know how to change the DNS server on MacBook Pro. If you slow down your connection to the global network or have problems opening any sites, try applying these settings.

Comments:

0 comments