
 en
en  Español
  中國人
中國人  Tiếng Việt
  Deutsch
  Українська
  Português
  Français
  भारतीय
  Türkçe
  한국인
한국인  Italiano
  Gaeilge
  اردو
اردو  Indonesia
  Polski
 As crucial elements of infrastructure, public DNS servers perform the essential function of translating domain names into associated IP addresses, allowing users on the internet to access specific websites. The most important benefits of using such servers are faster internet access, heightened security, and the ability to bypass geographical restrictions on certain content. Users may decide to change their settings in order to enhance their overall experience, so this article will be considered the top 10 public DNS servers solution at this moment.
Here’s a brief overview of the best public DNS servers to use, each known for its distinctive features and benefits:
Addresses: 8.8.8.8 and 8.8.4.4
Google provides the fastest public DNS servers, and his sharply reduced latency times for browsing make it especially favored amongst users. Along with speed, it boasts unrivaled security, protecting users from the growing threat of DNS cache poisoning. It is also renowned for enhanced protective measures against most internet threats.
Addresses: 77.88.8.8 and 77.88.8.1
Yandex.DNS has three modes to choose from – Basic (no filtering), Safe (protection from infected sites), and Family (blocking adult content). This surely comes in handy for parents and educational institutions that wish to impose stronger browsing restrictions, and individuals who prioritize increased security.
Addresses: 208.67.222.222 and 208.67.220.220
Open DNS is one of the best free public DNS servers for its excellent phishing protection. In addition to this, it allows the user to set up parental controls which enable them to filter content and ban certain websites. This makes the service great for households with children and organizations that have to protect against online threats.
Addresses: 8.26.56.26 and 8.20.247.20
This service specializes in blocking access to dangerous phishing, malware, and spyware websites. This service is recommended for users who do not have any protective tools on their devices, as it adds an additional layer of security.
Addresses: 156.154.70.1 and 156.154.71.1
This one aims to achieve powerful performance and security with minimal threats and downtime. It's Ideal for businesses which need guaranteed DNS services accompanied by security functionalities to protect sensitive information.
Addresses: 209.244.0.3 and 209.244.0.4
This one is popular for both its fast routing capabilities and exceptionally stable connections with low latency over time. This service is best suited for business and those who expect dependable, high-watt performance from their Internet services.
Addresses: 84.200.69.80 and 84.200.70.40
Such service is a no-log privacy one which specializes in keeping user information secure and untracked. This is a barebones solution for users who need a straight-forward service without any extra features, and meets the need for anonymity and simplicity.
Addresses: 9.9.9.9 and 149.112.112.112
Quad9 integrates performance with security by blocking malicious domains, ensuring user privacy is not compromised. This is a perfect solution for users and businesses wanting malware phishing protection without needing additional software.
Addresses: 1.1.1.1 and 1.0.0.1
Cloudflare claims to be the fastest and one of the most popular public DNS servers in the web and focuses on privacy above all else. It does not keep client personal data or information, and does not sell data, making it very attractive to people who care about privacy.
Addresses: 185.228.168.9 and 185.228.169.9
CleanBrowsing has a strong family safe service which blocks adult content and is aimed to make the internet safer for children. This is very useful for parents and schools who wish to limit their children’s exposure to inappropriate content.
As discussed earlier, using free and public dns servers can dramatically change the way you surf the web. We investigate the benefits along with the downsides to reach an informed decision.
Pros:
Although public DNS servers can improve speed and reliability and help bypass certain geographic restrictions, it’s important to understand their limitations. DNS handles domain name resolution but does not change your IP address or provide full control over traffic routing.
In practice, tasks requiring stable connections, IP rotation, precise geo-targeting, or higher anonymity cannot be solved with DNS alone. In such cases, DNS is usually combined with private proxies that manage traffic routing and IP address control.
Cons:
The provided strengths and weaknesses focus on the fact that public DNS servers can be beneficial in areas such as speed, security, and privacy, but adds the risk of numerous considerations that the user must take into account.
When using external proxies, unstable connections are not always caused by the server itself. In some cases, issues arise during DNS resolution, causing sites to load slowly or remain inaccessible. As a first diagnostic step, it’s often recommended to replace the provider’s default DNS servers with public DNS from the list above.
If the issue persists after changing DNS, it may indicate that the selected proxy type does not fully match the task. DNS handles domain name resolution, while proxy servers manage traffic routing and IP assignment. For a stable connection, both components must work together.
For instanse, stable browsing and access to geo-restricted sites, static IP addresses are commonly used because they provide predictable behavior and minimal connection drops. That’s why these scenarios usually rely on ISP proxies, which combine datacenter stability with a higher trust level than standard server IPs.
However, not all tasks are limited to static access or simple content viewing. In some cases, how target platforms perceive the traffic source and the ability to change IPs without quality loss become critical.
For such scenarios—where IP rotation, real-user behavior simulation, and higher site trust are required—residential proxy is typically used. It relies on IP addresses from real devices and networks.
It shows that public DNS servers can improve stability and access speed, but they represent only part of the network stack. For predictable operation under geo-restrictions, high load, or reliability requirements, you must consider the entire connection chain, not just DNS settings.
Thanks to its internal settings one can modify DNS through system settings easily, without needing to download anything. To do so, follow these universal steps for each of the platform:
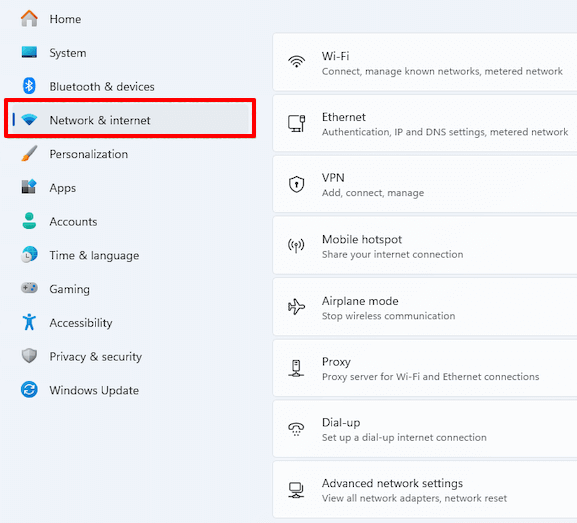
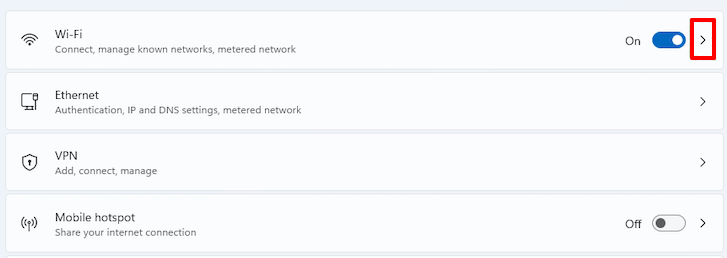
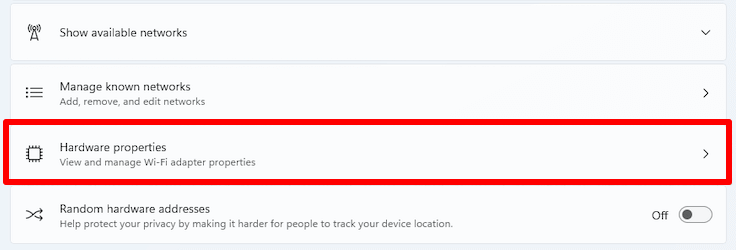
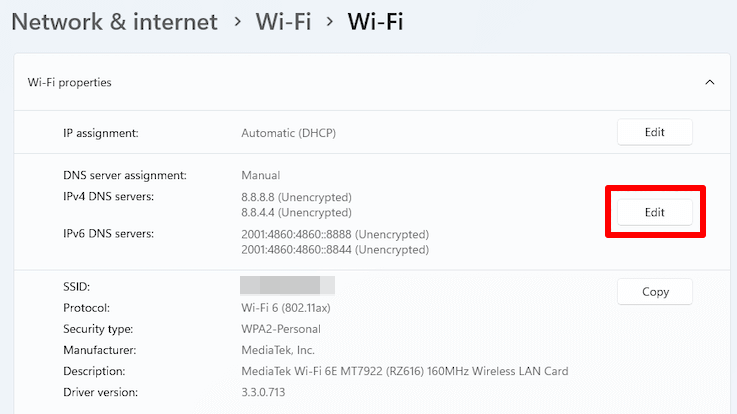
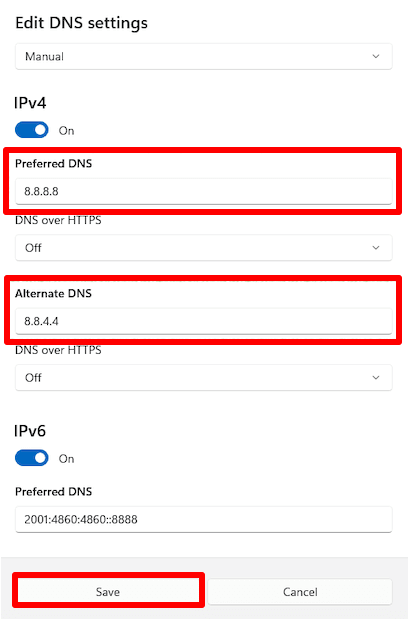
Once done, press the “Save” button. That’s it.
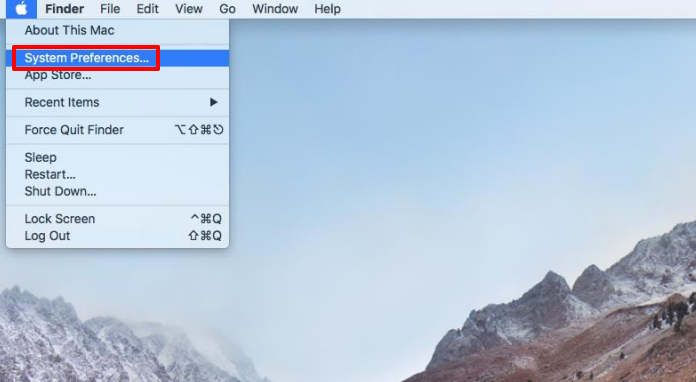
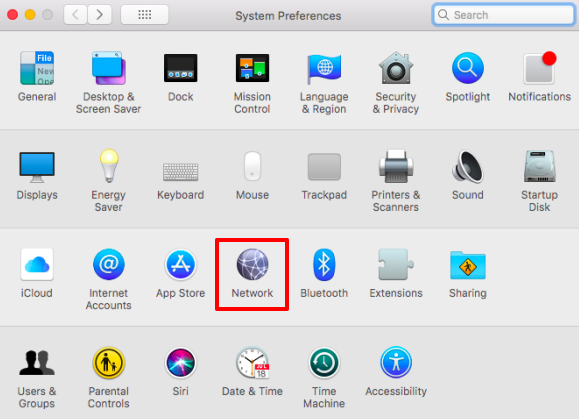
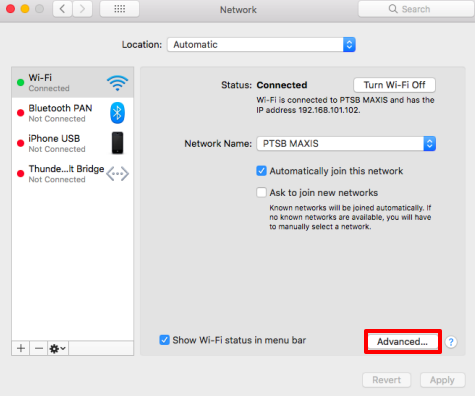
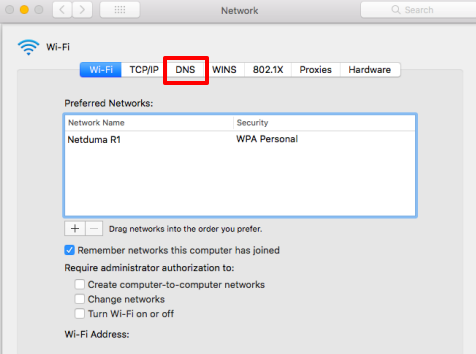
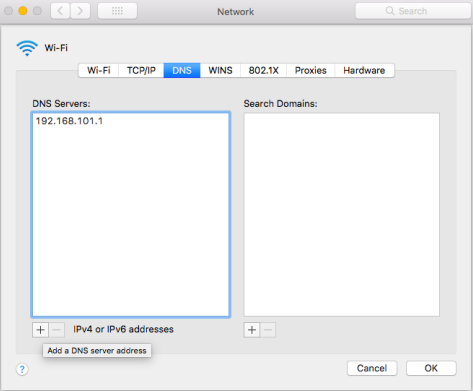
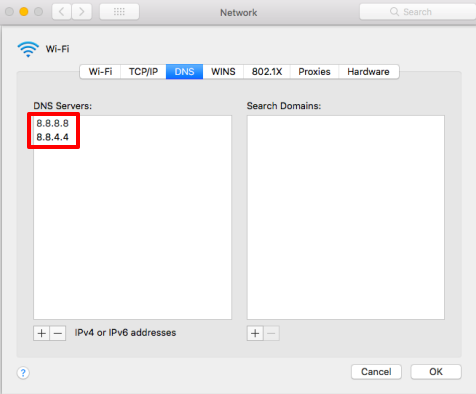
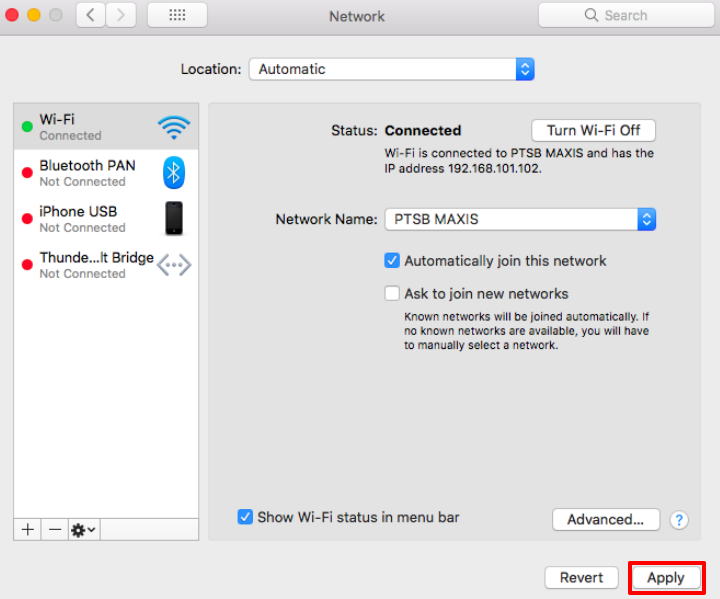
That’s it, the setup is complete.
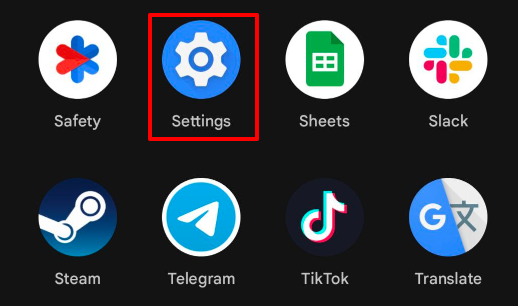
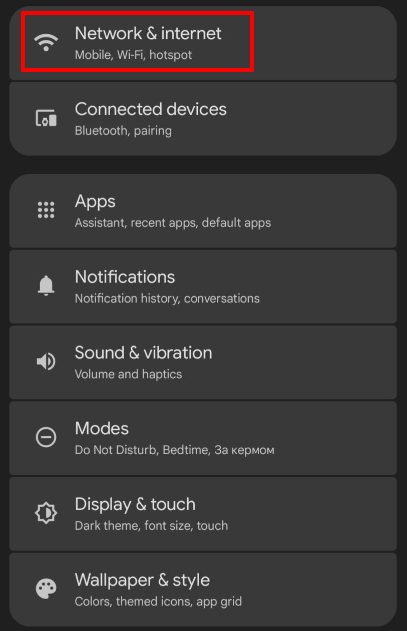
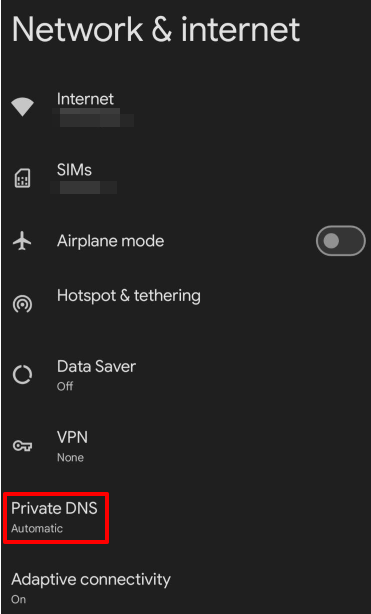
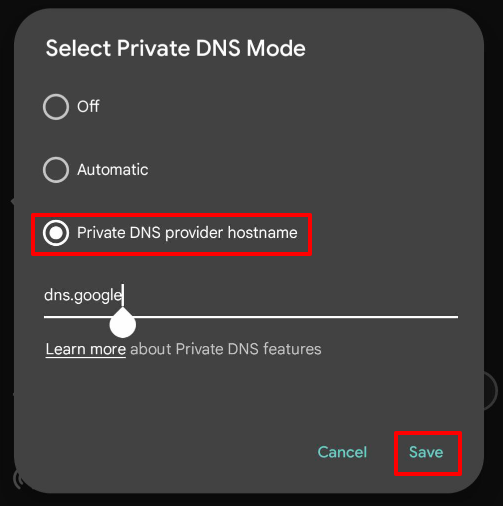
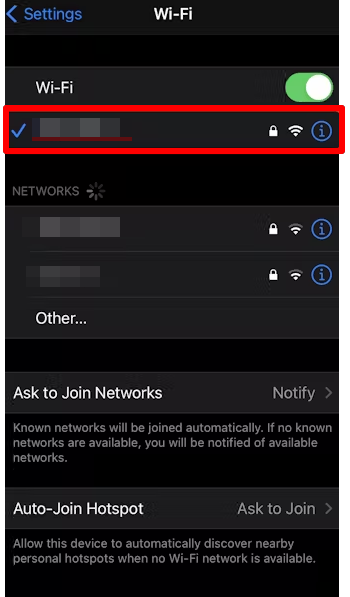
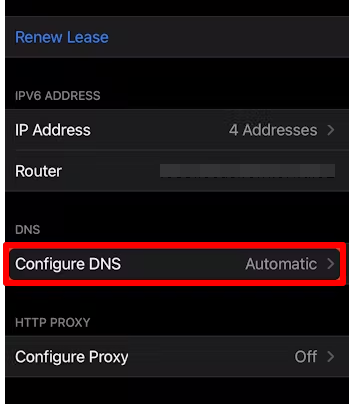
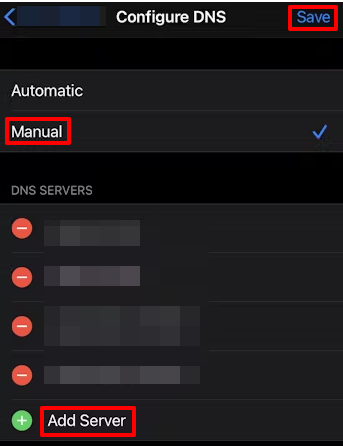
Once information is inserted, tap on “Save” and that’s it.
With tools like nslookup, dig, and Namebench, you can test the speed and latency of your public DNS servers. Each of these tools offers a unique perspective which can be useful in evaluating the efficiency and dependability of a DNS server.
nslookup is a command-line tool that enables you to query DNS servers to obtain the IP addresses associated with domain names. It's a basic tool for diagnosing them.
How to use it:
dig (Domain Information Groper) offers more detailed information about DNS queries and responses. This tool is perfect for those who need detailed insights into the domain name resolution process.
How to use it:
Namebench analyzes the performance of various servers based on your location and internet connection and helps find the fastest one.
How to use it:
These tools will assist you in evaluating the performance of your server, understanding its speed and latency, and choosing the best DNS server for your needs.
In this article we considered top public DNS servers and the ways to set up them. The importance of choosing the appropriate one is evident in areas such as browsing speed, security, and access to geo-restricted content. Since all public services are not created equal, you must put in the extra effort to select one that meets your needs from the myriad available services.
Comments: 0