
 en
en  Español
  中國人
中國人  Tiếng Việt
  Deutsch
  Українська
  Português
  Français
  भारतीय
  Türkçe
  한국인
한국인  Italiano
  Indonesia
  Polski
 For users seeking to improve their security online, bypass region restrictions, or surf the internet anonymously, setting up a proxy on macOS is a vital step. This guide aims to assist you in configuring a macOS proxy settings to allow for effective and secure access to web resources.
The protocol types most frequently used within macOS are HTTP, HTTPS, and SOCKS.
Let's study these more deeply to know their tasks, differences, suited usages, and how to pick the right one.
HTTP operates at the application level of the network architecture, transmitting and receiving unencrypted requests. It transmits and fetches requests as well as caches pages to improve loading speed and only provides IP masking. It is primarily used for bypassing IP-based restrictions.
HTTPS is in its simplest form HTTP, but with an added layer of encryption. HTTPS works slower than HTTP, but data exchanged through it is encrypted using SSL or TLS certificates further shielding man-in-the-middle attacks. Communication of sensitive personal data through safer browsers makes use of this protocol.
Unlike the two preceding methods, SOCKS functions at the session layer of the network architecture (below the application layer). A SOCKS proxy establishes a TCP or UDP connection, and simply forwards traffic without modification or inspection. Its performance is faster than data sending over HTTP or HTTPS because it does not offer identifiable user information at the application level. It is compatible with all internet traffic, notably when considerable data transfer is required in a short period of time, as is the case in online gaming or torrent downloading.
First, let’s find out how to configure an HTTP(S) proxy on macOS:
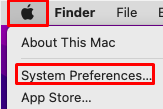
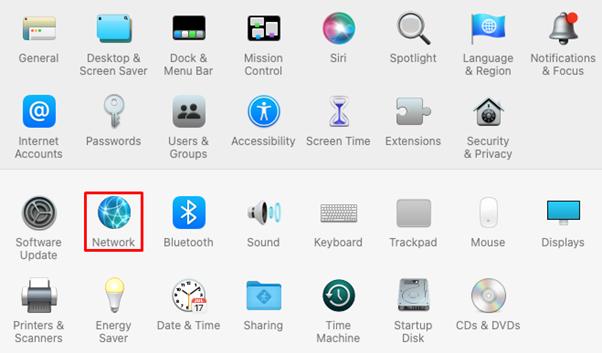
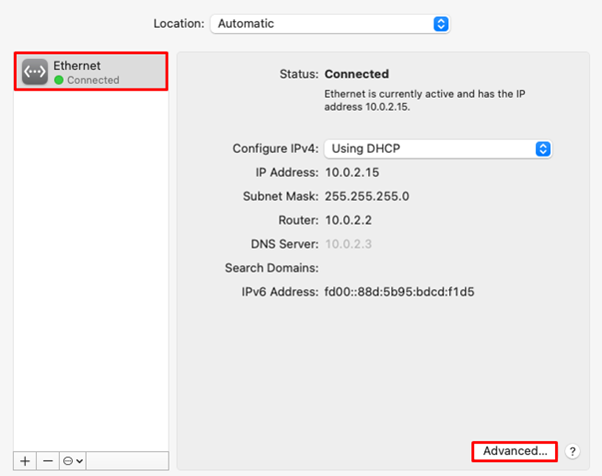
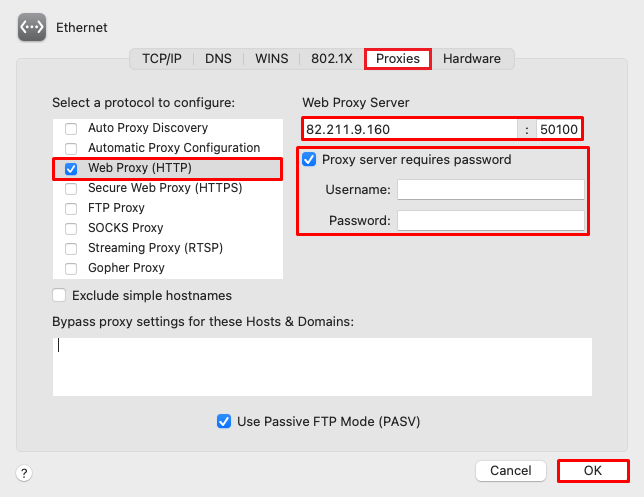
The steps for setting up a SOCKS on MacOS are quite identical to that of HTTPS. From the list of protocols under the “Proxies” section, enable SOCKS protocol. As in the previous section, fill in the necessary credentials such as IP address, port, username, and password.
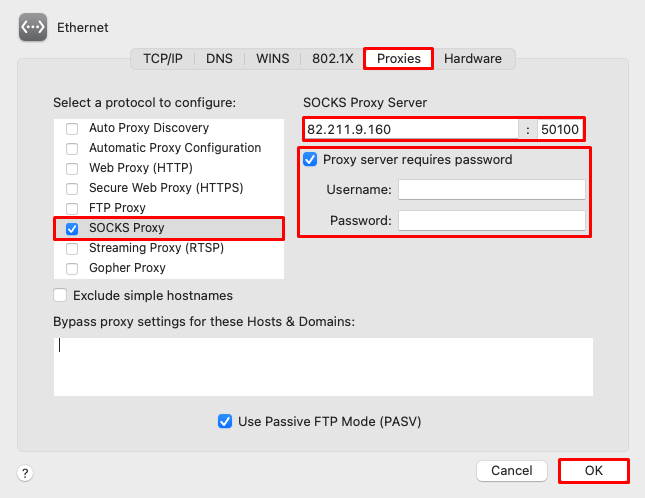
In this case, it should be emphasized that the settings configured here are applicable to all macOS applications uniformly without exception.
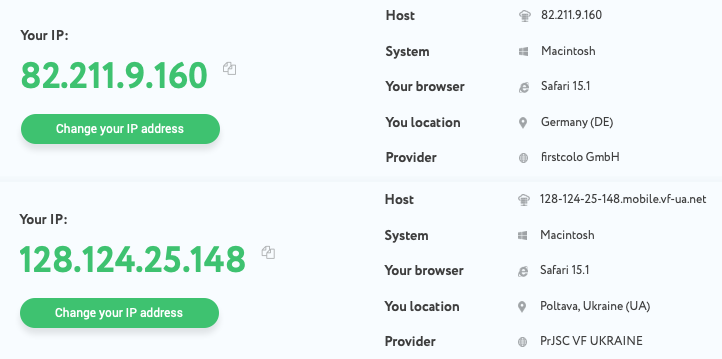
It is usually advisable to check if the server's functionality is working as intended after entering all the specified parameters. On Mac it can be checked using web-based services - for instance, a proxy checker.
Have a close look at what is displayed. You should observe changes to your current host, ISP, and geolocation before and after the proxy is used. If those remain constant, that means the server is not functional. In this case, it would be wise to check the parameters again.
The terminal can also be used for this purpose. With the traceroute command, one can track all the hops of the net towards the specified server.

Your anonymity and security relies on an effective server usage. Keep the following tips in mind while selecting one:
MacOS proxy settings are simple and don't involve complex technical skills. While configuration is simple, it greatly improves the user’s combination of security, privacy, and over restriction circumvention. It can be of great help in accessing blocked sites while ensuring that personal data is protected, especially in public Wi-Fi networks.
Because configuration is system-based, it instantly applies to all applications, ensuring enhanced convenience and consolidated functionality.
Comments: 0