 en
en  Español
  中國人
中國人  Tiếng Việt
  Deutsch
  Українська
  Português
  Français
  भारतीय
  Türkçe
  한국인
한국인  Italiano
  Gaeilge
  اردو
اردو  Indonesia
  Polski
 In this article we will cover the fundamentals of RankerX proxy configuration, touching on its importance as well as the benefits of utilizing high quality private proxies with this SEO and task automation tool. There also will be additional tips involving usage of different types of proxies.
RankerX is a powerful piece of SEO software that aids in improving ranking on search engines through automation of various tasks and link building techniques. As for proxy integration, RankerX users can hide their real IP addresses to prevent being flagged and banned by search engines. This is important to SEO specialists who deal with multiple campaigns simultaneously because they can perform these tasks without being blocked by spam filters.
The purpose of the SEO campaign will determine what type of service will be used. Knowing the difference between residential, datacenter, and mobile proxies will make a huge difference in the success of your campaigns.
Residential proxies are obtained from real life users which makes them harder to detect and block for search engines. This is important for actions that require to emulate real user actions such as conducting organic searches or even content strategy localization.
Datacenter ones are available in large quantities since they are located in server rooms from around the world. These proxies have unlimited capabilities for connecting and processing information. They cost less than other types and are beneficial to bulk scraping and data fetching that require massive speed increases.
ISP proxies, blend the best features of both residential and datacenter ones. They are hosted on networks owned by official ISPs, yet they offer the high speeds and reliability typically associated with datacenter proxies. This combination makes ISP exceptionally effective for SEO activities where both speed and the appearance of coming from a genuine user are essential.
Mobile proxies, in contrast, offer the highest level of undetectable privacy. These pass traffic through mobile networks, which makes them suitable targets for mobile driven SEO campaigns. They also help optimize search engine rankings for mobile devices and are critical for campaigns directed at mobile users.
What type of proxy server for RankerX to use is a matter of what your SEO needs are for anonymity, geographic targeting, and how much data needs to be processed in what timeframe. All proxies have their pros and cons, and these can be set to benefit the outcome of your SEO strategy.
As with any software, RankerX proxy settings are done with some steps that have to be followed sequentially.
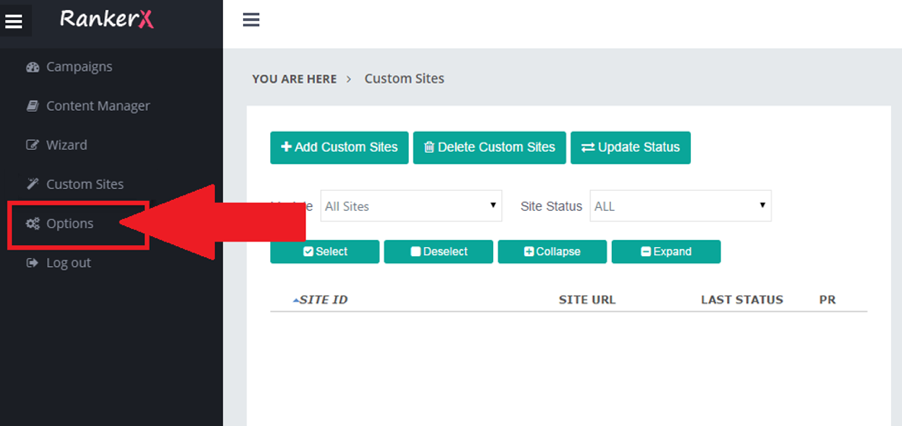
To set a proxy, RankerX needs to be opened and the “Options” section selected first. It is from this section that you are able to configure RankerX and proxies, among other things.

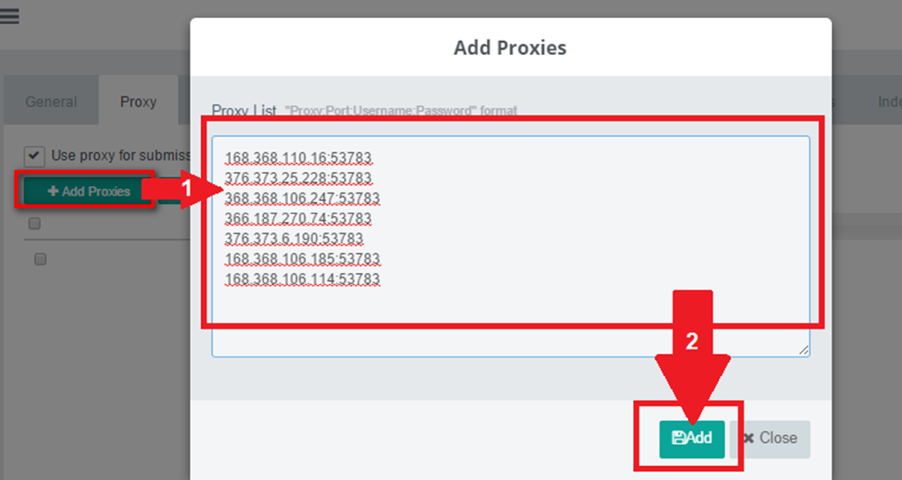
Then, the “Proxy” tab should be selected. You can now configure new proxies or edit old ones to your preferred choices. To start off, activate the checkbox displayed on the screenshot below and press the add button next.

RankerX allows you to add proxy servers in a single way or provide them as a list.
In this step, fill in the required details for your server, such as the IP address, port, and any necessary authentication information like username and password separated by the column. Make sure to input the correct details provided by your provider. After entering, hit the “Add” button.

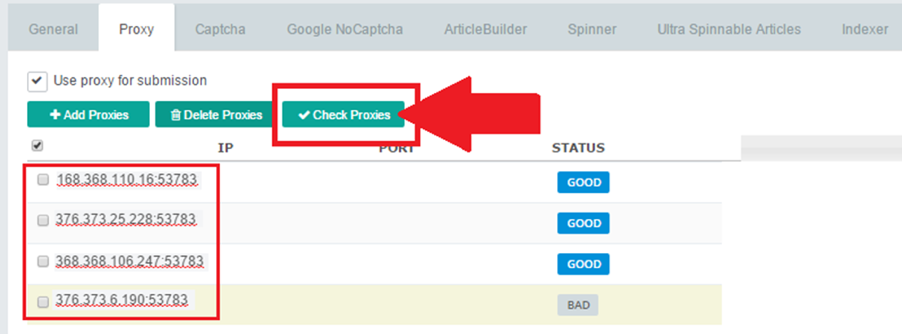
Once you have filled in the details, it is now time to test if proxies implemented to RankerX work. This step is crucial as you want to make sure the server works properly and can execute SEO tasks without issues arising. Simply press “Check Proxies”.

That’s it, if they are working properly you can start working with them and be sure there are no further difficulties.
The aforementioned points lead us to the conclusion that the proper configuration of RankerX with proxy is crucial when dealing with extensive SEO processes. Remember, that private proxies, such as ISP, Mobile, Residential will be excellent choices as they provide high trust-level and are less likely to be banned. To ensure protection and remain undetected, it is also wise to frequently switch IP addresses.
Comments: 1