 en
en  Español
  中國人
中國人  Tiếng Việt
  Deutsch
  Українська
  Português
  Français
  भारतीय
  Türkçe
  한국인
한국인  Italiano
  Indonesia
  Polski
 This extension offers a streamlined interface suitable for users with minimal technical experience. The setup process is designed to minimize complexity, allowing users to quickly apply connection rules without advanced configuration. Therefore, we will examine a step-by-step guide on proxy settings in Simple Proxy extension, how to activate it on Chrome, and common mistakes to avoid when configuring them.
Configuring the proxy settings in Simple Proxy extension is straightforward even if you have limited technical knowledge. This section provides step-by-step instructions for the Simple Proxy setup.

To start, visit the Chrome Web Store on your computer. Enter the name of the extension and click on the search icon. Once the extension pops up, click Add to Chrome.
After installation, the icon will appear in your browser’s toolbar. Click on the icon to launch it and start your Simple Proxy configuration.

This is the step where you will configure proxy settings in Simple Proxy. Click on the extension icon to expand the options.
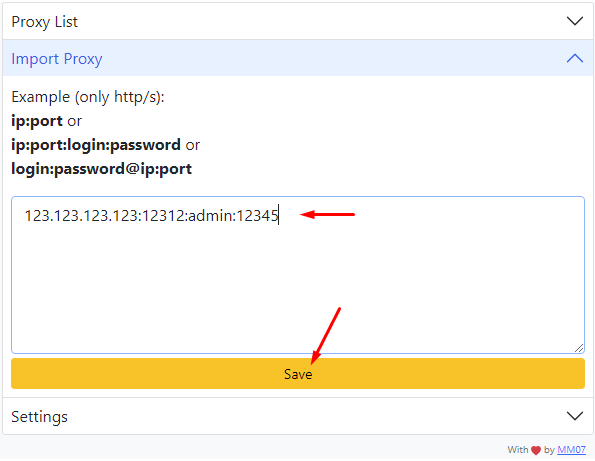
Here, click on the Import Proxy option to add a new intermediary server to it.

When you get an intermediary server from a reputable provider, you get three things:
For this step, enter the authorization details in the fields provided and select Save.

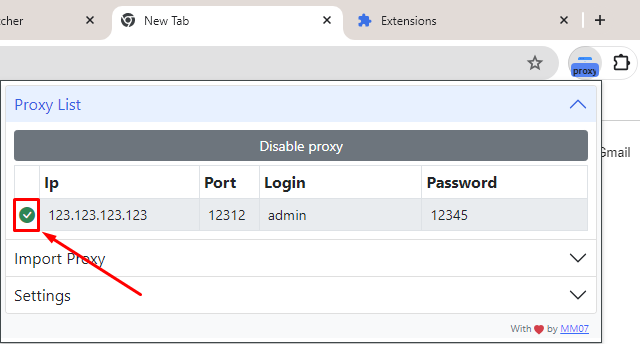
Once you save the details, it will appear in the Proxy List tab. Now, you need to Enable it if you want to hide your actual IP address. To do this, check the box next to your preferred server.
If you have gotten to this stage, your new IP is active and your network is routed through an intermediary server. As a result, your IP is masked during browsing, which may reduce exposure of personal data.
N.B: Before you visit any website, visit “My IP address” to confirm that your original IP is not visible. If the new IP address is displayed, your connection to an intermediary server has been established.
Although setting up this addon is easy, users often encounter a few mistakes during configuration. This section will explore those common mistakes when setting it up and some practical tips to fix them:
One of the most common mistakes is typing the wrong details including the IP address, port number, or authentication details (username and password).
To fix this error, double-check the entered details. Look out for any extra space or wrong addition to the details field.
Another common mistake is trying to enable proxy in Simple Proxy extension to an expired server. This often happens when you connect to a public server that has reached its usage limit or has been deactivated. Subsequently, when you connect to the internet, your IP address is not anonymous so, third parties can track your activities.
To avoid this problem, ensure you get a server from a reliable provider. They have a large IP pool to ensure you always have fresh IP details as necessary. In addition, test your new IP to ensure it is connected before you start browsing.
Other browser extensions may interfere with the configuration of the Simple Proxy. For example, if you have VPN extensions on the browser, you may need to deactivate them as they may trigger performance issues. Be sure to restart your browser and enable the new connection before you start browsing.
Cookies are small data packets that websites use to display personalized content. When you don’t clear your browser’s cookies and cache history, websites may still display content based on previously cached data. To fix this, clear the browser’s cache and cookies before adding a new server.
Understanding these potential issues when setting up this plugin ensures a smoother and safer browsing experience.
Configuring proxy settings in Simple Proxy extension is a way to mask your IP address and reroute traffic through another server. Such a solution offers anonymity and privacy. In addition, using an intermediary allows you to bypass geographical restrictions and access blocked content.
A well-set-up addon ensures reliable, anonymous, and stable access to the internet. Whether you are scraping online data, managing multiple social media accounts, or bypassing restrictions, configuring your proxy settings in Simple Proxy guarantees smooth operations.
Finally, always double-check your inserted details, don’t forget to activate the server itself, and get it from a reliable provider for optimal performance. When you buy a proxy for browser operations make sure there is support for HTTPS connection, keep this in mind before purchasing.
Comments: 0