Setting up a Proxy in the GoLogin Anti-Detect Browser

Comments: 1

GoLogin is an anti-detect solution that is straightforward and user-friendly, mostly preferred for managing multiple accounts for:

  • Marketing – running advertising campaigns in SMM and SEO and traffic arbitrage;
  • Advertising testing – checking ad impressions from unique geolocations and devices on different audiences;
  • Cryptocurrency arbitrage – safely managing multiple wallets and exchange accounts;
  • Development – website testing, and data scraping.

The all-in-one nature of the browser makes it effective for personal and company use. GoLogin proxy setup enables integration to assign selected profiles with them. The use of such servers will help minimize the chances of account blocks, bypass region based web restrictions, and improve online security and privacy. GoLogin anti-detection setup will be provided in the following blocks.

Why Using Proxy With GoLogin?

When you are online, especially when operating multiple accounts, the GoLogin proxy setup has its merits while working online:

  • Anonymity and privacy. Proxies are important for altering IP addresses. They make it possible for a person to surf the web to mask their actual identity and region using a computer located thousands of miles away. This is very helpful for people who do not want to share their online activities and personal details with anybody.
  • Enhanced security. By routing your proxy connection in GoLogin through a specific IP address, you add an additional layer of security between your device and the websites you visit. This protects you from direct attacks and cuts the possibility of a data breach because those attackers do not have access to the user’s IP address.
  • Multiple account management. GoLogin is well liked by users who seek to manage multiple accounts at the same time. Using them can mitigate the risk of account bans or suspensions that are common because of multiple account logins sharing the same IP address. Every server assigns a unique IP address to each account, which makes it seem that each account is managed from different places; this assists in evading systems designed to detect and eliminate duplicate accounts.
  • Avoiding restrictions and bans. If certain websites pose geographical limitations or IP-based restrictions, using a GoLogin proxy setup could eliminate the obstacle by presenting an IP from a desired location. This feature is vital for users who wish to use content or services limited to certain areas.

In general, if configure a proxy through GoLogin it enhances the manageability of one’s online presence while simultaneously improving the user’s operational capabilities and ensuring privacy and security.

Video Guide for Setting Up a Proxy in GoLogin

Step-by-Step GoLogin Proxy Setup

This GoLogin setup guide proxy will take you through the process of configuring and verifying the functionality of your setup. Let’s start.

Accessing Proxy Settings in GoLogin

The process starts with launching the browser and clicking the “Add Profile” button in the top right corner.

1.png

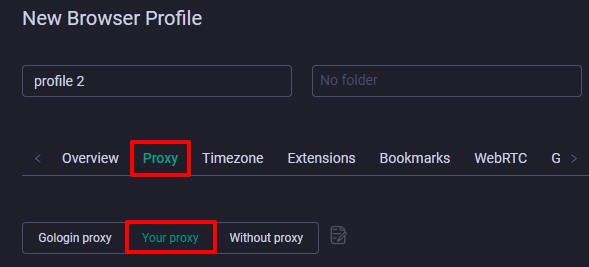
In the new window set a name for the profile and proceed to the “Proxy” tab. Here, choose the “Your proxy” option.
2.png

Selecting the Right Type

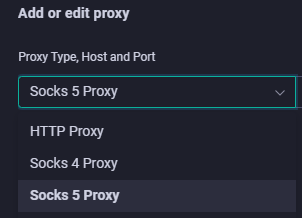
Browser allows the use of multiple types of protocols such as HTTP, Socks4 and Socks5. Depending on your requirements, some are more suitable than others:

  • HTTP: take these when you need them for basic web surfing purposes as they offer a good chaable of speed and privacy;
  • Socks4: these ones allow for TCP connections without authentication. They are suitable for simple activities when the different IP address is enough to mask the location;
  • Socks5: most suited for users that require heightened security and perform more complex activities like multiple types of traffic other than HTTP. Socks5 ones are more advanced as they can accept both TCP and UDP connections, and some may permit authentication, thus enhancing security.

For this GoLogin proxy setup we’re gonna use Socks5 this time.
3.png

Adding Credentials and Testing the Connection

The following stage will be to fill out the credentials required:
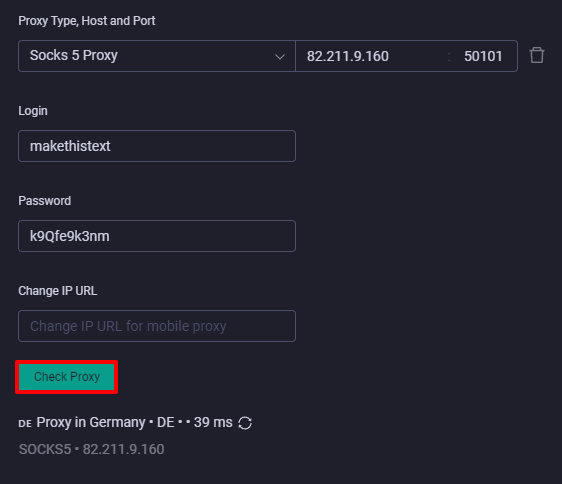
  1. Input the IP address and port number of your server.
  2. If authentication is required, enter the username and password.
  3. Double-check all the information provided at this stage to avoid issues with connecting.

    4.png

Once done, testing the connection is essential to ensure it works correctly. Press the “Check proxy” button below.

That’s it, the proxy settings in GoLogin are done. You can proceed to finish creating a profile.

GoLogin Multiple Proxy Integration Guide

If you need to handle a lot of servers the next block will be pretty handy.
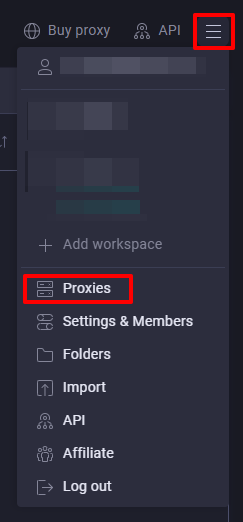
  1. In the right corner click on the menu button and then proceed to the “Proxies” section.

    5.png

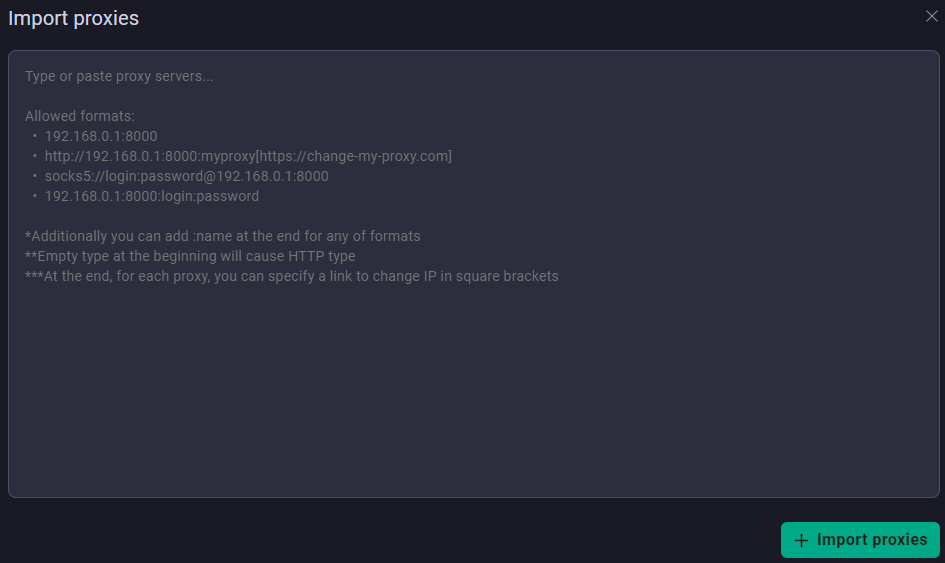
  2. Here, you will be able to import the list.

    6.png

  3. You’ll get the tips on how to import it properly. Make sure you follow its recommendations to avoid any proxy failure in Gologin.

    7.png

Now, when you create a new profile you’ll have the option to choose from this list and employ a specific server for a specific profile and task.

GoLogin Proxy Setup: Conclusion

As we have seen, integrating a proxy server with the GoLogin browser is very important for any user who needs to maintain anonymity online and operational security. Managing multiple profiles with unique IP addresses configurations enables users to circumvent geo-restrictions and minimize the risk of account detection and blocking. This is particularly useful in highly private environments like digital marketing, cryptocurrency management, and competitive intelligence gathering. With the increasing intricacy and scrutiny of digital environments, professionals using GoLogin and its proxy integration features are placed in a privileged position relative to their competitors, giving them the ability to protect and conceal their digital activities.

Comments:

1 comment

Shadrack
I need the best