 en
en  Español
  中國人
中國人  Tiếng Việt
  Deutsch
  Українська
  Português
  Français
  भारतीय
  Türkçe
  한국인
한국인  Italiano
  Gaeilge
  اردو
اردو  Indonesia
  Polski
 The Undetectable can be qualified as a browser that assists a user’s activity to remain hidden. The primary function of this is that not only can it change several browser fingerprints but also has the control for working on many profiles at the same time. It is important to note that alongside setting up the profiles in Undetectable private browser, proxy configurations are made allowing a user to further ensure anonymity as well as overcoming geoblocks.
The Undetectable browser is mainly used in web scraping to circumvent limitations and bans when collecting data. In addition, it’s employed in ad verification to ensure that ads are shown as they should be in different areas, and in affiliate testing to review affiliate and landing pages without revealing its affiliation. All these use cases are working properly only in case there are proxy servers used by users with the Undetectable browser.
With the help of this “how-to” guide, it will be possible to set up a proxy in the Undetectable browser properly. Screenshots are also provided for additional convenience and understanding.
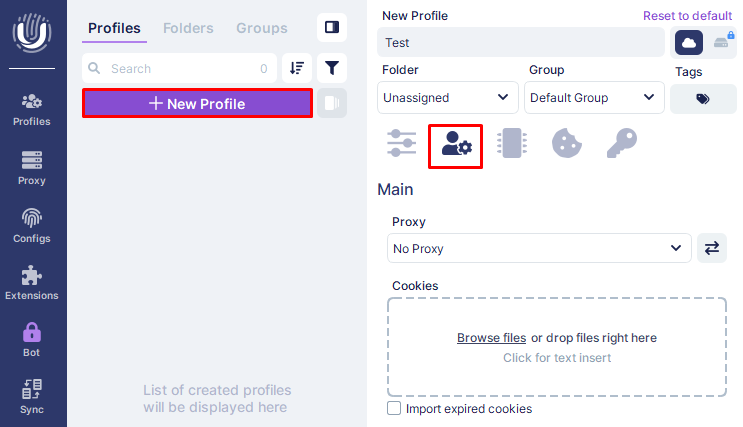
Head over to the homepage of the Undetectable browser and click on the “New Profile” button to start creating a new profile. Enter the necessary basic details required of the profile. To reach proxy settings itself navigate to the “Main” tab.

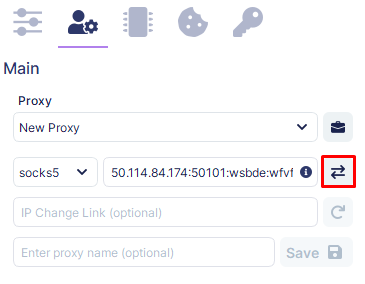
In the “Proxy” section, select the “New Proxy” option. Choose the protocol of connection you will be using – HTTPS, or Socks5. In the next field, type in your proxy server details in the correct format where the elements are separated with colons. Ensure that there are no typos to avoid any setup mistakes. If your proxy supports rotation, insert rotation URL. You may also give your proxy a name to make it easier to find. Next, click the icon that has been displayed on the screenshot to check that the proxy server has actually been functioning.

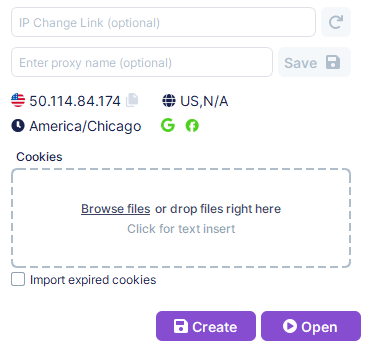
If the proxy is configured correctly, it will display the proxy’s country and region from which the connection is being formed and its connection status to Google and Facebook services.

After the proxy setup has been completed, click “Create” to proceed with completion of profile settings or go straight to running the undetectable profile with desired proxy settings by clicking “Open”.
Though the configuration for proxies in the Undetectable browser seems quite simple, users may still face difficulties. Below are the common ones of potential problems and their remedies.
Proxy connection problems are most commonly as a result of improper entry of IP address or port information. To solve these problems, do this:
Restart the browser to refresh the settings.
Problems of authentication occur as a result of the user entering the correct name for the proxy but using the wrong password in the login process. To fix these problems, you can:
Update the credentials and retry the connection.
The integration of a proxy with the Undetectable browser is a step that should be taken for the purpose of hiding one’s IP address since that significantly reduces the risk of being tracked by third-party services. Proxies also assist users in bypassing restrictions and in accessing content that is otherwise limited. For every business or user dealing in sensitive information, proxies are deemed to be very important as they help in keeping the information secure while the user is performing tasks on the internet.
In conclusion, the establishment of a proxy in the Undetectable browser is a practical way of enhancing web activities. It guarantees the users the bypassing of restriction sites, and the enhancement of the security of the information. It further offers a suitable approach for web activities that require users to conceal their identities. By using proxy integration, users can enhance their safety and privacy without compromising on the efficiency and availability of the internet services.
Comments: 0