 en
en  Español
  中國人
中國人  Tiếng Việt
  Deutsch
  Українська
  Português
  Français
  भारतीय
  Türkçe
  한국인
한국인  Italiano
  Indonesia
  Polski
 Proxy setup within the anti-detection features of BitBrowser is an effective method for enhancing the protection of your personal information. If any internet activity is done through a proxy server, the original IP address of the sender is masked, as well as any data transferred, making these activities almost untraceable. Using a proxy within BitBrowser is essential for tasks like managing multiple digital marketing accounts, competitive e-commerce analysis, and comprehensive market research as well.
This article walks you through the steps necessary to set a proxy in BitBrowser effectively with the goal of easing your ability to get access to geo-restricted content while ensuring that your online activities are completely private.
So, how to use BitBrowser with proxy servers efficiently? The following blocks will describe exceptionally how proxy servers can be applied in BitBrowser with screenshots for easy understanding.
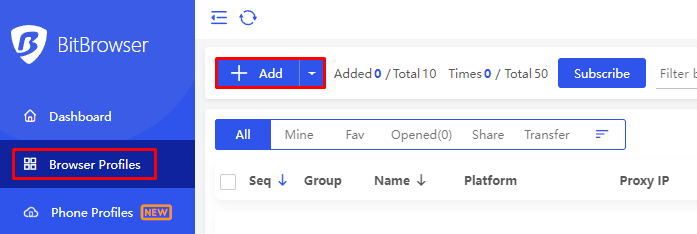
To start off, launch BitBrowser. Under the “Browser Profiles” tab, click “Add” on the upper left part of the screen to initiate the profile creation process.

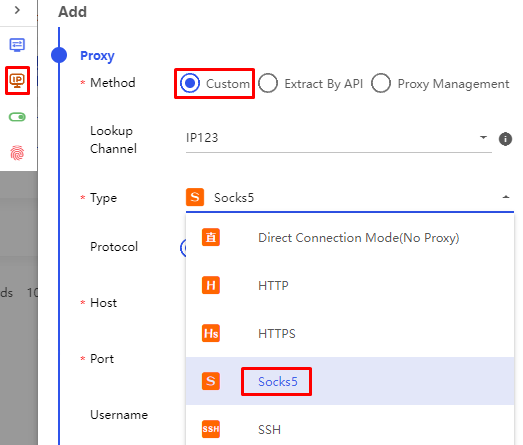
Once you have modified the basic profile information, click on the “Proxy” tab where you will input various specifications such as; A method to add proxies by selecting the “Custom” option and the selection protocol to be Socks5, in our case.

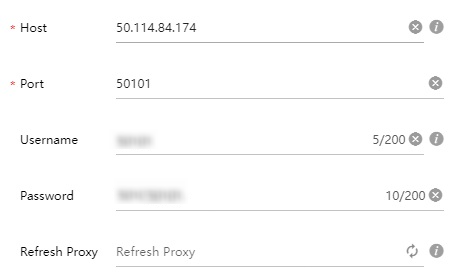
In the new window that appears you need to complete the forms filled in by specifying information such as IP address, port and if necessary authorization data of your private proxy server. If you want to use a rotating proxy, you can also add a link for IP rotation. Ensure the accuracy of all provided information in order to avoid issues during server operations.

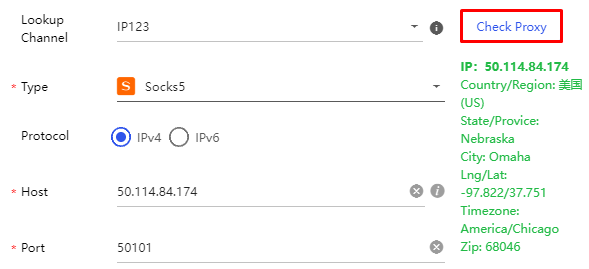
Next, launch the process of connection verification by clicking on the “Check Proxy” button that is found at the right part of the screen. When connected successfully, the green message will pop up with the location and related information.

Afterward, finalize the profile creation and save it. Your profile will be working with the already embedded proxy, providing you with a secure as well as anonymous connection while using BitBrowser.
It is quite clear that using a proxy in conjunction with the BitBrowser provides substantial benefits in a wide range of use cases. These are the noticeable ones:
Use cases presented above point to the importance of use of a proxy in conjunction with BitBrowser and can be useful for deep-level understanding of this technology and what it can do.
By the way, to use a proxy in BitBrowser effectively, it is important to understand how to configure it properly if you want to make use of the possible enhancement of privacy and security it offers. It follows from this manual that the user activity remains untraceable and sensitive data is kept safe from exposure to third parties if using a private proxy-servers.
It's also important to note that the type of proxy server you choose significantly impacts the security and efficiency of your tasks. Data center or ISP proxies are fine for less complex activities such as bypassing restrictions within a region, but for advanced tasks either residential or mobile proxies are best. These kinds of proxies offer the highest level of confidentiality of the connection and also allows it to rotate IP addresses which improves security and operability.
Remember, the key to maintaining online security is using anti detect browsers like BitBrowser as well as a regular updating of your proxy settings.
Comments: 0