Proxy settings in Mozilla Firefox

Comments: 1

In this article, we will talk about how to step by step configure proxy settings in Mozilla Firefox. With its help, you can bypass blocking on sites and use the Internet anonymously. We will learn how to use a proxy in the Mozilla browser, as well as delete the previous history of visiting sites so as not to leave traces when solving personal and professional tasks on the network.

1.png

In order to start working in Mozilla Firefox through a proxy, you need a browser and a proxy server, which can be found freely on the Internet or purchased from a reliable supplier. You can download the browser from the official website of Mozilla, and if you do not have a private proxy, we recommend purchasing it on our website. Configuring a Firefox proxy is a simple process that only takes a few minutes of your time. Just follow the instructions.

If you are using a Macbook, then you can set up a proxy in Safari on MacOS.

Video tutorial for step-by-step proxy settings in Firefox

Step-by-step proxy server setup in Mozilla Firefox

  1. In order to protect ourselves and correctly configure the proxy server for the Mozilla Firefox browser, we need to clear the collected data by the browser. We are talking about cookies, cache and browsing history. We go into the browser, there is an image in the upper right, clicking on which opens the browser menu. Next, go to "History".

    2.png

  2. In the journal menu, select “Clear Recent History...”.

    3.png

  3. In the opened “Clear All History” window. In the “Time range to clear:” field, set the “Everything” period. We also mark the checkboxes in all the items and click “OK”.

    4.png

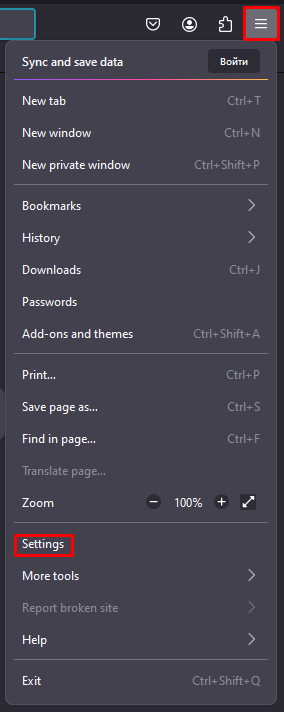
  4. Now the proxy setup itself in firefox begins. Open the browser menu again and select the "Settings" item.

    5.png

  5. To make it easier to find the proxy server settings menu in Firefox, write “Proxy” word in the search bar at the top of the window that opens. In the found result, click the "Settings..." button.

    6.png

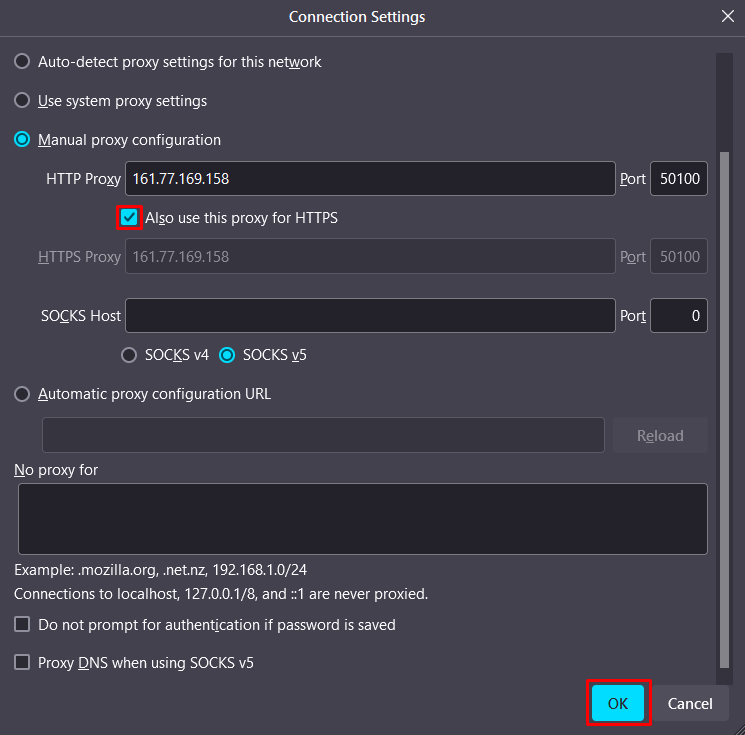
  6. The window "Connection Settings" opens and we see the category "Configure Proxy Access to the Internet". We select the item "Manual proxy settings", set a check mark in the items "Use this proxy server for all protocols" and "Do not ask for authentication (if the password was saved)". Enter the details of the purchased private proxy server. You can easily find the IP address, as well as the port in the letter on your mailbox, if the purchase was made from the Proxy-Seller, as well as in your personal account. We will take one of our proxy servers as an example. After entering all the data, press the "OK" button to save all the changes.

    7.png

  7. Immediately after configuration, the proxy server authorization window will appear. If, when purchasing a proxy, the authorization type was selected “Login and password” - you can also see this data in a mail or in your personal account. When authorizing by IP, this window will not appear. the proxy server will already be automatically authorized. Enter the required data in the "Username" and "Password", put a tick in the item "Use Password Manager to remember this password." and click "OK".

    8.png

The proxy setup in firefox is complete.

If you need to add more than one proxy to your browser, for example, to Mozilla, then see the instructions in the article configuring multiple proxy servers in one browser.

How to change proxy in Mozilla

Replacing the proxy server is done as follows:

  1. Open the menu.
  2. Go to "Settings".
  3. 9.png

  4. Enter the word "Proxy" in the search bar.
  5. Click "Settings...".
  6. 11.png

  7. Instead of the current proxy, enter the data of the new one.
  8. Click "OK".

12.png

You can switch proxy servers in your browser through special extensions that you can find in the Firefox online store.

Disable proxy server step by step in Mozilla Firefox

The main reason for disabling proxies in Mozilla Firefox is to change browser options. And for this you need to have information about the actual IP-address.

If the proxy was configured using standard browser tools, there may be a conflict, so this setting should be disabled.

  1. Go to the settings by writing the word "Proxy" in the search box:

    13.png

  2. Go to the connection settings and in the item "Configure Proxy Access to the Internet" and change the switch from "Manual proxy settings" to "No proxy". Click "Ok":

    14.png

When changes were made and the proxy was reconfigured in firefox, it is imperative to clear the cache. This is important for remembering the history of visited sites, as well as the presence of cookies that contain personal data, which may adversely affect the entire operation of the browser in the future.

If you want to set up a proxy server not only on your computer, but also on your smartphone, then follow the instructions: for Android or for iOS.

Clearing the cache in Mozilla Firefox

To preserve the anonymity of personal data, it is advisable to carry out such cleaning after you finish using the Internet as often as possible:

  1. Open the menu by pressing the triple-line button at the right side;
  2. Find the “History” category and click on it;
  3. 15.png

  4. Press the “Clear recent history” button;
  5. 16.png

  6. Select time range to clear, put checkboxes for “Browsing and Download History”, “Cookies”, “Cache”;
  7. Press “OK”.
  8. 17.png

Next, go to the "General" section in the "Settings" category and select "Settings..." in front of the "Network Settings".

Set up a proxy server not only for Mozilla Firefox, but also for other programs. For this purpose, read the instructions for setting up a proxy in the Proxifier program.

Comments:

1 comment

vas
good