 en
en  Español
  中國人
中國人  Tiếng Việt
  Deutsch
  Українська
  Português
  Français
  भारतीय
  Türkçe
  한국인
한국인  Italiano
  Indonesia
  Polski
 cURL is a command line utility that is included in the libcurl library and is used to transfer data with the use of various protocols such as HTTP, HTTPS and FTP. cURL is one of the basic components of developers’ tool kits, used in practice to test web APIs, download files, and perform other Internet-related data transfer tasks.
The tool also provides a variety of functions such as authentication, proxy connections and SSL settings, which are important for web and system development.
Residential proxies are useful for scraping data from web pages that use some methods relevant to bot protection or limit the amount of requests accepted from a single IP address. There is also an API for these types of proxies, which makes it easier to connect proxies to other services or applications. This support for API enables rotation of IPs, improving stability and making proxy management more efficient. The same approach is common for social image platforms — for example, using Pinterest proxies helps match IP regions and stabilize workflows when managing multiple accounts or performing image-focused scraping.
Here we will demonstrate in detail how to create a list of residential proxies and add them to cURL using an API tool.
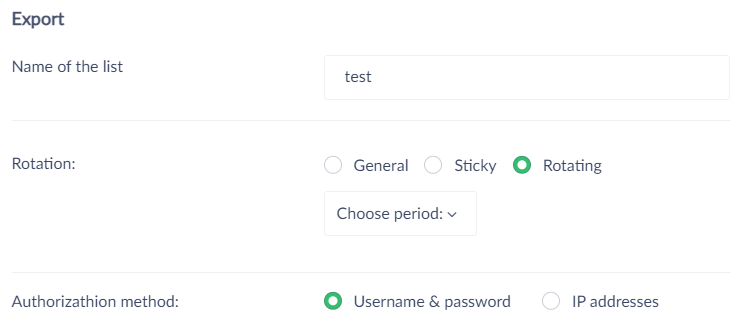
The purchased proxies can be viewed in the “Orders” section of the personal dashboard under “Resident”. To put together a list of residential proxies and API integration, there are a few steps need to be performed:


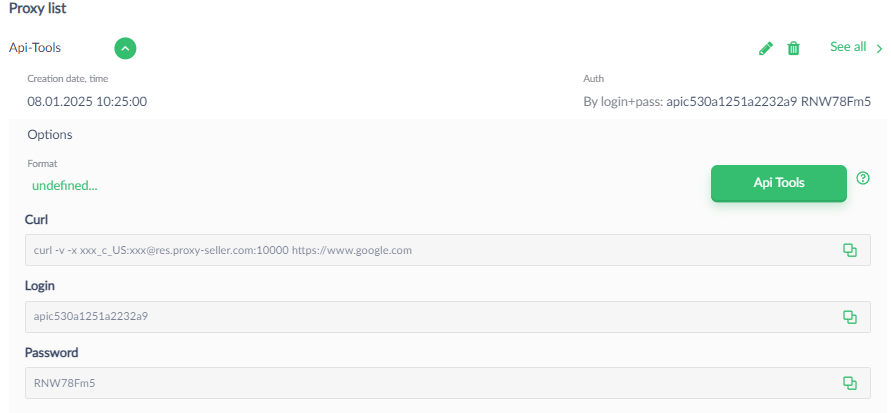
The final step prior to directly working with cURL is generating the API key. Copy it and place it in a text file, and then edit the string after -x, inserting into it the username and the password of the proxy. The result should be as follows:
curl -v -x apic530a1251a2232a9:RNW78Fm5@res.proxy-seller.com:10000 https://www.google.com
Save this data for further integration. Now, let’s proceed with the system configuration that would allow us to engage with the cURL.
For the purposes of this write up, we will be using Windows 11, these examples have Curl already embedded into the system. However, for illustrative purposes, let’s take a look at how to do this manually on every OS.
Although cURL is included in the standard set of tools in Windows 11, it is not available in earlier versions, such as Windows 10. To open the command prompt, press the Win+R key combination and enter cmd. cURL can be installed using the package manager WinGet with the command:
winget install curl.curl
In most Linux distributions, cURL is available through standard package managers. To install in Ubuntu or Debian, use:
apt-get install curl
For Red Hat-based systems such as RHEL, CentOS, or Fedora, use the Yellowdog Updater Modified (YUM):
yum install curl
OpenSUSE users can install cURL through zypper:
zypper install curl
In Arch Linux, cURL is installed via pacman:
pacman -Sy curl
On macOS, cURL is best installed through the package manager Homebrew. After installing Homebrew, execute the command:
brew install curl
Now that cURL is installed on the operating system, we can proceed to integrate residential proxies using the API.
To verify that every request made is being routed through the proxy, various options are available. One of the most basic is a test service that provides information about the IP address used and any further details on the request. Services such as httpbin.org provide this capability.
In the command prompt, type in the previously saved API and at the end add the test site which is httpbin.org. The format is as follows:
curl -v -x apic530a1251a2232a9:RNW78Fm5@res.proxy-seller.com:10000 http://httpbin.org/ip
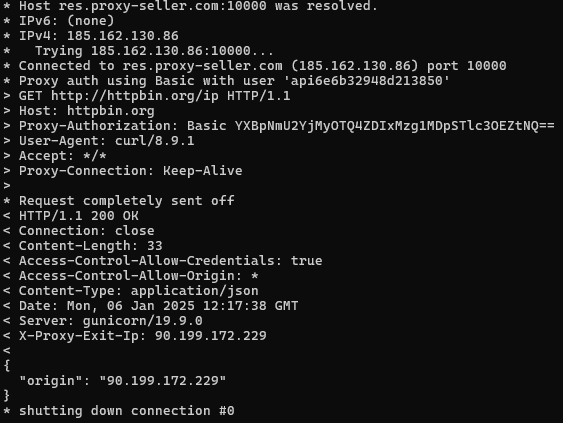
This command will make it possible to send a request to httpbin.org using the proxy. The service will respond with a JSON object containing the IP address from which the request was received and other parameters. If the connection is ok, the response will go as:

"origin": "90.199.172.229": This is the IP address that has been used as outgoing IP for httpbin.org and would be expected to be the proxy IP address.
As in addition to the practical portion of this article, also useful shall be some information concerning the sending data via cURL with different flags.
Special attention is paid to the flags -d, -F, and --json, each serving a specific purpose.
Sending JSON data through residential proxy using -d:
Primarily for sending forms or JSON, Often a POST request is sent using the -d or --data flag. This example demonstrates how to send authentication data through with API residential proxy as follows:
curl -v -x apic530a1251a2232a9:RNW78Fm5@res.proxy-seller.com:10000 -H "Content-Type: application/json" -d '{"username":"admin","password":"password123"}' http://httpbin.org/ip
Here, -x is used to configure the proxy with authentication data, and -d sends user information to the server.
Sending a file through residential proxy using -F:
The -F flag is used for sending files in multipart/form-data format. This method is ideal for APIs that require file uploads through a proxy.
curl -v -x apic530a1251a2232a9:RNW78Fm5@res.proxy-seller.com:10000 -F "file=@path_to_your_file.txt" http://httpbin.org/ip
The -F flag specifies the path to the file that should be sent, and -x configures the proxy to route the request.
Simplified sending of JSON using --json:
The --json flag is aimed at easier sending of JSON as it sets the appropriate headers describing the nature of the data automatically.
An example of sending JSON using a residential proxy with cURL --json goes as follows:
curl -v -x apic530a1251a2232a9:RNW78Fm5@res.proxy-seller.com:10000 --json '{"key":"value"}' http://httpbin.org/ip
In this case, --json takes care of adding the necessary headers in order to target JSON and sends the request through the said proxy to httpbin.org which will return the IP along with the requested information.
Using cURL and API residential proxies in conjunction opens up a world of possibilities with regards to performing network requests. The ability to manage proxy servers with ease allowing users to change IP addresses and certain configurations easily without any manual input. This not only assists in the automation of everyday tasks but increases anonymity and the security of internet related activities, making them less susceptible to external threats.
Comments: 0