
 en
en  Español
  中國人
中國人  Tiếng Việt
  Deutsch
  Українська
  Português
  Français
  भारतीय
  Türkçe
  한국인
한국인  Italiano
  Indonesia
  Polski
 Ghost Browser is a multi-session browser built for professionals who manage multiple logins, accounts, or workflows from a single interface. One of its key advantages is the ability to assign a different server to each tab or session. This makes it especially useful for marketers, data analysts, and automation users who need to operate across various IP addresses securely.
By using a Ghost Browser proxy, users can reduce the risk of detection, avoid IP bans, and improve privacy during routine tasks. This feature is especially valuable when working with sensitive platforms, scraping tools, or location-specific content. The browser’s built-in control tools allow you to configure multiple IPs with ease.
The setup process involves using Ghost Browser’s built-in tool called Ghost Proxy Control. It enables users to assign different IPs to different tabs and import a list in bulk using a CSV file. This ensures efficient management of multiple IPs with minimal manual setup.
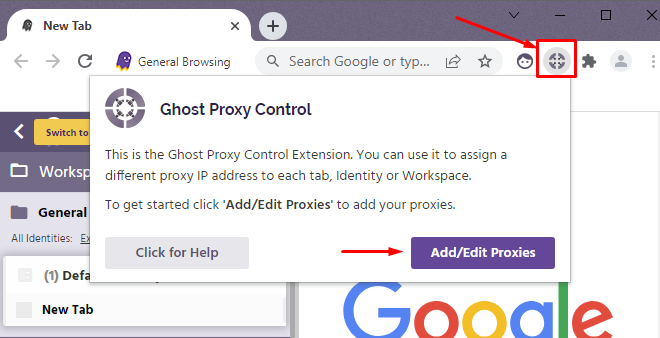
Once the browser is launched, locate the Ghost Proxy Control icon in the browser toolbar. Click the icon to reveal a dropdown menu, and then select the “Add/Edit Proxies” option.
This opens the main management interface. From here, you’ll be able to upload new IPs, assign them to specific groups, and run tests as needed.
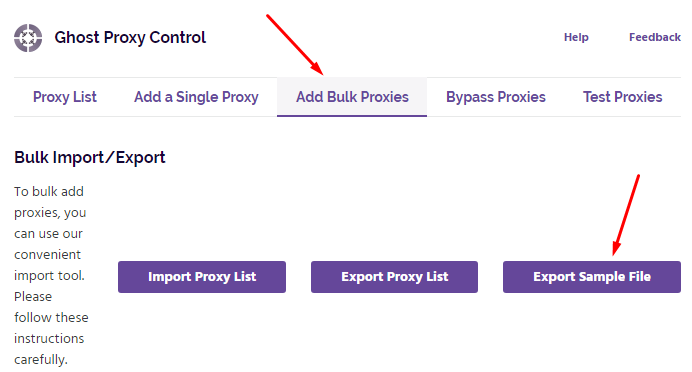
Inside the manager, click on the “Add Bulk Proxies” option. From the menu that appears, select “Export Sample File.” This will generate and download a CSV template that you will use to enter your data.
Using the official sample file ensures you format your entries correctly. This avoids errors during the import process and guarantees compatibility with Ghost Control.
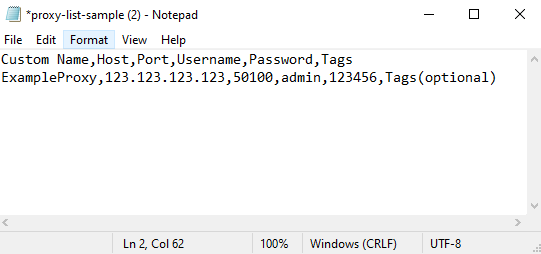
Open the downloaded CSV file using a spreadsheet editor. The file contains structured columns for entering data. At a minimum, you’ll need to complete the following fields:
Each data point must be separated by a comma. You can add multiple entries, one per row. For intermediaries with IP-based authentication, leave the username and password fields blank. Be sure to select the correct type for each entry.
Filling out this file correctly is essential to successful configuration. This step is the foundation of your Ghost Browser proxy configuration and will determine how smoothly you can set up new connections for multiple sessions or tasks.
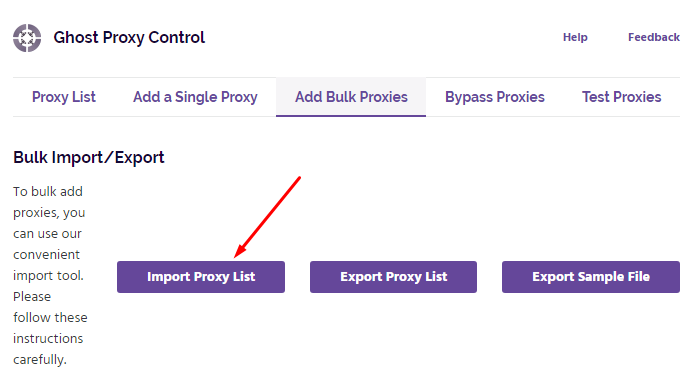
Once your CSV file is complete, return to the management interface in Ghost Browser. Click “Import Proxy List” and upload your saved CSV file. The system will parse your entries and populate the list.
Imported IPs will now appear in the list within Ghost Proxy Control. From here, they can be assigned to individual tabs or tab groups depending on your project’s needs.
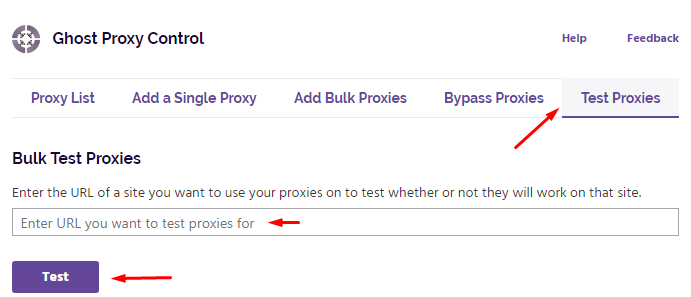
To ensure everything is working correctly, proceed to the “Test Proxies” tab. Enter a test URL - for example, https://www.google.com - and click “Test.” This will trigger a connection attempt for each configured IP.
Testing helps confirm that your intermediaries are active and responding as expected. It also ensures proper credentials have been entered for IPs that require authentication. This verification step is essential for ensuring reliable multi-session management.
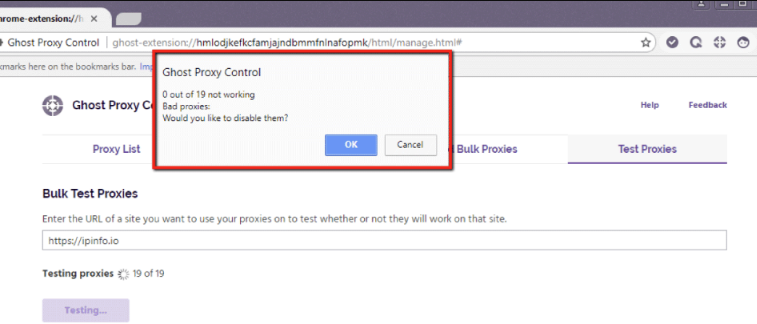
Once the test completes, Ghost Browser will display the results in a popup window. Each entry will show the test outcome:
If errors are detected, recheck your CSV file for formatting issues, missing fields, or incorrect types. Retest the affected IPs after making corrections.
This step ensures your Ghost Browser proxy setup is reliable before starting any sensitive tasks or automation.
Using a Ghost proxy browser allows you to separate each identity or workflow, improving anonymity and reducing risk. Understanding how to use a proxy in Ghost Browser ensures that each session remains isolated, helping users operate securely across platforms.
You’ll learn how to assign proxies automatically in Ghost Browser Proxy for efficient IP management. The tool offers three main auto-assign options.
| Assignment Method | Description | Session Consistency |
|---|---|---|
| Random proxy per tab or Identity | Assigns a different proxy randomly to each browser tab or Identity. | Varies on every tab; maintained within an Identity. |
| Random proxy without repetition | Distributes proxies randomly but ensures no proxy repeats until the entire list is used. | Avoids proxy overlap across tabs or Identities. |
| Next proxy in list (sequential) | Cycles through proxies in order, assigning the next available proxy to each tab or Identity. | Provides predictable proxy assignment. |
Understanding how proxy assignment differs between tabs and Identities is key.
Identities offer significant benefits when you run many accounts needing consistent IPs. Since all tabs under one Identity share the same proxy and cookies, you avoid account conflicts. For example, you can run three Facebook accounts with three different Identities, each tied to a different IP address, preventing detection or login issues.
You can also organize your work using Workspaces. Workspaces group clients, projects, or tasks into sets of Identities with specific proxy or IP configurations. This helps manage multiple projects without mixing credentials or proxies.
Premium features unlock unlimited Identities and Profiles. Profiles allow you to save proxy and browser settings for even more advanced management. With these features in Ghost Proxy Browser, you can scale your browser proxy control easily across many accounts and projects.
Ghost Browser Proxy offers flexible override options at three levels: per tab, Identity, and Workspace. You can override the auto-assigned proxies to control connection settings precisely.
Override choices include:
This flexibility lets you combine auto-assign proxies with manual overrides for fine-grained proxy management. For example, you might auto-assign proxies per Identity but override a single tab to use a direct connection when testing.
For the best proxy sources, Proxy-Seller is recommended. It provides a wide catalog of proxies compatible with Ghost Browser proxy control, including IPv4, IPv6, residential, ISP, and mobile proxies. This variety suits many use cases, from web scraping to managing social accounts. Proxy-Seller supports SOCKS5 and HTTPS proxies with full authentication options. This compatibility ensures smooth integration with Ghost Proxy Browser’s features without connection issues. Their user-friendly dashboard simplifies proxy management. You can easily import and configure proxies for seamless use in Ghost Browser.
Proxy-Seller also offers 24/7 customer support and setup assistance. This helps you troubleshoot and configure proxies quickly, maximizing your Ghost Browser proxy experience.
You’ll learn a practical approach to identifying and fixing common proxy issues when using Ghost Browser Proxy.
Common proxy errors include:
Follow these steps to debug your proxy setup:
By following these steps, you’ll minimize downtime and maintain smooth operation with your Ghost Proxy Browser setup. Troubleshooting smartly protects your accounts and preserves anonymity when using Ghost Browser Proxy.
Configuring Ghost Browser proxy is more than just a setup task – it creates a foundation for secure, flexible, and scalable browsing. Once the initial configuration is in place, users can experiment with different intermediary types, manage session-specific identities, and adapt their workflows to projects that require anonymity or geo-specific testing.
Regularly updating lists and verifying their performance ensures smoother long-term use, while the Ghost Proxy Control extension gives advanced users the flexibility to handle multiple projects in parallel without conflicts.
By treating proxy management not only as a privacy tool but also as an operational strategy, Ghost Browser becomes a powerful environment for both everyday work and specialized online activities.
Comments: 0