 en
en  Español
  中國人
中國人  Tiếng Việt
  Deutsch
  Українська
  Português
  Français
  भारतीय
  Türkçe
  한국인
한국인  Italiano
  Gaeilge
  اردو
اردو  Indonesia
  Polski
 AdsPower can be defined as a robust anti-detection tool that allows users to manage and set up all their online accounts with much ease. In this case, the user’s IP address would be masked with the proxy server IP – thus foiling the user activity tracking. This configuration is useful in avoiding being tracked and any geographical restrictions that might be imposed on certain content. Moreover, proxies help in conducting competitive analysis and scraping data while masking the identity of the users and their website’s location. For long sessions and consistent account workflows, ISP proxies are a practical choice because they provide a stable IP for each profile.
This setup guide simplistically leads you through the process of configuring a proxy within the AdsPower interface. We have also included a video as well as step-by-step instructions to assist this process.
The proxy setup process starts with launching AdsPower and ends when the configuration has been set. Everything that needs to be done in between has been explained in the following guide.
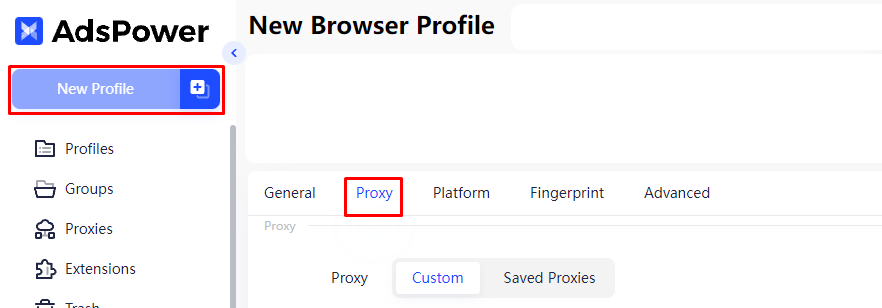
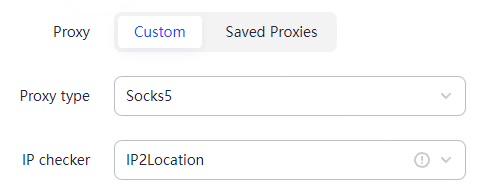
First of all, initialise AdsPower and begin with the creation of a profile by clicking the button “New Profile” in order to attach the new proxy settings directly to the new profile. Then click on the “Proxy” tab and select the “Custom” option.

In the following section you are given the advantage of choosing between HTTP, HTTPS, and SOCKS5 proxies. For sensitive operations, it is advisable to use the HTTP or HTTPS proxies since they also encrypt the information on the proxies towards the web. The usage of SOCKS5 proxies is best suited where the operations are non-sensitive since they are more of a general-purpose proxy supporting TCP and UDP protocols. You can easily check the proxy connection status using the built-in online checker in AdsPower.

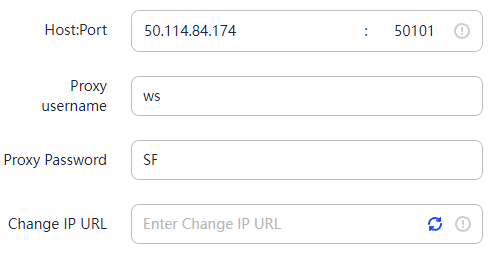
Enter the proxy details in the designated fields. This includes the proxy's IP address, port, and, if needed, username and password. All of these details are important for a secure and stable connection to the proxy server integrated into AdsPower. If you are using a proxy that rotates at intervals, you can also provide a link with which rotation will be performed. If you rely on rotation for sensitive workflows, private mobile proxies are often preferred because carrier IPs typically have strong trust signals in anti-detect scenarios.

To test the proxy’s successful operation, click on the “Check Proxy” button.

The AdsPower proxy integration enhances the existing anti-detection functionality of the browser that accommodates advanced fingerprint options and mass operation tools. This is possible because proxies assign a unique IP to each browser profile, complementing the digital fingerprint adjustments. The unique IP is highly important, as it provides an added layer of identity disguise for those activities that require high degrees of anonymity.
When you need profiles to look more like real users, residential proxies can help by using IPs associated with household networks.
For the users who operate several accounts or perform huge market analysis and extensive digital marketing campaigns, using proxies with AdsPower is effective in ensuring that all accounts are distinct from each other, thus maintaining low chances of intersection and detection. This feature is very useful in cases where the user’s digital fingerprints and activities are being tracked to prevent the user from accomplishing the task and compromise the user’s security and effectiveness.
AdsPower ensures proxy and profile security through a robust security architecture designed to protect your data and browsing environment. It encrypts proxy credentials and profile data both in transit and at rest, safeguarding sensitive information from leaks or interception.
You can enable multi-factor authentication (MFA) on your AdsPower account to add an extra security layer, preventing unauthorized access even if your password is compromised.
AdsPower fully isolates each browser profile, preventing fingerprint cross-contamination across different profiles or proxies. This isolation means your browsing data, cookies, and fingerprints remain separate, helping maintain anonymity and avoid account bans caused by shared fingerprint data.
Additionally, AdsPower complies with major data privacy laws like GDPR and CCPA, ensuring your proxy usage and profile data management meet strict privacy and security standards.
To further enhance proxy security when using the AdSupply proxy integration, follow these recommended practices:
By combining AdsPower’s secure platform with high-quality proxies and these best practices, you maximize your privacy, reduce the risk of bans or data leaks, and ensure a reliable proxy for the AdsPower experience.
When encountering a proxy failure in AdsPower, users typically may face a few technical challenges. This matter will be tackled in this block, and simple approaches will be proposed to solve the issues.
When using an AdsPower proxy, users often make several common mistakes that can cause account issues or degrade performance.
One common error is mixing proxy types within a single profile. For example, combining residential and datacenter proxies in the same profile confuses websites and raises suspicion, increasing the risk of bans. Always use a consistent proxy type per profile to maintain stable sessions and avoid fingerprint contamination.
Another mistake is neglecting proxy authentication. Forgetting to input the proper proxy credentials when adding a proxy to AdsPower prevents connections from working, resulting in failed logins or blocked access. Make sure you add proxies with the correct username and password assigned by your proxy provider, especially for private or rotating proxies.
Ignoring proxy session timeouts can also lead to problems. Many proxies expire or rotate IPs after a given period. Continuing to use expired IPs in AdsPower can cause errors or trigger security alerts. Regularly refresh or reset your proxy sessions within the AdsPower proxy integration settings to prevent this.
Poor proxy hygiene can have serious consequences:
To avoid these issues when you learn how to add a proxy to AdsPower, follow these practical tips:
Following these basic but vital practices ensures smooth AdsPower proxy integration and stable browsing profiles.
In this section, you’ll learn how to effectively monitor and troubleshoot proxy performance within AdsPower using both internal and external tools.
Via Internal Tools: Start with AdsPower’s built-in proxy diagnostics and logging features. It provides real-time status on connection success, latency, and errors for each proxy assigned to your profiles. Check these logs regularly to catch connection drops or authentication failures early.
Via External Tools: Consider external monitoring tools like ProxyCheck.io to validate if your proxies leak IPs or fail geolocation tests. These services help detect proxy issues that AdsPower’s internal tools may not flag, such as geo-mismatch or slow response times.
When interpreting proxy errors, note the following common problems:
To switch proxies within AdsPower without disrupting active sessions:
Best practices for proxy rotation include scheduling automatic switches every set number of minutes or sessions. AdsPower supports setting rotation policies to avoid prolonged use of a single IP, reducing detection risk.
For advanced users, integrating scripting or automation frameworks like Python with Selenium or Puppeteer enhances monitoring by automating proxy health checks and session restarts.
Remember that the quality of proxies impacts monitoring effectiveness. Proxy-Seller offers high-quality proxies with dedicated channels up to 1 Gbps, ensuring fast and stable connections, crucial for AdsPower users. Their geographic coverage across 220+ countries also supports precise geo-targeting and helps you troubleshoot region-specific proxy issues accurately.
Use Proxy-Seller’s APIs and dashboard to automate proxy management. Combined with AdsPower’s tools, you can monitor proxy health in real-time, adjust rotations, and replace faulty proxies swiftly, keeping your campaigns running smoothly.
Using the AdsPower browser to configure a proxy provides extra protection, anonymity, and freedom while surfing the web. This is particularly important for people who manage multiple accounts or require access to geo-targeted content. Testing and proper placement of the proxy guarantee that every single action taken is private and secure, ensuring the user remains efficient and there are no opportunities for tracking or loss of data risks to occur.
Comments: 0