
 en
en  Español
  中國人
中國人  Tiếng Việt
  Deutsch
  Українська
  Português
  Français
  भारतीय
  Türkçe
  한국인
한국인  Italiano
  Gaeilge
  اردو
اردو  Indonesia
  Polski
 Editing videos in high video resolutions such as 4K or 8K require sophisticated machines with high processing power and large amounts of Random Access Memory (RAM). If you experience editing the video with lagging frames per second, a stuttering user interface, CPU intensive rendering and your system is simply struggling to keep up with the demands—it’s possible to conjecture that your system is a lower tier machine and lacks basic processing capabilities. Fortunately, there is a workaround. Using proxy files in Premiere Pro can significantly speed up editing by reducing the load on the CPU and GPU.
However, first, it's important to explain: what is a proxy in Premiere Pro. Simply put, they are lightweight copies of original video files, used to speed up editing on weaker computers. It’s important not to confuse them with proxy servers – network intermediaries that provide anonymity on the internet.
This article will discuss how to use proxy in Premiere Pro, which settings to choose, and how to avoid mistakes during work. Moreover, we will focus on editing proxy files in Premiere Pro, covering the entire process from import to export of the completed video.

Employing proxy files in Premiere Pro significantly enhances the efficiency of editing, particularly when dealing with high-resolution media files (4K, 8K) or files that utilize resource-heavy codecs. In the absence of proxies, the system loads and processes video materials, which places an enormous strain on the CPU and GPU.
Proxies are, without a doubt, the most convenient feature available and Premiere Pro users certainly appreciate the comfort this feature offers. Some of the most important benefits include:
In cases where the project contains sophisticated graphics or high FPS (frames per second) footage, proxy in Adobe Premiere Pro assists in eliminating lags during editing, as well as simplifying the final export process.
These files are created using optimized codecs and reduced resolution. So, How do proxy files work in Premiere Pro exactly:
Using proxy in Premiere Pro makes the editing process convenient and fast while ensuring stability during the editing of a high volume of video materials.
Proxy files in Premiere Pro are created by converting the original files to lighter formats using Adobe Media Encoder. This process can be done both manually and automatically. In the manual method, you select the files, set the encoding parameters, and specify the saving location. In the automatic method, importing the media files will trigger the creation of proxies if corresponding parameters are set in the project settings.
Choosing the right configuration affects the speed of the program and the convenience of editing.
Before using proxy in Adobe Premiere Pro, it is important to know which settings to consider first:
Best proxy settings for Premiere Pro (depending on the operating system and version of the program):
| Original size | Optimal resolution | Format | Codec |
|---|---|---|---|
| 4K (3840х2160) | 1280х720 | QuickTime (MOV) | Apple ProRes LT |
| 4K (4096х2160) | 1280х720 | H.264 (MP4) | H.264 |
| 6K-8K | 1920х1080 | Cineform (AVI/MOV) | GoPro Cineform |
| Full HD (1920х1080) | 640х360 | QuickTime (MOV) | Apple ProRes Proxy |
Tips for choosing formats:
Tip: If the project has many video layers and the computer is weak, better choose 720p in QuickTime ProRes Proxy format – it provides a balance between quality and performance.
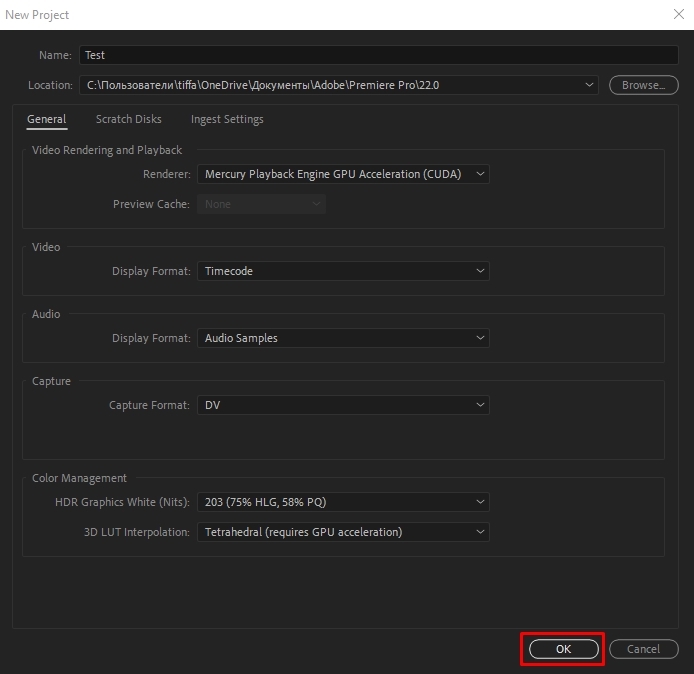
Before getting know: how to use proxy files in Premiere Pro, check If Adobe Media Encoder is integrated, as some versions do not contain it. In such cases, you will need to acquire and install it separately.
Original video material importation process:

Proxy file creation procedure:
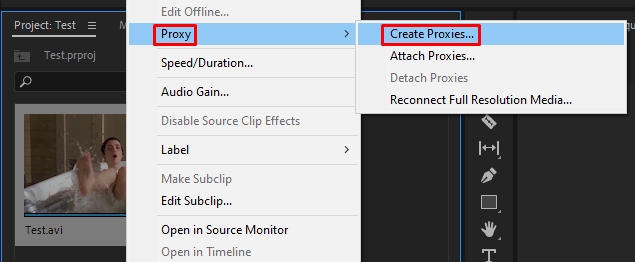
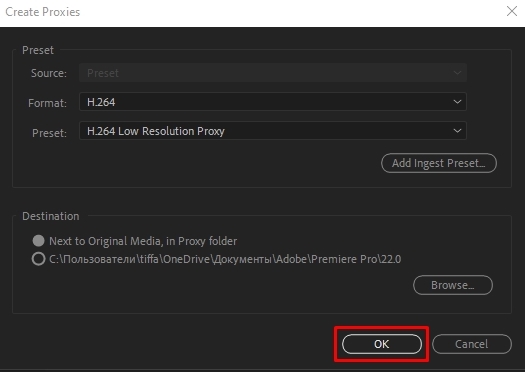
Adobe's Media Encoder is going to open on its own and will begin making the duplicates you want. They will be finalized in the provided folder after the process is complete.

Substitution of a video file with proxy will be done automatically:
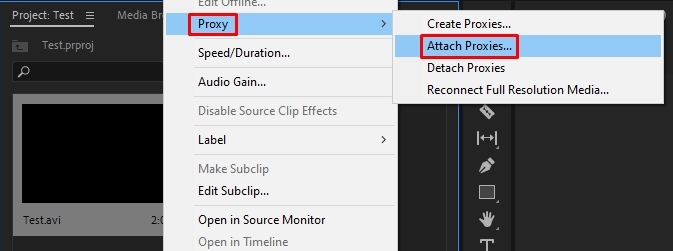
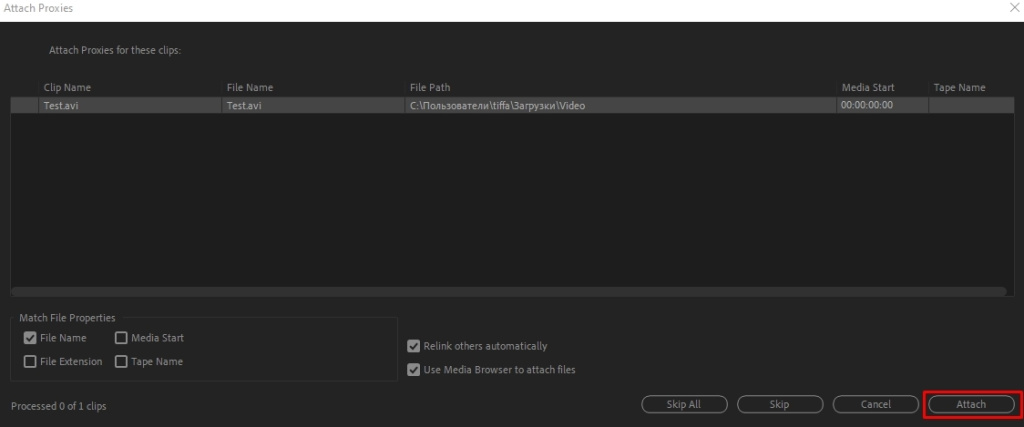
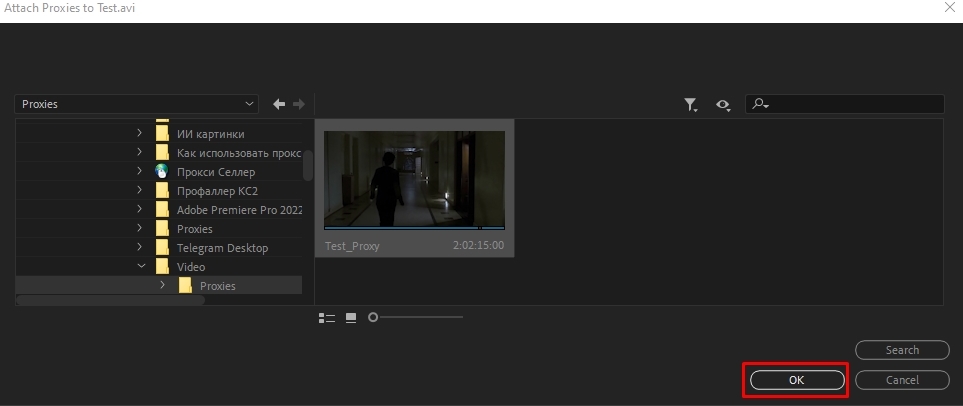
When working with Adobe Premiere Pro, managing proxies properly entails attaching them to the original media files after they’ve been imported into the system. If they’re already done in advance or in another software, these can be added manually. Also, the application is flexible in organizing files, enabling quick switching and automation for project tasks through the use of special commands or macros.
If copies have already been created, they can be manually attached to the original video files. To start off, import the original videos as described in the previous section. Considering we have a ready file, we need to specify its path, not create it.
The algorithm for: how to import a proxy in Premiere Pro is as follows:
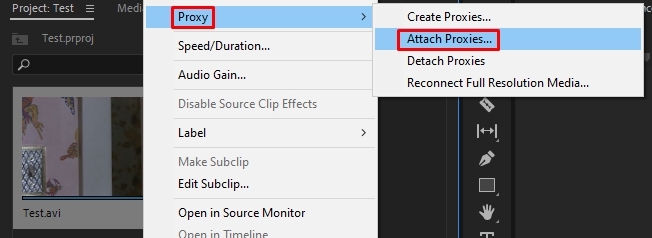
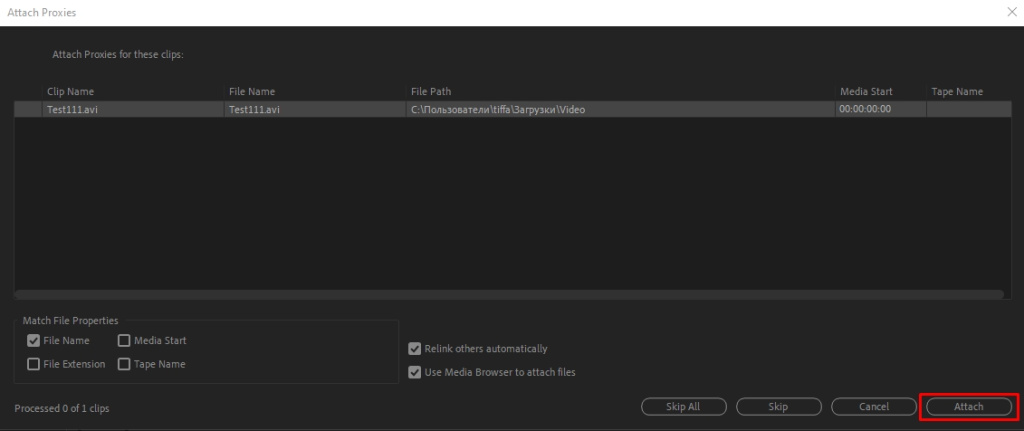
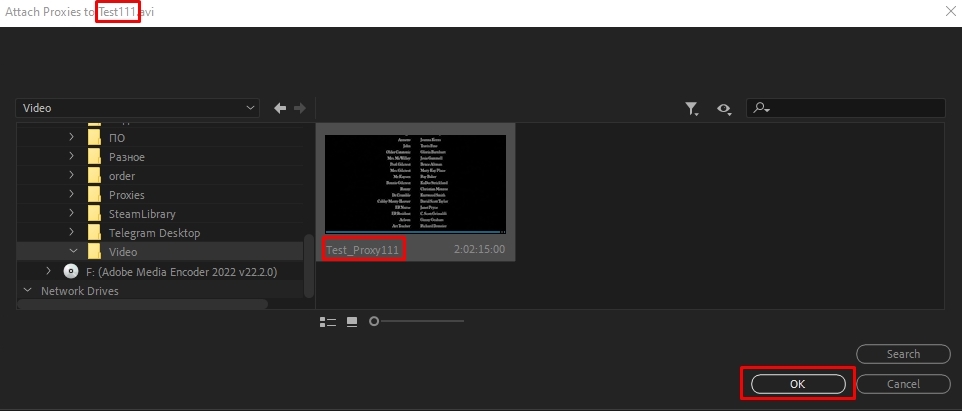
Now, during editing, the program will use the lightweight copies of the video, and when exporting, it will switch back to the original video files.
Note: Proxy files must match the originals in terms of duration and encoding—otherwise, the editor will not be able to correctly link them.
Basic rules for dealing with proxy files in Premiere Pro and properly organizing the process:
Even if you have a powerful PC, lightweight analogs speed up work with multi-layered projects, complex color correction, and effects.
The use of proxy in Adobe Premiere facilitates video editing workflows, however failure to adhere to the correct process can result in problems in syncing, color grading, and even the final export. If you do not follow the steps, you may experience audio-visual desynchronization, color inaccuracies, and quality degradation during renders.
Main principles for effectively proxy editing in Premiere Pro:
These steps are essential for retaining the highest possible quality in the final export.
For the last output rendering, it is vital to set the original video files as the source material, rather than using proxies. If you forget to turn off these settings before exporting, the quality of your video will suffer. In this case, some steps must be undertaken prior to exporting a proxy for Premiere Pro.
Steps on how to confirm the original video is being exported:
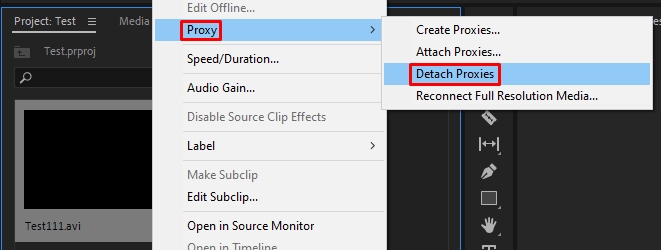
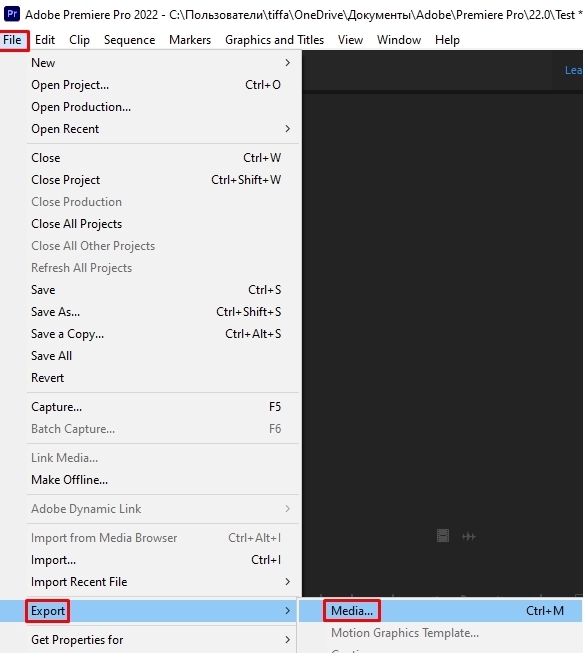
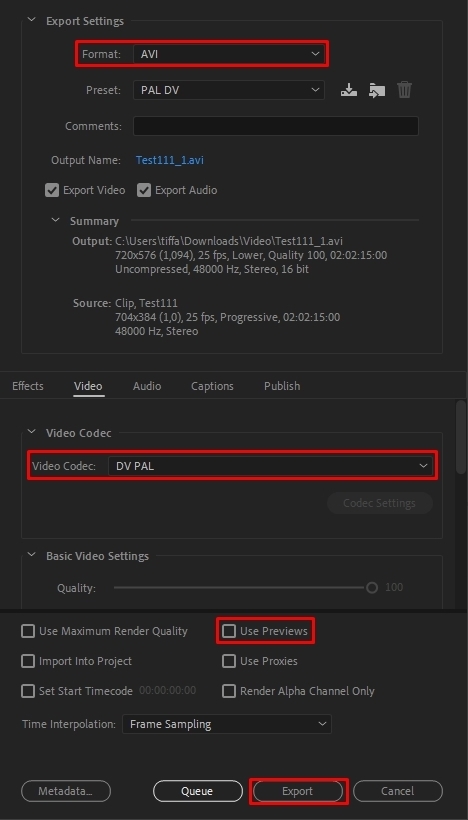
During the process, you may encounter various problems – from losing connection with files to export errors. The table below lists common mistakes and ways to resolve them.
| Error | Cause | Solution |
|---|---|---|
| Proxy files not linking to original video | Different resolution, frame rate, or codec | Recreate the copy using the same parameters as the originals |
| Premiere Pro cannot find proxy files | Proxies moved or deleted | In the project window, select files and manually specify the path to the copies during their attachment |
| Video loses quality during export | Proxy mode enabled | Disable proxy files before rendering and uncheck “Use Previews” |
| Codec error during export or creation of proxies | Outdated or incompatible codec | Use ProRes, DNxHR, or Cineform, update Media Encoder |
| Audio out of sync | Different audio parameters between proxies and originals | Edit audio only on original files, check the sampling rate |
| Blurry image in preview window | Low resolution of video copy or incorrect preview setting | In the “Program Monitor” select “Full Resolution”, re-create proxy in Premiere Pro with 720p or 1080p |
If Adobe Premiere Pro or files from cloud services are unavailable for download due to local country policy, sanctions, regional restrictions, or corporate network rules, it is recommended to buy a proxy server. Its use will help circumvent blocks and protect transmitted data.
To sum up, using proxy in Premiere Pro increases efficiency when dealing with high-definition content, as it reduces strain on the system. To minimize issues, it is critical to ensure appropriate creation, importation, and oversight of proxy files. They facilitate the simplification of editing workflows, however, switching back to the original footage prior to exporting is essential for maintaining fidelity in the final product. The ProRes Proxy, DNxHR, and Cineform formats are the most optimal due to their speed and quality. Following these principles guarantees seamless editing workflows while achieving superior quality in the final render.
Comments: 0