如何在Windows PC上 端口 制

评论: 0

任何个人电 用户 可 在Windows中 封端口。 可 有几个原因 但最主 的是 在关 端口的情况下 所有以某种方式 接到网络的程序 不 收到信息的答复。最常 的是 个程序是为了在互动的电 游戏中与其他玩家互动 的。此外 开放的Windows端口不断使用Viber、Skype和μTorren应用程序。 如何在不同的操作系统中 火墙 封 算机上的端口。

不仅在一个浏 器上工作 且在所有网络 接上工作的代理服务器 尝 Windows 8.1的 置来 置代理。

。如何 封 些端口 80, 443, 25565, 4950, 2955, 20, 27015 在 Windows 10 7 上

如何在 火墙中 封Windows 10端口

(以 火墙为流 的Minecraft游戏打开一个端口为例 。 为了允 端口 你必 为传出和传入的 接创建 则。
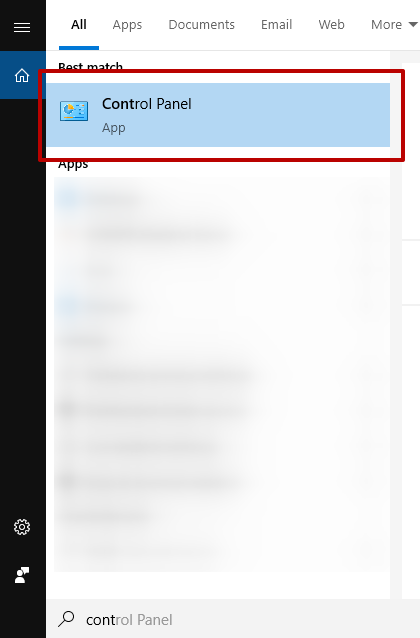
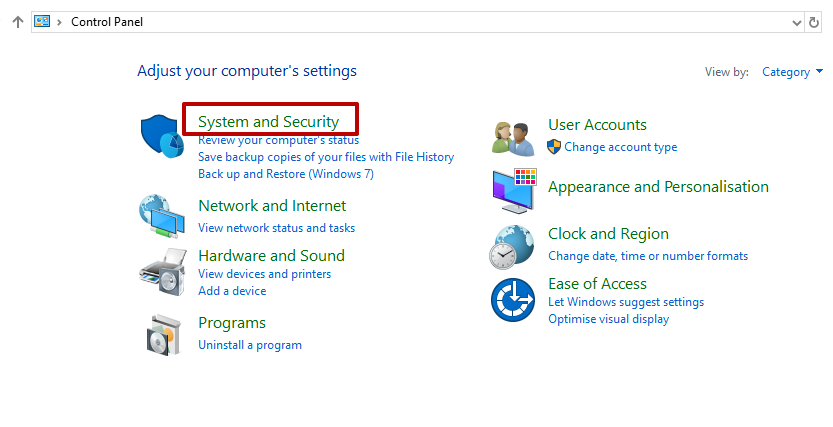
  1. 打开 "控制 板"

    Open «Control Panel»

  2. 入 "系统和安全 "类别:

    Enter the «System and Security» category

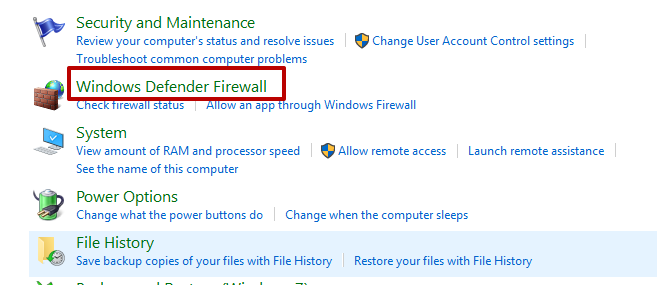
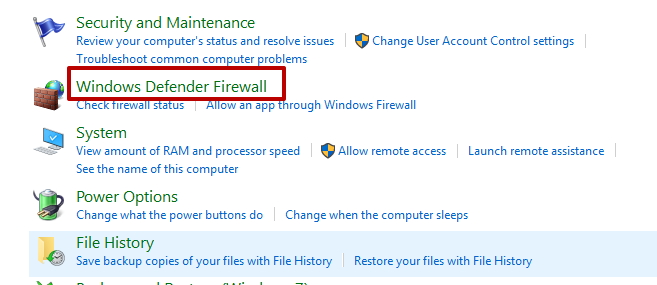
  3. 打开 "Windows Defender 火墙 " 单:

    Open the «Windows Defender Firewall» menu

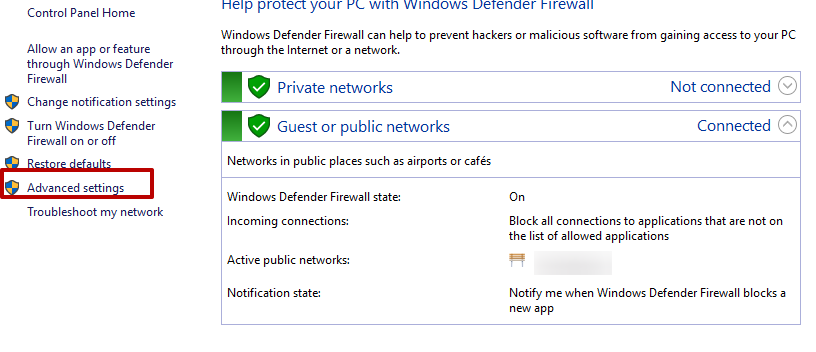
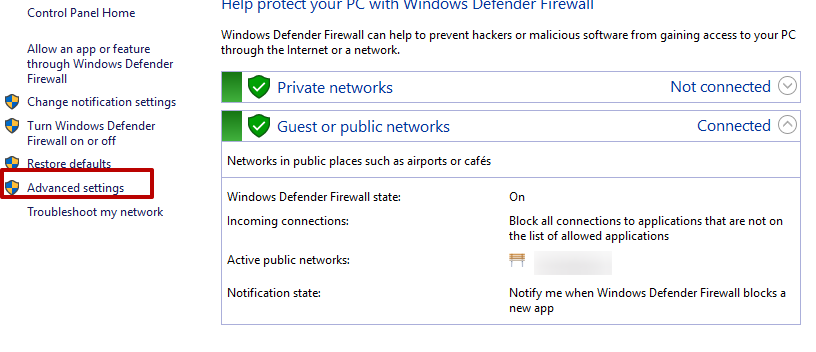
  4. 按 " 级 置 "按 :

    Press the «Advanced settings» button

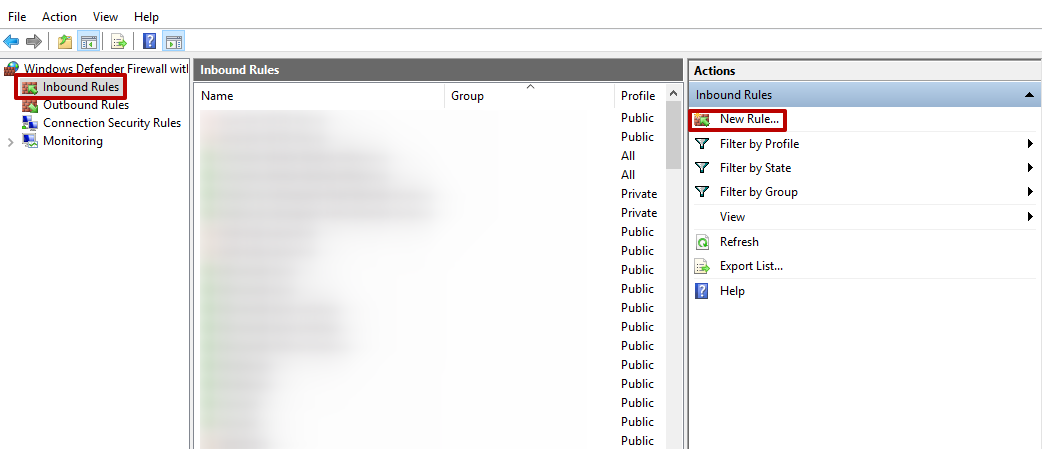
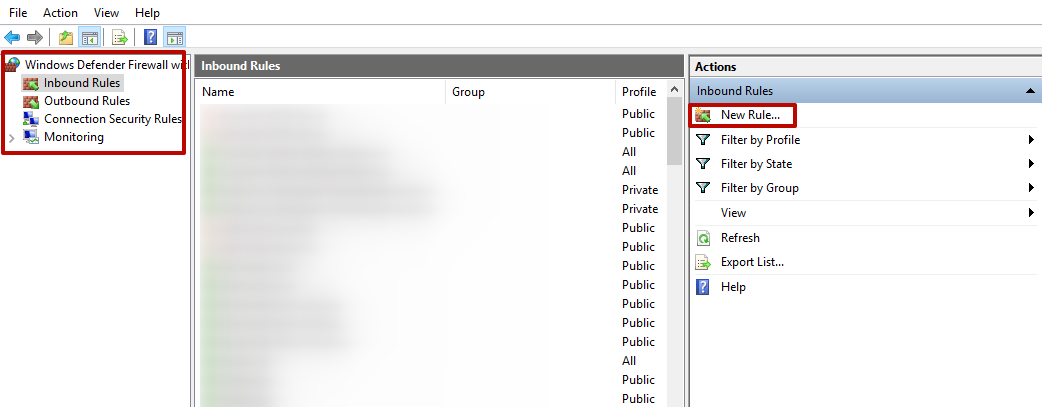
  5. 按 "入站 则 "和 "新 则... "按 。

    Press the «Inbound Rules» and «New Rule…» buttons

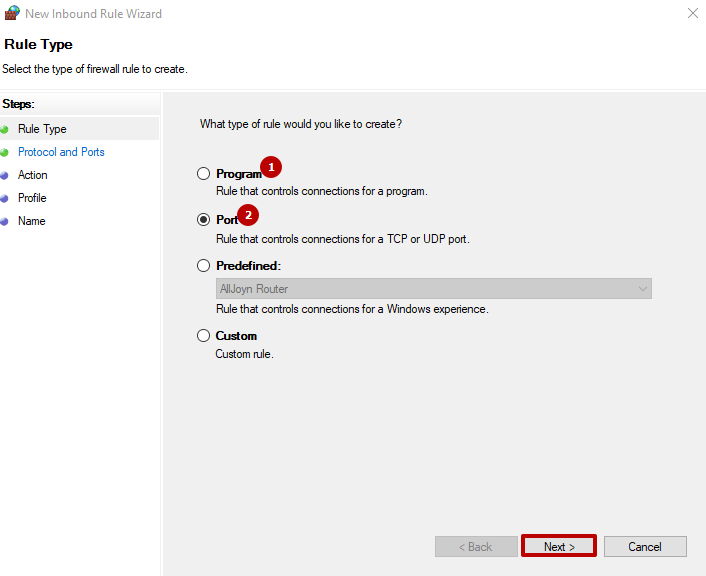
  6. 你可以单独为 程序打开端口 1 或完全打开 算机 它 2 。然后按 "下一步 "按

    Open the port for the program separately (1) or open the computer access to it completely (2). Then press the «Next» button

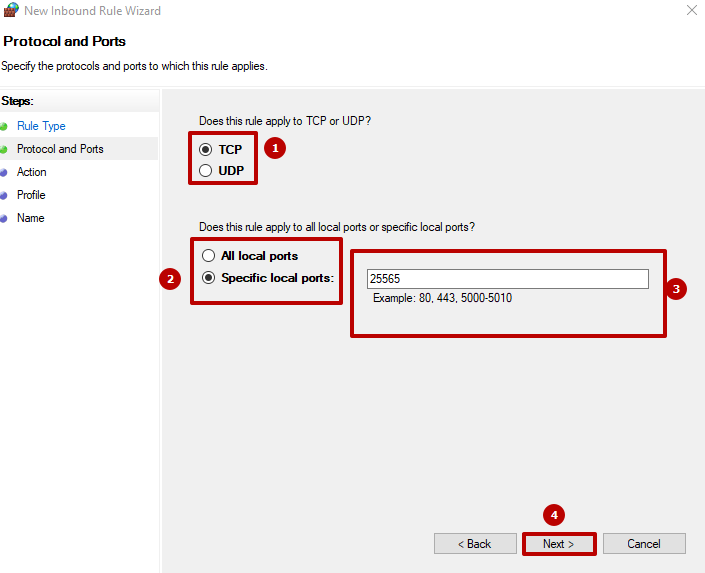
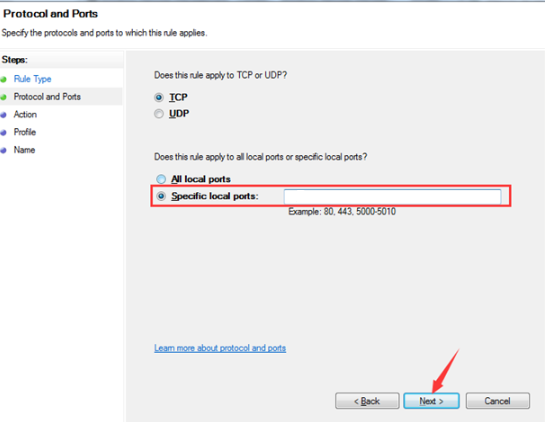
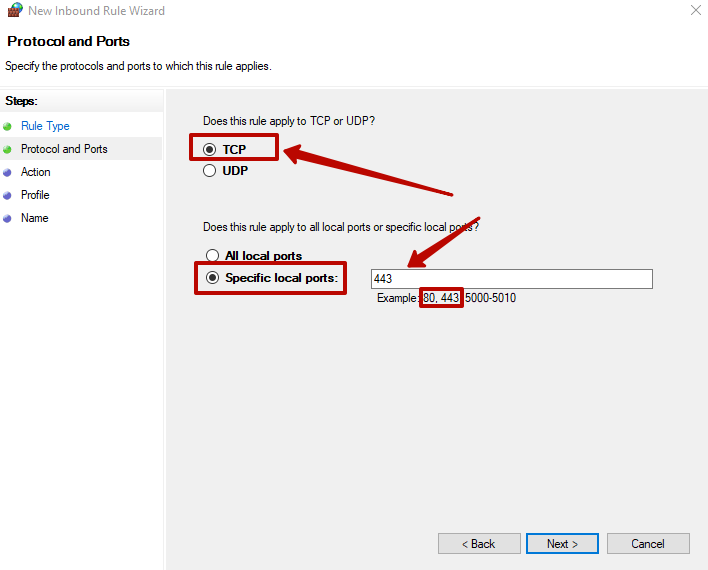
  7. Minecraft使用25565端口和 两个协 。创建2个协 则 1 。不 择 "所有本地端口" 2 。 入25565内 3 。点击 "下一步 "按 。

    Create 2 protocol rules (1). Do not select «All local ports» (2). Enter 25565 inline (3). Click the «Next» button

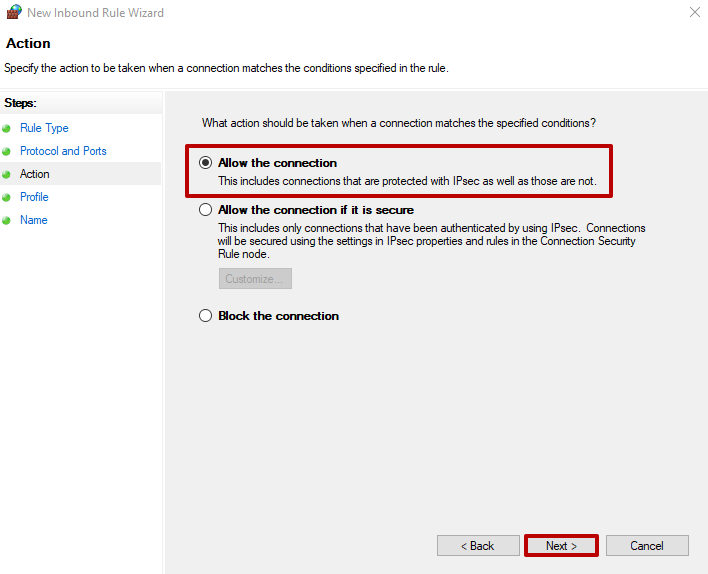
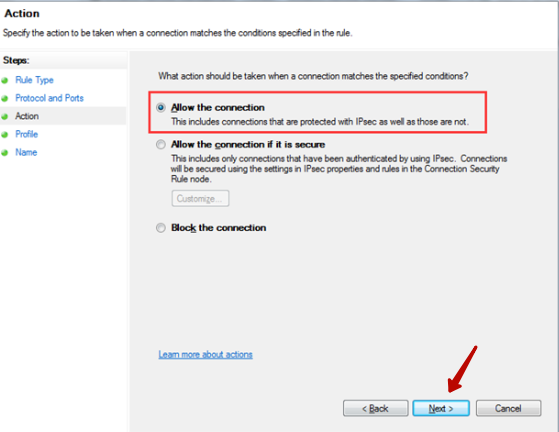
  8. 在 "允 接 "上打上标 然后再按一次 "下一步 "按

    Put a mark for «Allow the connection» and press the «Next» button

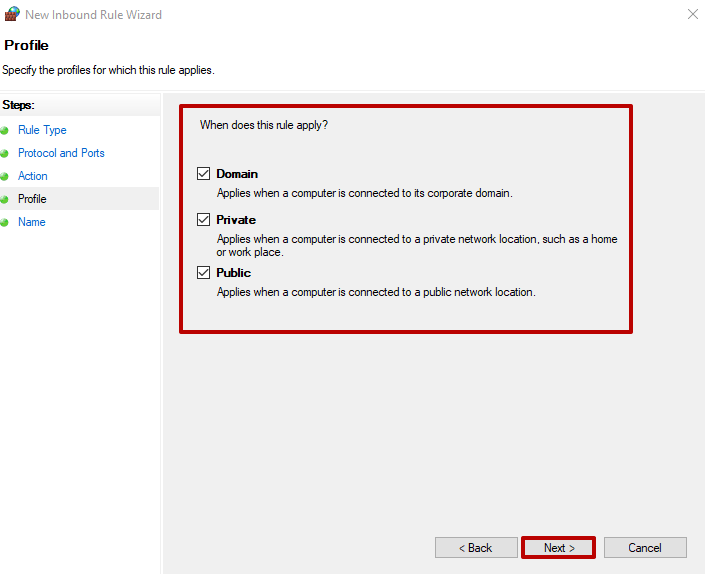
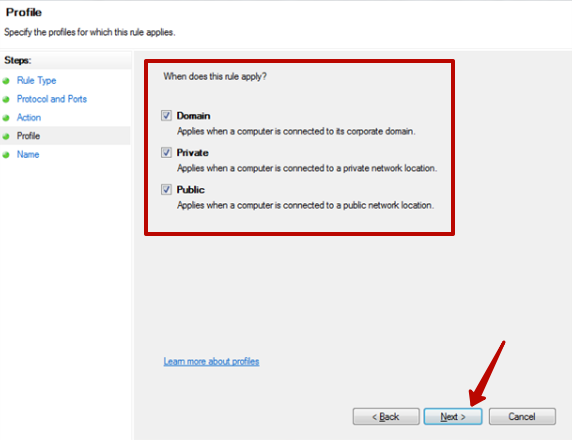
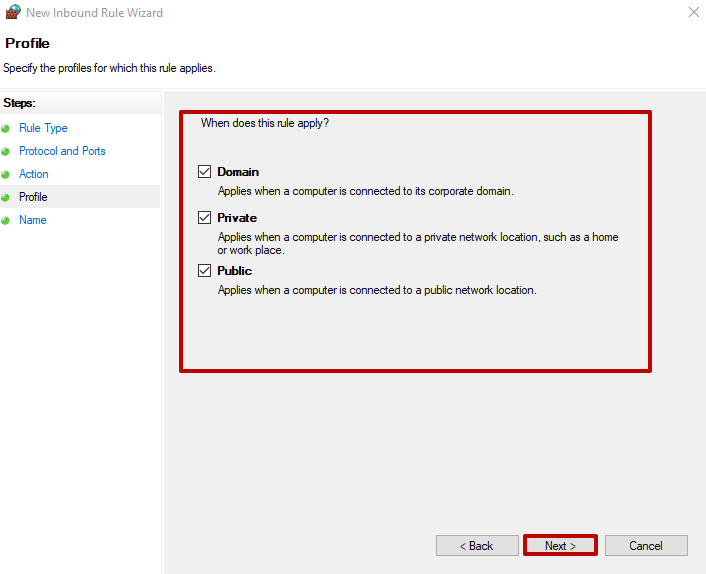
  9. 为 个 则 择所 的 置文件 然后按 "下一步 "按 :

    Choose the required profiles to this rule and press the «Next» button

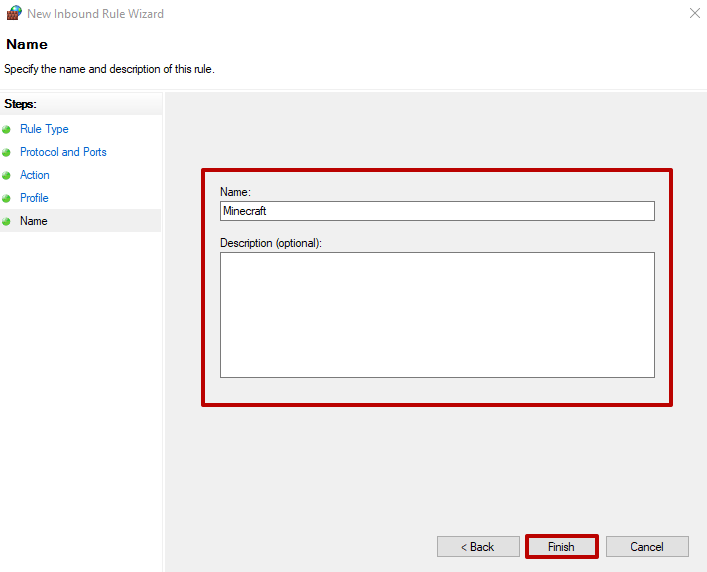
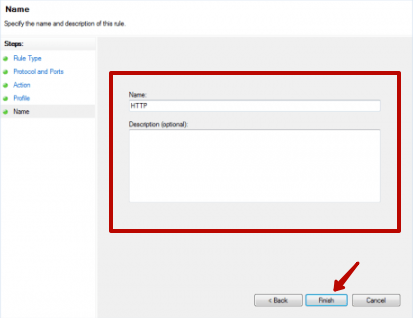
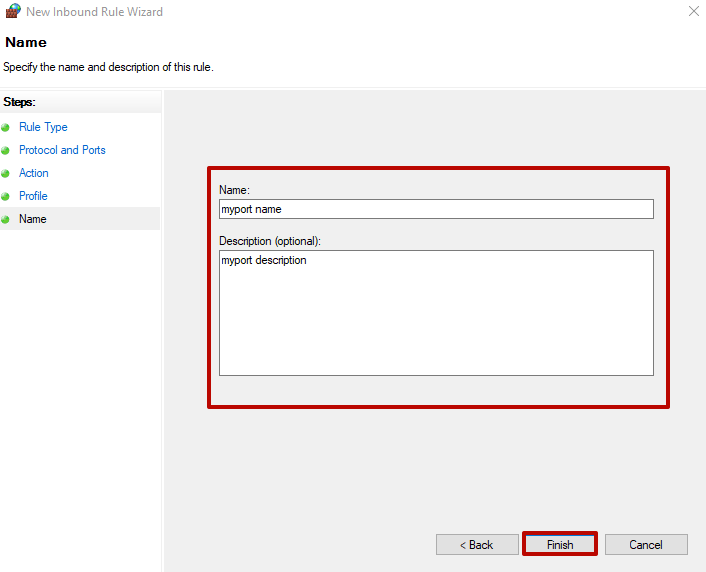
  10. 入 则名称和描 。创建 则后 按 "完成 "按 。对UDP协 也可以做同样的操作:

    Enter the rule name and its description. To create the rule press the «Finish» button. The same actions could be done with UDP protocol

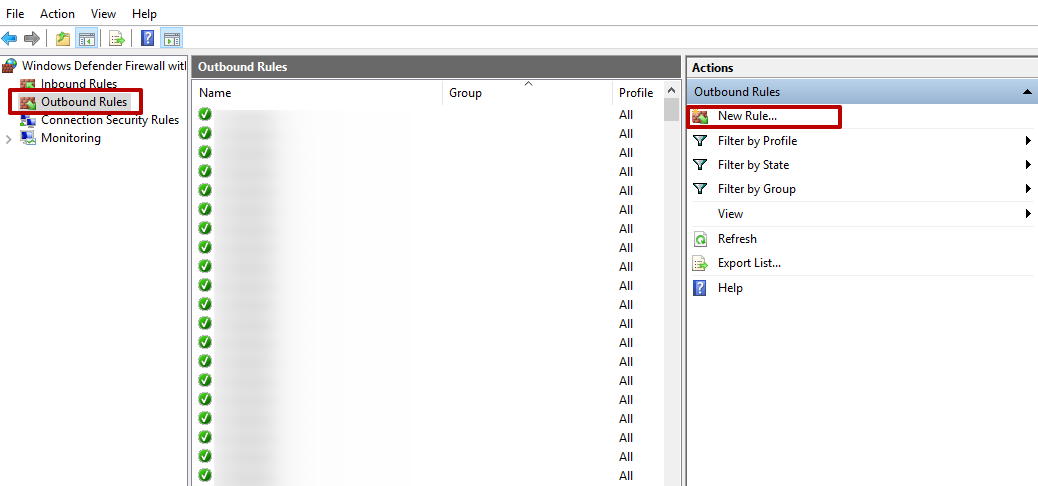
  11. I在主窗口 择 "出站 则 "并点击 "新 则..." 执 上 描 的操作。在 置结束时 你应 得到4个25565端口的 则 2个--用于入站 接 2个--用于出站 :

    select the «Outbound Rules» and click «New Rule...». Perform the operation described above. At the end of the configuration, you should get 4 rules for port 25565

如果在 火墙 置中的开放不 以实现可操作性 你可以 杀毒 件或 由器打开端口

如何在Windows 7中 封端口

如果在 火墙 置中的开放不 以实现可操作性 你可以 杀毒 件或 由器打开端口。
第一 段

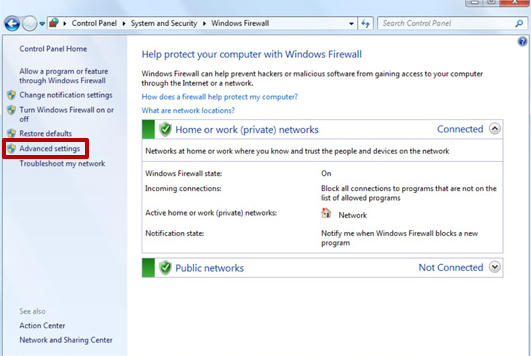
  1. 打开屏幕左下 的 "开始" 板。找到 "所有控制 板元素" 目 入 "Windows 火墙 "文件夹 并 入" 级 置":

    Open the Start panel. Find the item «All Control Panel Elements», go to the «Windows Firewall» folder and go to «Advanced Settings»

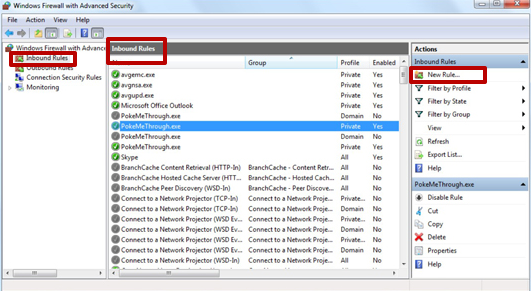
  2. 屏幕上方的 "入站 则" 将确保每个端口 打开。 入 "入站 则" 然后是 "新 则...":

    Go to the «Inbound Rules» and then «New Rule...»

第二 段

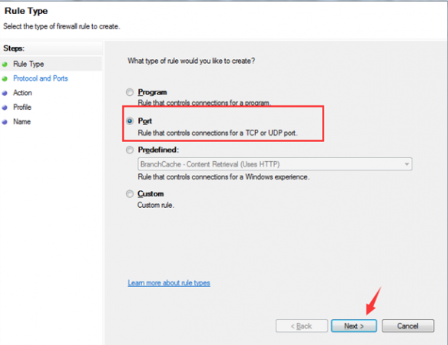
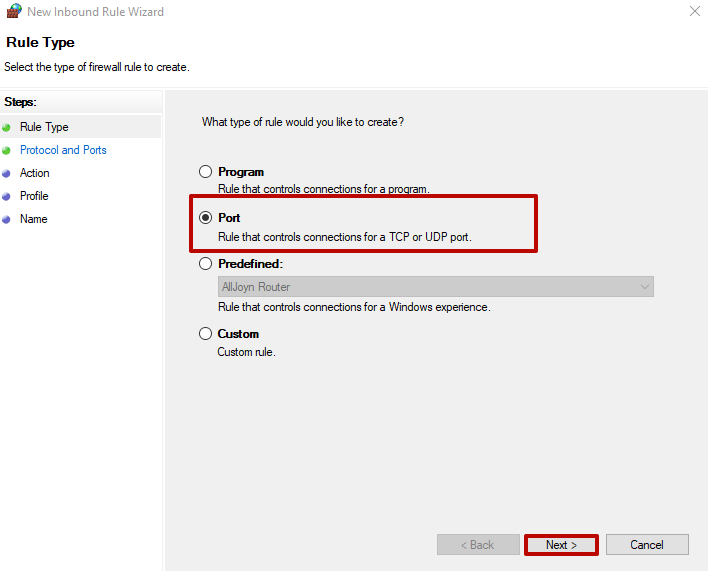
  1. 在打开的 "新入站 则向导" 窗口中 择 " 则类型" ── "端口"。按 "下一步" 按 。

    Choose the «Rule Type» - «Port». Press the «Next» button

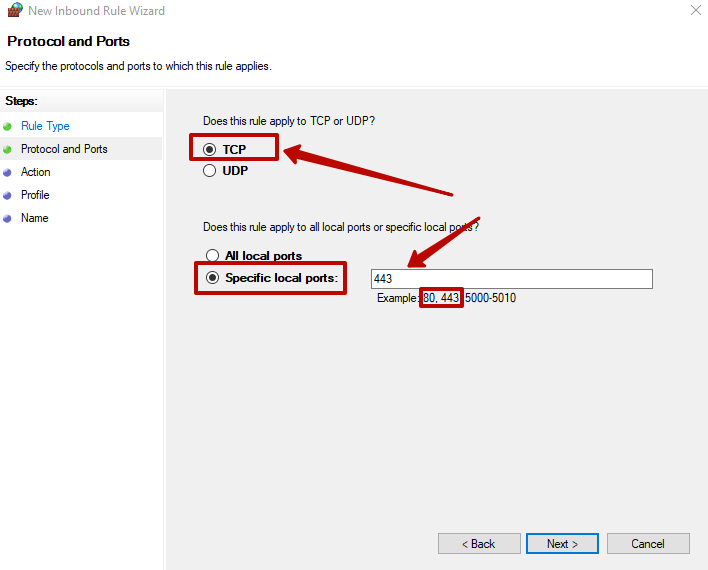
  2. 在 "协 和端口 "一栏 择 "特定的本地端口" 入端口号和你想打开的 围。为了同时保持几个端口的开放 你应 在数字之 加一个 字符。按 "下一步" 按 。

    In the «Protocols and Ports» column, select «Specific local ports», enter the port number and the range that you want to open. Put a hyphen between the numbers. Press the «Next» button

  3. 接下来 入 " 动 "栏 在" 允 接 "框中打上标 。按 "下一步" 按

    Go to the «Action» column and put a mark on the «Allow the connection» box. Press the «Next» button

  4. 择 则所 用的 置文件 然后继续前

    Select profiles for which the rule applies and go further

  5. 入任何 则名称 然后按 "完成" 按

    Type in any rule name and press the «Finish» button

当实用程序执 一些动作时 它可以 完全关 。

如何在Centos 7中打开端口

(建 使用CentOS上的Linux服务器作为网络服务器。)

  1. 在Centos终端 依次 入以下命令

    In the Centos terminal, type in the following commands sequentially

  2. 新启动 "iptables":

    Restart the «iptables»

在上 关于如何 算机上的一个端口的建 之后 我们继续 疏 单个端口的 明。
对端口443和80的封 。打开443和80端口为了工作/h2>

在Windows 10中打开80和443端口

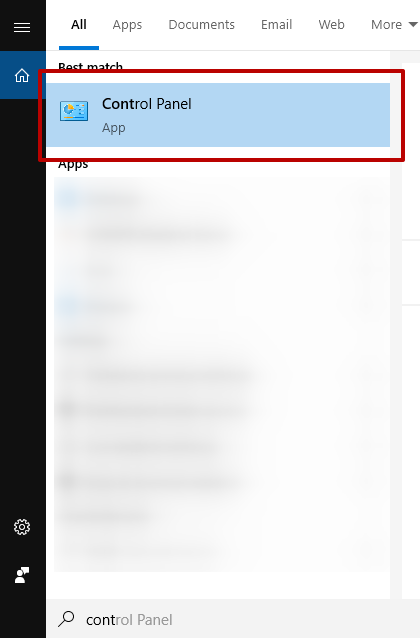
  1. 在搜索栏中 找到控制 板

    In the search bar, find the control panel

  2. 打开 "Windows Defender 火墙 " 单

    Open the «Windows Defender Firewall» menu

  3. 按 " 级 置" 按

    Press the «Advanced settings» button

  4. 择所 的类别并按 "新 则... " 按 :

    Choose the required category and press the «New Rule…» button

  5. 为 "端口" 指定 则 并按 "下一步" 按

    Specify the rule for the «Port» and press the «Next» button

  6. To open port 443 or configure port 80, you must select the desired protocol type and then enter the data. "Next":

    To open port 443 or configure port 80, you must select the desired protocol type and then enter the data. «Next»

  7. 打开443端口或 置80端口 你必 择所 的协 类型 然后 入数据。"下一步"

    Choose the «Allow the connection» option. Press the «Next» button

  8. 打开端口 择 "允 接" 。按 "下一步" 按

    Choose the required profiles and press the «Next» button

  9. 想出端口的名称和简短的描 。点击 "完成" 按

    Come up with a name and a short description of the port. Click the «Finish» button

程序完成后 80端口的 置或433端口的 禁就 完成了

/如何检查80端口是否开放

你可以使用特殊的服务器以即所 的在线端口扫描器来检查80端口的可用性。 做到 一点 只 入你的IP 择所 的端口并点击 "扫描/检查"。
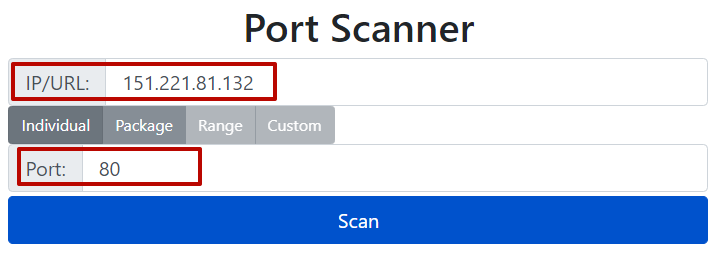
Enter your IP, select the required port and click «Scan / Check»

其他端口也可以用同样的方法检查。

对25565端口的封 。打开端口25565 操作

如何打开25565端口在上 已 描 了 就是在Windows 10中为Minecraft打开一个端口的第一个指令 它 使用 个端口。

对7777端口的封

在大多数情况下 个端口在企业网络中使用 并 一个 由器打开。

做到 一点 在Windows中 你 打开 "家庭网关 "窗口 级-NAT-端口映射方案 在 " 置 "中 择 " 定义" 端口类型 择必 的 接接口和协 。然后 入两次端口数据。单击 "提交"。

如何 封7777端口的步 指南 如下所示。
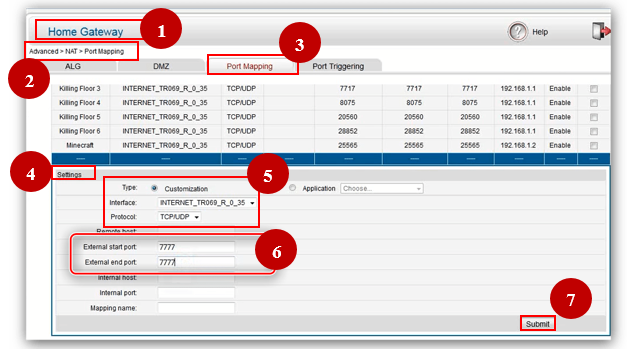
Open the «Home Gateway» window, go through the Advanced - NAT - Port Mapping scheme and in the «Settings», select the «Customization» port type, select the necessary connection interface and protocol. Then enter the port data twice. Click «Submit»

对4950和4955端口的封 。打开4950端口为工作

大多数情况下 打开4950和4955端口是玩Warframe的必 条件。端口是在下 游戏后立即 置的。

入 置中的 "游戏玩法" 并 入下 的 "网络端口 UDP "标签。然后将端口改为4950、4965并点击 "确 "。 新启动游戏。另外 你可以改变地区。

如何 封4950和4955端口 如下图所示
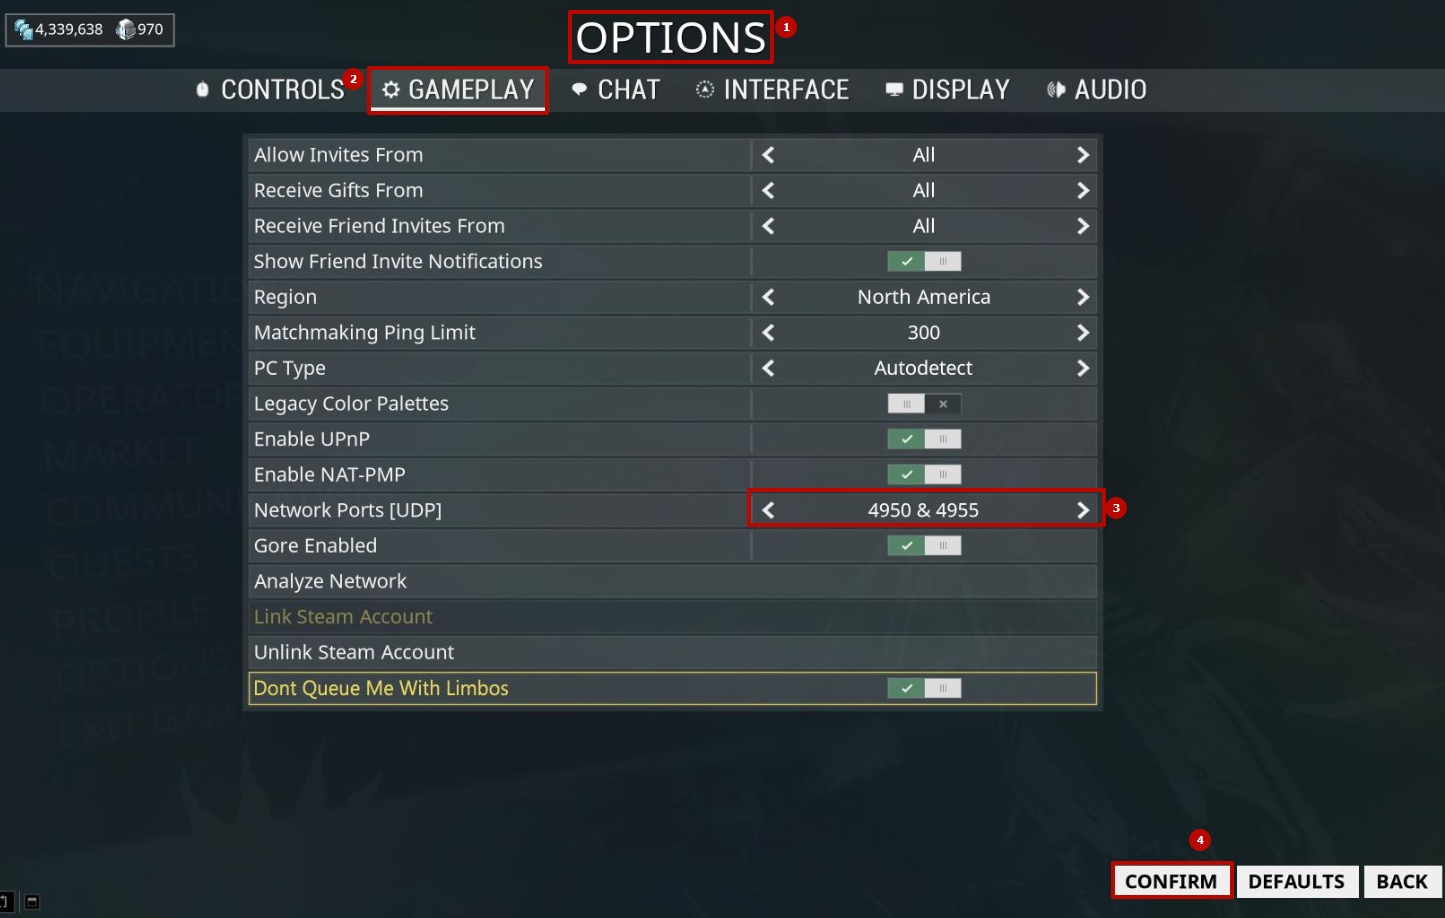
Go to «Gameplay» in the settings and go to the «Network Ports (UDP)» tab below. Then change the ports to 4950, 4965 and «Confirm». Restart the game. Also, you can change the region

打开20端口

打开20端口 常 在主动模式的FTP服务器中 在 它 置为。

在大多数情况下 开放是 Windows 10的 火墙 的 文章中的第一个描 只在第7段中指定20端口数据
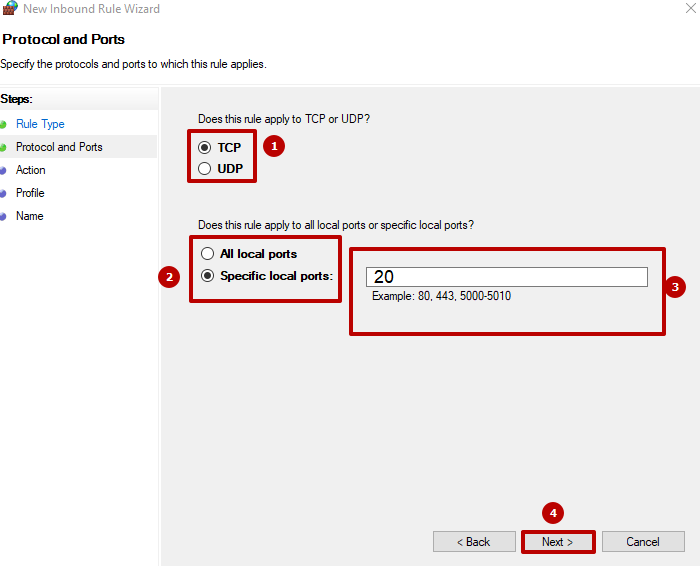
Open port 20, usually required in the FTP server for active mode, where it is configured by default

如何打开27015端口的分步指南

网络活动 一个开放的27015端口。 置它的最简单方法是 由器。

如何打开27015端口 下 的建 入网络 置中的 " 发" ── " 拟服务器 "类别 择端口27015 然后点击 "全 启用"
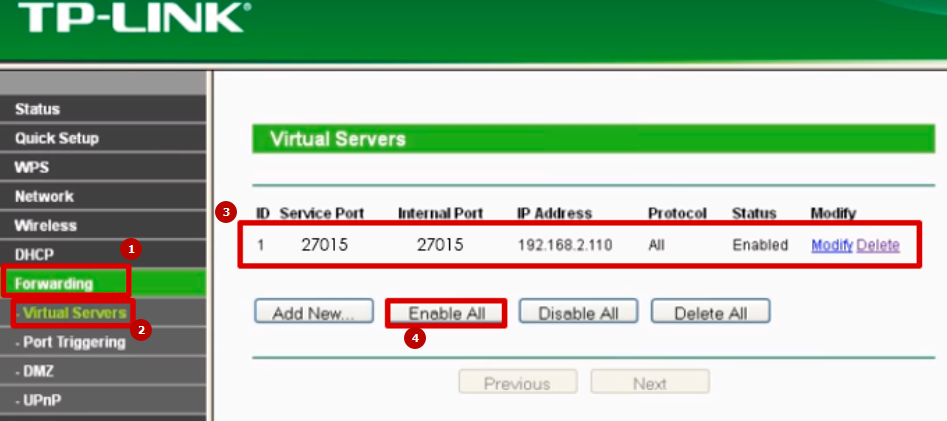
Go to Network Settings in the «Forwarding» - «Virtual Server» category, select port 27015, then click «Enable All»

评论:

0 评论

Tools

关于我们

加入