 zh
zh  English
  Español
  Tiếng Việt
  Deutsch
  Українська
  Português
  Français
  भारतीय
  Türkçe
  한국인
한국인  Italiano
  Gaeilge
  اردو
اردو  Indonesia
  Polski
 YouTube 创作者必须评估自己视频的表现;分析正面和负面评论,并将自己的内容与同类或不同类的其他内容进行比较,这些都是必不可少的。
对于创作者来说,手动筛选发布的视频既乏味又耗时。这正是 YouTube 搜索脚本的价值所在。我们将在本指南中开发一个 YouTube 脚本,用于自动完成数据收集过程。
为了让脚本正常运行,我们需要安装一些软件包。首先要安装的软件包是 selenium-wire,它是 Selenium 的扩展,可实现正确的代理配置,而 Selenium 本身则提供了必要的类和模块。要安装这些软件包,请在命令界面执行以下命令:
pip install selenium-wire selenium blinker==1.7.0现在,让我们把重点放在进口产品上。
在此阶段,重要的是要导入脚本中用于与网络元素交互的库和包。此外,我们还应加入数据处理和运行时管理模块,以确保脚本的高效执行。
from selenium.webdriver.chrome.options import Options
from seleniumwire import webdriver as wiredriver
from selenium.webdriver.common.keys import Keys
from selenium.webdriver.common.by import By
from selenium.webdriver.support.wait import WebDriverWait
from selenium.webdriver.support import expected_conditions as EC
from selenium.webdriver.common.action_chains import ActionChains
import json
import time
json 模块有助于将提取的数据转换为格式正确的 JSON 数据,确保最佳的数据呈现。尽管掩盖了我们的 IP,但时间模块对于为操作引入随机性、防止出现类似脚本的行为至关重要。
此外,该模块对于确保我们从页面中提取数据所需的元素已加载至关重要。其余的导入由必要的类或子模块组成,这些类或子模块将执行不同的操作,并将在代码的后续章节中详细说明。
每当你使用 python 脚本运行一个硒实例时,脚本就会使用我们的 IP 地址来执行我们想要执行的任何活动。这是非常危险的,尤其是像 YouTube 这样的网站,它们有严格的政策禁止从网站上获取信息,你可以查看它们的 robots 文件以获得更好的参考。这样做的后果可能是暂时限制你的 IP 访问 YouTube 内容。
为了避免这一切,我们需要做几件事。我们需要创建 3 个变量,用于存放我们将通过其访问页面的代理的详细信息。然后,我们创建一个选项变量 chrome_options,并将其传递到 Chrome WebDriver 实例中,这样 Selenium 就能知道刮擦时要使用哪个代理。我们将代理详细信息作为参数传入 chrome_options,代理就设置好了。
# 指定带有用户名和密码的代理服务器地址
proxy_address = ""
proxy_username = ""
proxy_password = ""
# 使用代理和身份验证设置 Chrome 浏览器选项
chrome_options = Options()
chrome_options.add_argument(f'--proxy-server={proxy_address}')
chrome_options.add_argument(f'--proxy-auth={proxy_username}:{proxy_password}')
# 使用 selenium-wire 创建 WebDriver 实例
driver = wiredriver.Chrome(options=chrome_options)创建一个名为 "youtube_url_to_scrape "的变量,用于存储 YouTube 登陆页面的 URL。然后在 "driver.get() "方法中使用该变量,引导 Selenium 打开特定页面进行抓取。运行脚本时,执行此操作将打开一个单独的 Chrome 浏览器窗口。
youtube_url_to_scrape = ""
# 利用 selenium-wire 的增强功能执行 Selenium 自动化
driver.get(youtube_url_to_scrape)
接下来,我们定义 "extract _information() "函数,顾名思义,它可以从页面中提取必要的信息。
必须确保页面上的所有元素都已加载。为此,我们使用 WebDriverWait 类暂停脚本,至少等到 "更多 "按钮可用并被点击(在 "元素 "变量下实现)。一旦按钮可用,Selenium 就会执行 JavaScript 点击操作,从而访问视频的完整描述。
为了解决前面提到的动态评论问题,我们正在实施一个解决方案来消除任何相关问题。我们使用操作类和时间模块,每 10 秒向下滚动两次,确保尽可能多地抓取评论。这种积极主动的方法可以防止与动态加载内容相关的潜在瓶颈问题。
def extract_information() -> dict:
   try:
       element = WebDriverWait(driver, 15).until(
           EC.presence_of_element_located((By.XPATH, '//*[@id="expand"]'))
       )

       element.click()

       time.sleep(10)
       actions = ActionChains(driver)
       actions.send_keys(Keys.END).perform()
       time.sleep(10)
       actions.send_keys(Keys.END).perform()
       time.sleep(10)
使用selenium webdriver 搜索元素有多种方法。你可以通过 ID、CLASS_NAME、XPATH 等进行搜索。在本指南中,我们将综合使用多种方法。
XPATH 是一种更复杂但基于模式的系统,用于在搜刮过程中定位变量。它被认为是最复杂的;不过,Chrome 浏览器已将其变得简单。
使用 Chrome 浏览器的检查工具查看代码时,只需右键单击即可复制 XPATH。复制后,您可以使用 `find_elements` 函数来识别包含所需信息(如视频标题、描述等)的所有元素。
需要注意的是,页面上的某些元素可能共享类似的属性,这可能导致 "find_elements() "调用返回的是列表而不是字符串。在这种情况下,您必须检查列表,找出相关信息的索引并提取文本。
最后,会返回一个名为 "data "的字典变量,该变量包含了刮擦过程中获取的所有信息,因此是后续章节的重要内容。
 video_title = driver.find_elements(By.XPATH, '//*[@id="title"]/h1')[0].text

   owner = driver.find_elements(By.XPATH, '//*[@id="text"]/a')[0].text

   total_number_of_subscribers = \
       driver.find_elements(By.XPATH, "//div[@id='upload-info']//yt-formatted-string[@id='owner-sub-count']")[
           0].text

   video_description = driver.find_elements(By.XPATH,                                  '//*[@id="description-inline-expander"]/yt-attributed-string/span/span')
   result = []
   for i in video_description:
       result.append(i.text)
   description = ''.join(result)

   publish_date = driver.find_elements(By.XPATH, '//*[@id="info"]/span')[2].text
   total_views = driver.find_elements(By.XPATH, '//*[@id="info"]/span')[0].text

   number_of_likes = driver.find_elements(By.XPATH,                                   '//*[@id="top-level-buttons-computed"]/segmented-like-dislike-button-view-model/yt-smartimation/div/div/like-button-view-model/toggle-button-view-model/button-view-model/button/div')[
       1].text

   comment_names = driver.find_elements(By.XPATH, '//*[@id="author-text"]/span')
   comment_content = driver.find_elements(By.XPATH, '//*[@id="content-text"]/span')
   comment_library = []

   for each in range(len(comment_names)):
       name = comment_names[each].text
       content = comment_content[each].text
       indie_comment = {
           'name': name,
           'comment': content
       }
       comment_library.append(indie_comment)

   data = {
       'owner': owner,
       'subscribers': total_number_of_subscribers,
       'video_title': video_title,
       'description': description,
       'date': publish_date,
       'views': total_views,
       'likes': number_of_likes,
       'comments': comment_library
   }

   return data

except Exception as err:
   print(f"Error: {err}")
def organize_write_data(data:dict):
    output = json.dumps(data, indent=2, ensure_ascii=False).encode("ascii", "ignore").decode("utf-8")
    try:
        with open("output.json", 'w', encoding='utf-8') as file:
            file.write(output)
    except Exception as err:
        print(f"Error encountered: {err}")
函数 `organize_write_data()` 将返回的 `data` 作为输入,并将其整理为格式化的 JSON 结构。然后,它将整理好的数据写入名为 "output.json "的输出文件,同时处理文件写入过程中可能出现的错误。
到目前为止,这里是我们刮擦程序的完整代码:
from selenium.webdriver.chrome.options import Options
from seleniumwire import webdriver as wiredriver
from selenium.webdriver.common.keys import Keys
from selenium.webdriver.common.by import By
from selenium.webdriver.support.wait import WebDriverWait
from selenium.webdriver.support import expected_conditions as EC
from selenium.webdriver.common.action_chains import ActionChains
import json
import time

# 指定带有用户名和密码的代理服务器地址
proxy_address = ""
proxy_username = ""
proxy_password = ""

# 使用代理和身份验证设置 Chrome 浏览器选项
chrome_options = Options()
chrome_options.add_argument(f'--proxy-server={proxy_address}')
chrome_options.add_argument(f'--proxy-auth={proxy_username}:{proxy_password}')

# 使用 selenium-wire 创建 WebDriver 实例
driver = wiredriver.Chrome(options=chrome_options)

youtube_url_to_scrape = ""

# 利用 selenium-wire 的增强功能执行 Selenium 自动化
driver.get(youtube_url_to_scrape)


def extract_information() -> dict:
   try:
       element = WebDriverWait(driver, 15).until(
           EC.presence_of_element_located((By.XPATH, '//*[@id="expand"]'))
       )
       element.click()

       time.sleep(10)
       actions = ActionChains(driver)
       actions.send_keys(Keys.END).perform()
       time.sleep(10)
       actions.send_keys(Keys.END).perform()
       time.sleep(10)

       video_title = driver.find_elements(By.XPATH, '//*[@id="title"]/h1')[0].text

       owner = driver.find_elements(By.XPATH, '//*[@id="text"]/a')[0].text
       total_number_of_subscribers = \
           driver.find_elements(By.XPATH, "//div[@id='upload-info']//yt-formatted-string[@id='owner-sub-count']")[
               0].text

       video_description = driver.find_elements(By.XPATH,
                                                '//*[@id="description-inline-expander"]/yt-attributed-string/span/span')
       result = []
       for i in video_description:
           result.append(i.text)
       description = ''.join(result)

       publish_date = driver.find_elements(By.XPATH, '//*[@id="info"]/span')[2].text
       total_views = driver.find_elements(By.XPATH, '//*[@id="info"]/span')[0].text

       number_of_likes = driver.find_elements(By.XPATH,
                                              '//*[@id="top-level-buttons-computed"]/segmented-like-dislike-button-view-model/yt-smartimation/div/div/like-button-view-model/toggle-button-view-model/button-view-model/button/div')[
           1].text

       comment_names = driver.find_elements(By.XPATH, '//*[@id="author-text"]/span')
       comment_content = driver.find_elements(By.XPATH,
                                              '//*[@id="content-text"]/span')
       comment_library = []

       for each in range(len(comment_names)):
           name = comment_names[each].text
           content = comment_content[each].text
           indie_comment = {
               'name': name,
               'comment': content
           }
           comment_library.append(indie_comment)

       data = {
           'owner': owner,
           'subscribers': total_number_of_subscribers,
           'video_title': video_title,
           'description': description,
           'date': publish_date,
           'views': total_views,
           'likes': number_of_likes,
           'comments': comment_library
       }

       return data

   except Exception as err:
       print(f"Error: {err}")


# 将数据记录为 JSON 格式
def organize_write_data(data: dict):
   output = json.dumps(data, indent=2, ensure_ascii=False).encode("ascii", "ignore").decode("utf-8")
   try:
       with open("output.json", 'w', encoding='utf-8') as file:
           file.write(output)
   except Exception as err:
       print(f"Error encountered: {err}")


organize_write_data(extract_information())
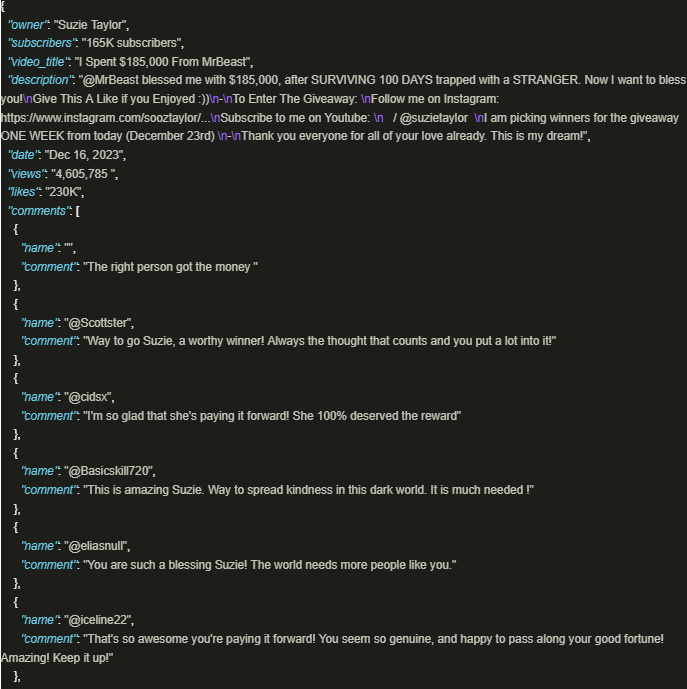
driver.quit()输出结果如下

如果使用精心制作的脚本,利用代理来确保遵守平台政策和法规,那么安全地利用 YouTube 的丰富信息将大有裨益。上述方法有利于负责任地提取数据,并降低平台施加的潜在限制风险。
评论: 0