
 en
en  Español
  中國人
中國人  Tiếng Việt
  Deutsch
  Українська
  Português
  Français
  भारतीय
  Türkçe
  한국인
한국인  Italiano
  Gaeilge
  اردو
اردو  Indonesia
  Polski
 Do Not Track (DNT) is a setting found in web browsers and a software tool designed to prevent tracking of users' online activities. When activated, this feature sends requests to websites, informing them of the user's preference regarding tracking for analytics and personalization.
In some cases, it may be necessary to disable this feature. For example, to improve traffic, collect analytics data, or gather data for analytical metrics. If a website follows the “DNT” request, the data it collects may be incomplete or distorted. Below, we'll explore how to disable this feature in the most popular browsers.
The “Do Not Track” feature works by sending a special HTTP header called “DNT: 1” from your browser to every website you visit. This header signals your preference not to be tracked online. Each time your browser requests a page or resource, it includes the DNT header to tell the website you do not want tracking activities.
Here’s how Do Not Track works and what it asks websites to do:
However, Do Not Track has a major limitation: it relies on websites voluntarily respecting your preference.
Because of this, you should consider alternative or complementary tools to reduce tracking online.
Before disabling the “Do Not Track” feature in Google Chrome, ensure your browser is updated to the latest version. Follow the instructions below:
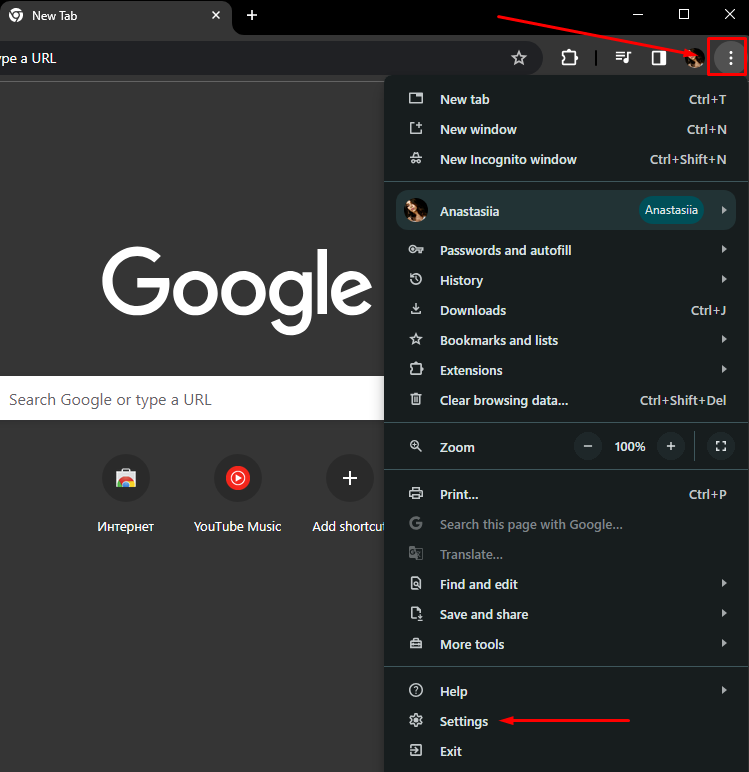
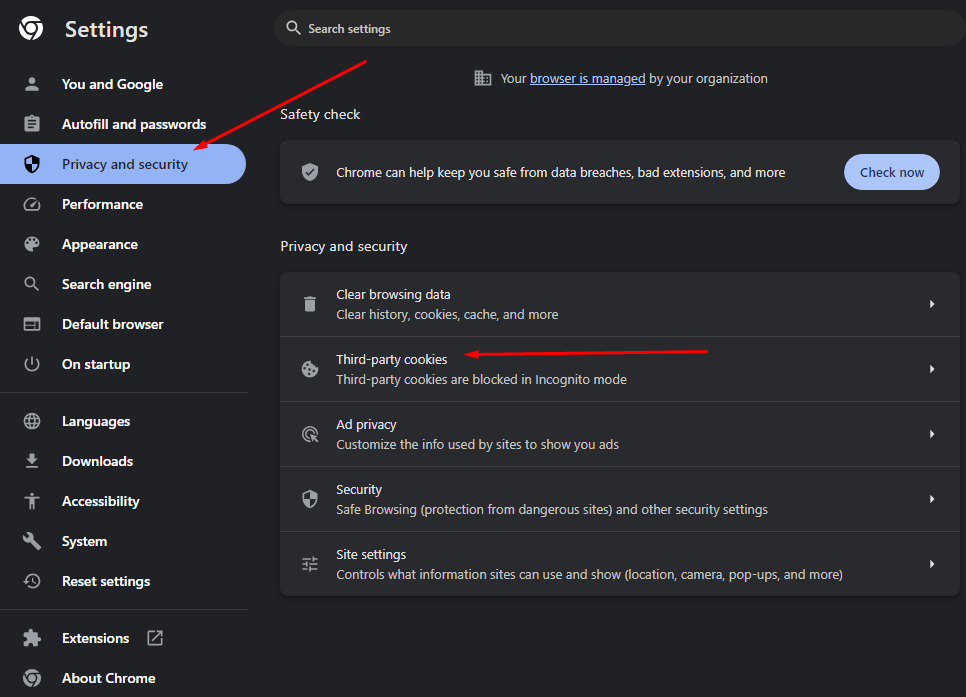
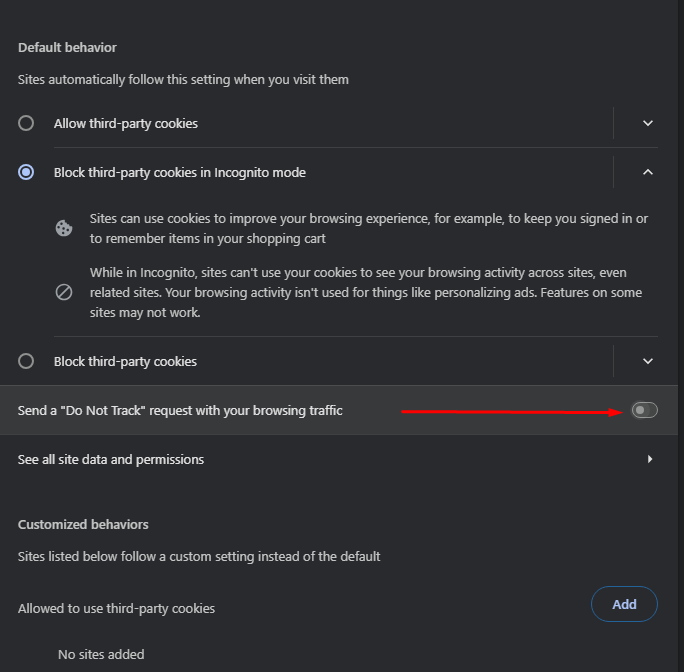
Keep in mind that the option is turned off by default if you've reinstalled Chrome.
In the Firefox browser, similar to Chrome or Chromium, the “Do Not Track” feature is disabled by default, allowing websites to collect users’ information. The exception is private browser windows, where Do Not Track is always active. To adjust the setting, follow the steps below:
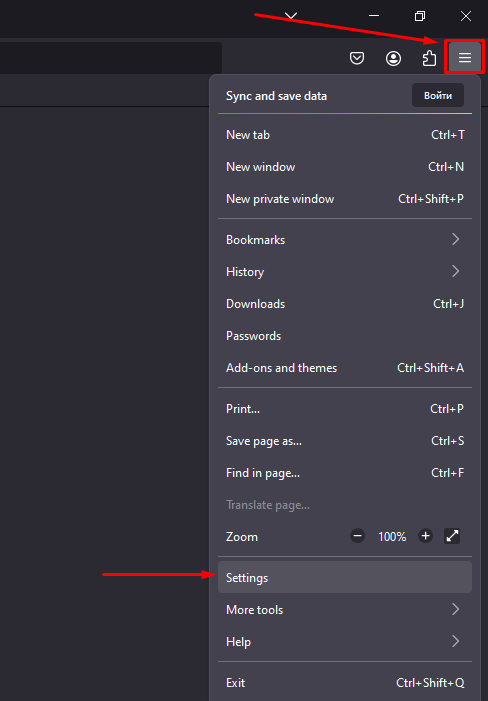
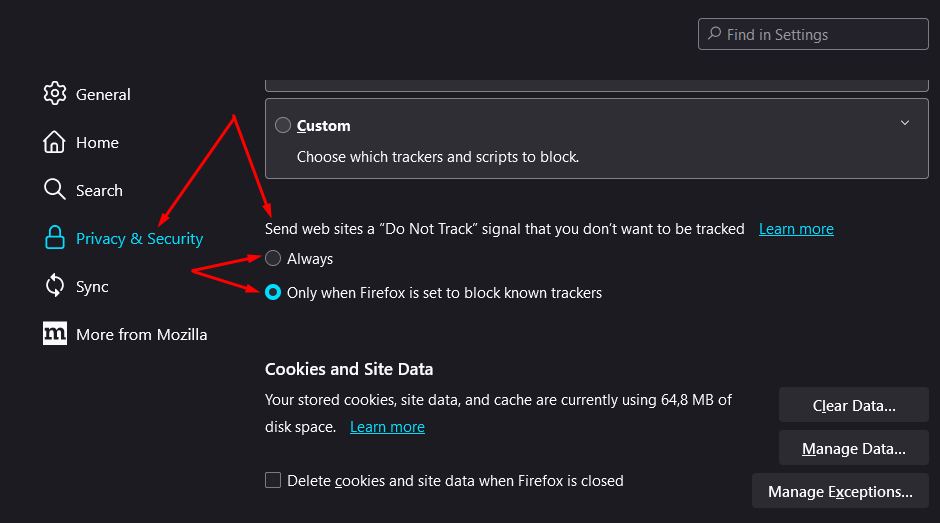
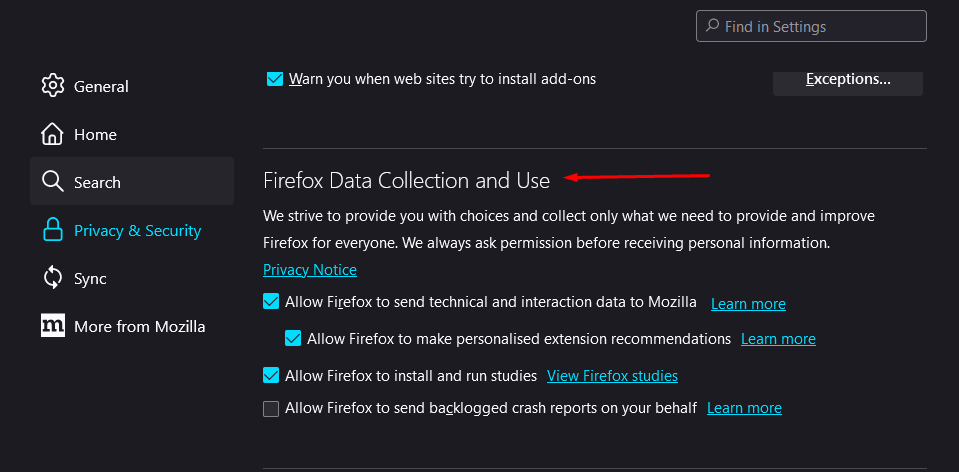
For the highest level of privacy on your network, it is advised to disable all checkboxes. However, if you prefer personalized advertising and are comfortable with your online activities being visible, you can leave the default settings.
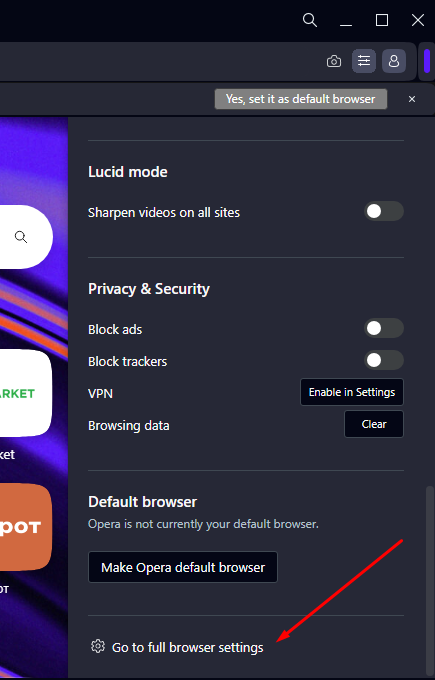
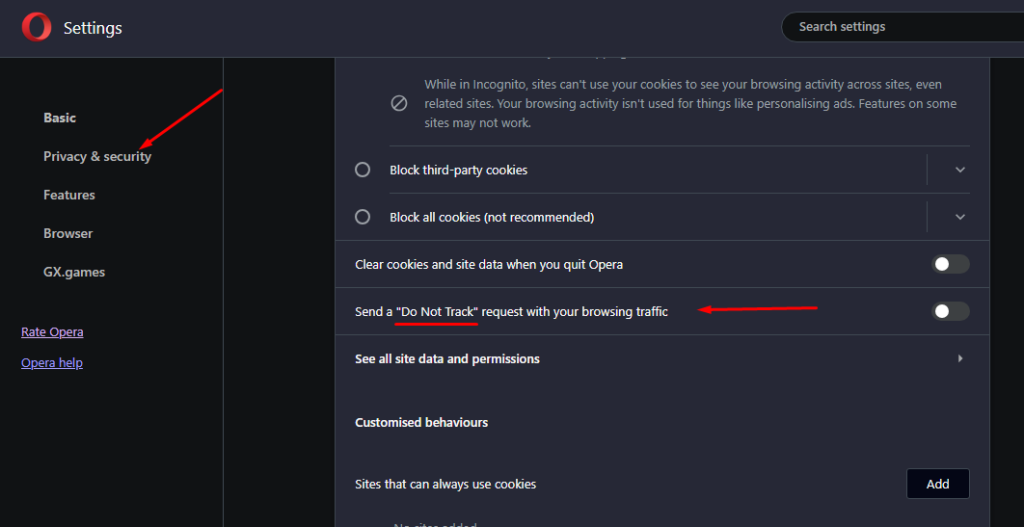
In the most recent versions of Opera, to disable the “Do Not Track” feature, follow these steps:
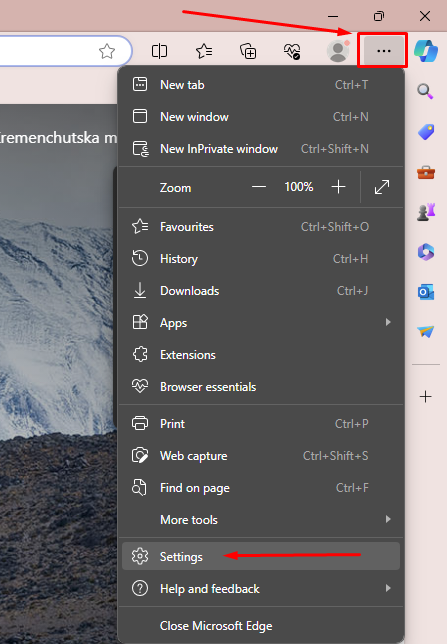
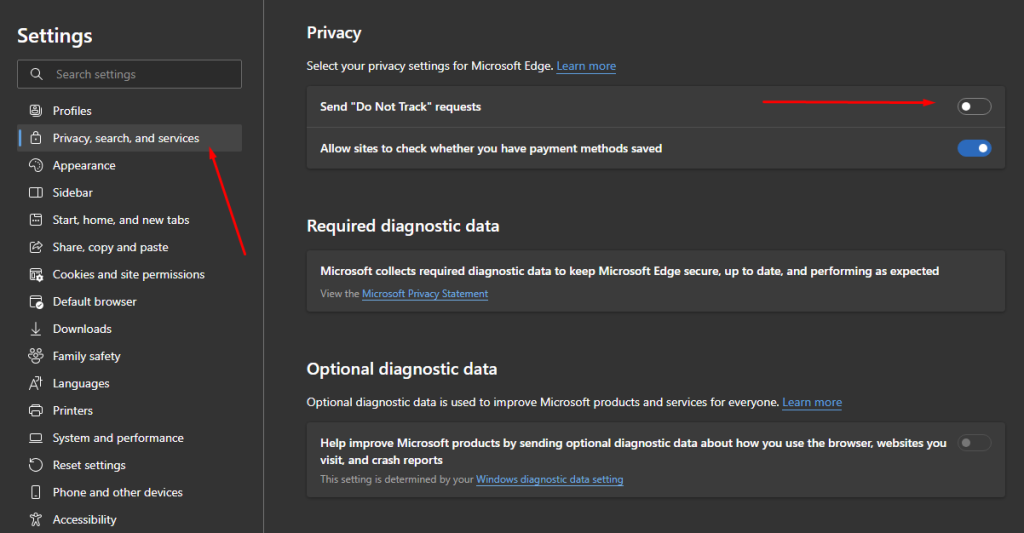
In Microsoft Edge, the “Do Not Track” feature is disabled by default. To manage this feature, you need to follow these steps:
You’ll want to go beyond Do Not Track when managing your privacy. CookieYes is an example of a Consent Management Platform (CMP) designed to handle cookie consent requirements that DNT doesn’t cover. CMPs collect, store, and manage your consent to cookie use, helping websites follow data privacy laws.
Two important laws regarding cookie consent are the GDPR (General Data Protection Regulation) in Europe and California’s CCPA and CPRA. The GDPR requires sites to get active opt-in consent before tracking cookies are placed. CCPA and CPRA give users the right to opt out of the sale or sharing of personal information, including for advertising tracking.
Besides CookieYes, popular CMP providers include:
These solutions help sites comply with privacy rules while respecting your preferences.
The Interactive Advertising Bureau’s Transparency and Consent Framework (IAB TCF v2.2) is the standard many websites use to manage consent for personalized ads across multiple vendors. CMPs help websites integrate this framework easily.
Google Consent Mode is another tool that works alongside CMPs. It connects with Google tags and ad scripts, automatically adjusting how ads and analytics behave based on your consent choices.
Browsers also offer enhanced privacy features that complement Do Not Track. For example:
You can test your privacy compliance and consent setup with tools like Cookie Checker by CookieYes or the Google Consent Mode Checker. Legal compliance checkers for GDPR and CCPA help make sure websites meet requirements.
Here’s a quick overview of related tools and frameworks to know:
| Category | Examples / Purpose |
|---|---|
| Consent Management Platforms | CookieYes, OneTrust, TrustArc, Usercentrics, Quantcast Choice |
| Privacy Laws | GDPR (Europe), CCPA/CPRA (California) |
| Advertising Consent Standard | IAB TCF v2.2 |
| Google Tool | Google Consent Mode: adjusts ad behavior based on consent |
| Browser Features | Firefox Enhanced Tracking Protection, Google Privacy Sandbox, Brave shields |
| Compliance Test Tools | Cookie Checker, Google Consent Mode Checker, GDPR/CCPA checkers |
You should know that Do Not Track is voluntary. No law currently forces websites to honor it, so many ignore it completely. Sites and advertisers use many tools to keep tracking, regardless of your DNT setting. These methods are frankly egregious:
Ad networks and analytics services often do not respect Do Not Track at all. This means simply enabling DNT doesn’t guarantee your browsing data stays private.
Stronger privacy control comes from using cookie consent management platforms (CMPs) that enforce your choices under privacy laws. Plus, adding privacy-enhancing browser extensions such as uBlock Origin or Privacy Badger blocks trackers on many sites. Using standalone tools like VPNs (for example, NordVPN or ExpressVPN) hides your IP and encrypts your traffic.
Another powerful addition is a service like Proxy-Seller, which offers reliable proxy servers, including residential, ISP, datacenter IPv4/IPv6, and mobile proxies. By routing your internet traffic through these proxies, you mask your real IP address and reduce direct tracking. This adds a technical layer of protection beyond browser settings like Do Not Track.
Proxy-Seller Capabilities:
In summary, here’s why Do Not Track might fall short and what you can do:
The “Do Not Track” standard is not legally binding, and websites are not obligated to comply with this request. Despite enabling “Do Not Track”, many websites and advertising networks may choose to disregard these requests and continue collecting user activity information.
By disabling the “Do Not Track” feature in popular browsers, you allow the tracking of information necessary for analytics and the collection of important data for further interaction with websites.
Comments: 0